
Summary
Once your EK Mines build reaches the point where it can comfortably handle high-tier content, the next step is turning that damage into a reliable endgame farming setup. With enough damage to clear T16 maps quickly, you can move through Voidstone progression, Boss Rush strategies, Betrayal farming, crafting, and eventually Uber bosses.
This guide covers a practical endgame progression path for an EK Mines setup, including defensive upgrades, Atlas strategies, currency farming, and the key gear-crafting steps used to push the build further. To fund the crafting materials and gear upgrades needed along the way, buy POE currency and secure the resources.
Prepare EK Mines for T16 Mapping
EK Mines can reach extremely high damage, but a glass-cannon setup can become unreliable once you start running difficult maps. Before focusing entirely on clear speed, add enough defenses to survive the content you intend to farm.
Add Evasion and Energy Shield
A body armour with both Evasion and Energy Shield is an efficient early defensive upgrade because the passive tree is already positioned close to Evasion and Energy Shield nodes.
Pair the armour with Grace and Ghost Dance. Grace improves your evasion, while Ghost Dance provides additional Energy Shield recovery. Together, they give the build a much more comfortable defensive foundation for early mapping without requiring a complete redesign of the passive tree.
Once the basic defenses are covered, T16 maps become a realistic target if your damage is already high enough to eliminate monsters quickly.
Improve Pack Coverage
High-tier maps can expose weaknesses that are not obvious during normal clearing. If the build struggles against large packs, consider taking additional projectile-related passives that improve how many enemies EK can hit.
The goal is not simply to increase tooltip damage. Better projectile coverage can significantly improve real-world clear speed, especially in maps with large monster packs.
Unlock Your First Voidstones
A strong early objective is to obtain at least two Voidstones and accumulate enough Atlas passive points to establish your first dedicated farming strategy.
The first Voidstone can be obtained quickly, but the second choice is important if you want to specialize in Boss Rush farming.
Choose the Maven Voidstone
Instead of immediately prioritizing the other commonly targeted Voidstone, the Maven Voidstone is particularly useful for a Nightmare-map Boss Rush strategy.
The important reason is access to the Abomination map, which is a strong option for repeatedly rushing bosses. Once the two Voidstones are active, you can begin focusing your Atlas tree around fast boss kills rather than full map clearing.
Farm Nightmare Maps With Boss Rush
The Nightmare Boss Rush strategy is designed around speed. Instead of clearing every pack, the objective is to reach the final boss as quickly as possible, collect the valuable drops, and immediately move to the next map.
Use a Low-Investment Atlas Setup
This strategy does not require a large number of Atlas passive points. Combine the dedicated Atlas tree with the appropriate Scarabs to make the maps easier and more consistent.
There is a trade-off: the setup sacrifices some quantity in exchange for a smoother and faster run. This is especially useful when your gear is not yet strong enough to comfortably handle heavily modified Nightmare maps.
If six-mod Nightmare maps are still too dangerous, do not force the higher difficulty. A faster, safer version can produce better results because the entire strategy depends on minimizing downtime.
Why Boss Rushing Works
A well-optimized EK Mines character can finish a Boss Rush map in roughly a minute when the only objective is reaching the boss.
That makes the strategy attractive even with minimal Atlas investment. The primary goal is to accumulate boss-related fragments and currency while continuing to progress toward the remaining Voidstones.
Complete the Atlas and Unlock More Endgame Content
After establishing an initial Boss Rush strategy, continue unlocking the remaining Voidstones. Once all of them are available, additional map options and upgraded encounters become accessible.
Sanctuary maps can then be used to access an upgraded Sanctum boss. If you already have experience running Sanctum, these encounters can be completed efficiently.
However, do not stay locked into one profitable activity before completing the Atlas. Temporarily pausing the farming strategy to finish map completion can unlock much stronger farming options later.
Build a Betrayal Farming Strategy
With the Atlas largely established, Betrayal becomes another strong option for generating currency.
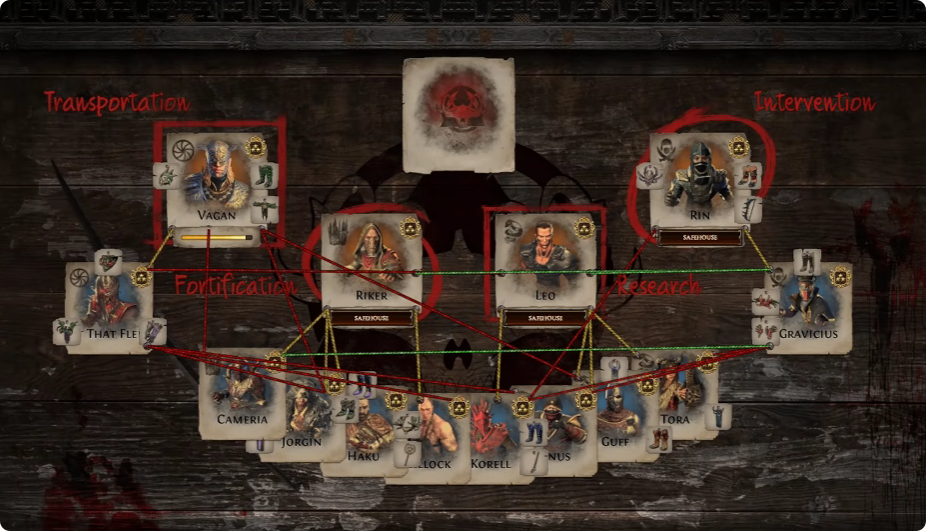
Betrayal requires more planning than many other farming strategies because the Syndicate board determines what rewards you can obtain. The exact board setup is a separate subject, so the key focus here is how to farm once the desired board is prepared.
Focus on Transportation and Intervention
For this setup, run the appropriate Betrayal Atlas tree and Scarabs, then prioritize the Transportation and Intervention Safehouses.
The Mastermind should be skipped because defeating it resets the entire Syndicate board. If the goal is to maintain a carefully prepared board, preserving the existing setup is more valuable than completing the Mastermind encounter.
Target Syndicate Medallions
The main reward target is Syndicate Medallions, while Scarabs provide a more consistent secondary source of currency.
This makes Betrayal different from strategies that rely almost entirely on jackpot drops. You still have valuable high-roll possibilities, but the steady Scarab income helps smooth out the results.
Betrayal also rewards players who understand the mechanic rather than simply running maps as quickly as possible. Knowing which Safehouses to run and how the board interacts with your farming strategy is essential.
Upgrade EK Mines Gear Through Crafting
Once your farming setup starts generating currency, reinvest it into the weapon and amulet slots. These upgrades can provide a major damage increase.
Craft a +1 Wand
Start with a suitable wand base and use Fossils to target a +1 level modifier.
Once the desired modifier appears, use a Fracturing Orb to attempt to lock it onto the item. If you have multiple suitable bases, it can be worth preparing more than one because the fracture attempt is not guaranteed.
After successfully fracturing the important modifier, use Essences to target Projectile Speed. Continue using Orbs of Annulment until the desired suffix setup remains.
To obtain another +1 modifier, craft Cannot Roll Attack Modifiers, lock the suffixes, and use a Harvest Physical craft to target the additional +1 Physical modifier.
For EK, Projectile Speed is particularly valuable because it allows Ethereal Knives projectiles to travel and return more effectively, even in open areas without convenient walls.
Craft a High-Damage Amulet
The amulet follows a similar crafting philosophy.
First, use Chaos Orbs until you hit the desired +2 levels modifier. Then use the appropriate currency to split the modifier from the item.
After that, craft Cannot Roll Attack Modifiers, lock the suffixes, and use a Harvest Physical craft.
Unlike the weapon process, this step involves a 50/50 outcome rather than a guaranteed result, so prepare enough currency for multiple attempts.
If the required Yellow Lifeforce becomes expensive, stop spending currency blindly. Instead, run Harvest yourself. Around 20 maps can provide enough resources to generate additional crafting attempts while also producing consistent income from selling excess Lifeforce.
Fix Resistances Before Farming Ubers
Large offensive upgrades can leave your defensive stats behind. After completing the amulet, reassess your resistances before moving into Uber content.
Replacing conversion gloves with a pair that provides cold conversion and resistances can solve several problems at once. A Watcher's Eye with conversion and Cold Penetration can further improve the setup.
Taking the appropriate Cold Mastery restores full conversion while allowing the glove implicits to contribute additional damage.
At this stage, the build has enough damage and defenses to begin testing Uber encounters.
Farm Uber Eater for High-Risk Profit
Uber Eater of Worlds is a natural target when you want to turn excess currency into potentially valuable drops.
Instead of starting with a small number of attempts, you can liquidate unused gear and currency to purchase a larger batch of fragments. A 50-run sample provides a better indication of how the strategy performs over multiple attempts.
The results will naturally vary because Uber farming is heavily influenced by valuable jackpot drops. In one 50-run test, the strategy produced a rare high-value drop and finished with roughly 20 Divines of profit.
That result demonstrates the main appeal of Uber farming: it can produce significant returns, but the strategy remains fundamentally more volatile than consistent farming methods such as Harvest.

Final EK Mines Endgame Progression
A practical progression path for this EK Mines setup is:
1. Add Evasion and Energy Shield defenses.
2. Run Grace and Ghost Dance.
3. Enter T16 maps once damage and survivability are sufficient.
4. Obtain two Voidstones, prioritizing Maven for Nightmare Boss Rush.
5. Farm Nightmare maps quickly for fragments and currency.
6. Unlock the remaining Voidstones and complete the Atlas.
7. Build a Betrayal board and farm Transportation and Intervention Safehouses.
8. Reinvest currency into a high-end wand and amulet.
9. Use Harvest to fund expensive crafting attempts.
10. Fix resistances and conversion before moving into Uber content.
11. Test Uber Eater farming when you have enough capital to absorb unlucky runs.
EK Mines is therefore best viewed as an experienced-player endgame build rather than a beginner-friendly setup. To ease the transition, POE currency can help you acquire the essential gear.