
Looking for a Paladin build that combines insane damage, incredible survivability, and effortless gameplay? Look no further than the Charge Orodin—a revolutionary twist on the classic Orodin setup that elevates the build to new heights, a power spike that can feel as transformative as when you buy Diablo 4 Gold to instantly upgrade your end-game arsenal. This isn’t just another variation; it’s the definitive evolution, incorporating Shield Charge to add powerful offensive and defensive layers while keeping the beloved one-button playstyle. Let’s dive into how you can hit for trillions and speed-farm Pit Tier 100s with ease.
Why This Build Stands Out
At its heart, this build retains the core mechanics that make Orodin builds great but perfects them. By integrating Shield Charge, we gain:
· Free Survivability: 22% base damage reduction and Resolve stacks for additional mitigation.
· Massive Damage Scaling: Unlocks the use of Ring of Starless Skies for up to 50% multiplicative damage and huge attack speed bonuses.
· Ultra-Smooth Gameplay: Shield Charge literally replaces your move button. No extra key presses—just hold one button to move, deal damage, and become nearly unkillable.
· The result? A build that lets you comfortably clear end-game content and even go AFK while your spirit wolves clean up.
Core Mechanics: How It All Works
1. The Engine: Holy Light Aura
This is your primary damage source. It passively emanates holy light from you and your allies, dealing constant damage to nearby enemies. We scale it with:
· Attack Speed: Holy Light Aura's pulse rate scales with your attack speed, making it our most important stat.
· Dawnfire Gloves: This unique makes your aura deal Fire damage and provides a chance for double damage.
· Care Rune: Summons spirit wolves that also emanate the aura, creating multiple damage sources.
2. The Game-Changer: Shield Charge
This skill isn't an addition—it's a replacement for your basic move.
· Defense: Grants 22% damage reduction and builds Resolve stacks (via the Relentless Charge skill node) for even more damage reduction and a 10% damage boost from Defiance Aura.
· Offense: Because it's a Core skill that spends Faith (your primary resource), it activates the Ring of Starless Skies.
· Resource Management: Paired with the Buck and Lum runes, you regain all Faith spent while moving, allowing infinite Shield Charge use.
3. The Damage Multipliers
· Ring of Starless Skies: Spending Faith with Shield Charge gives a stacking multiplicative damage bonus (up to 50%) and provides a massive attack speed roll.
· Aspect of Proalitizing (Amulet): This is where the "trillions" come from. It provides a massive multiplier to damage from Adjudicator skills, which Holy Light Aura is.
· Key Passive - Coat of Arms: Grants a massive damage bonus based on your Armor and Block Chance.
Skill Tree Breakdown
Core Setup (1-50):
1. Holy Bolt: 1 point (gateway skill).
2. Ong Guard: 3 points (Armor & Block Chance).
3. Repost: 3 points.
4. Fanaticism Aura: 5 points + 1 Enhanced + 1 Right of Vengeance.
5. Defiance Aura: 5 points + 1 Enhanced + 1 Right of Might.
6. Holy Light Aura: 5 points + 1 Enhanced + 1 Right of Mercy.
7. Shield Charge: 5 points + 1 Enhanced + 1 Relentless Charge (Mandatory).
8. Resolute: 1 point (to unlock Conviction).
9. Conviction: 3 points (Attack Speed from Resolve stacks).
10. Key Passives & Support:
· Coat of Arms (Key Passive)
· The Best Offense (3), Fortitude (3), Cracking the Armor (3)
· Righteousness (3), Pacify (1), Dizzying Blow (3)
· Iron Sharpens Iron (3), Break the Line (3), Heavy Weight (3)
· Master Craftwork (3), Shining Armor (3), Giant Slayer (3)
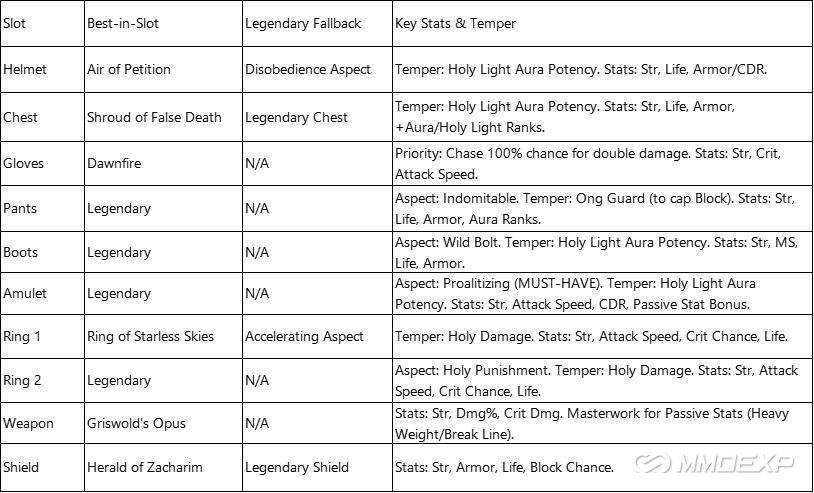
Gear, Aspects, and Tempering
Mythic & Unique Priorities
Runes (Non-Negotiable)
· Neo & Care: Summons your spirit wolves, your AFK damage army.
· Buck & Lum: The essential combo that refunds Faith spent while moving, enabling infinite Shield Charge.
Jewels & Oath
· Weapon: Emeralds (Crit Damage)
· Armor: Rubies (Strength)
· Jewelry: Diamonds (All Resist)
· Oath: Do NOT use Juggernaut. It consumes Resolve stacks. Judicator is a safe choice.
Season 11 Divine Gifts
· Purified Slots: Essence of Sin, Anguish, Lies, Pain. These provide flat bonuses to movement speed, fortify, and barriers.
Paragon Board & Glyphs
Legendary Node Priority:
1. Castle: Massive damage from Armor.
2. Shield Bearer: Damage from Block Chance.
3. Preacher: Damage from Attack Speed.
4. Beacon: Damage from Wolves/Mercs in your aura.
Glyphs & Leveling Order:
1. Spirit (Crit Damage)
2. Judicator (Adjudicator Skill Damage)
3. Canny (Non-Physical Damage)
4. Exploit (Vulnerable Damage)
5. Challenger (Elite Damage)
6. Leveling: Get all Glyphs to 46 in the order above, then repeat to 100.
Mercenaries & Final Tips
· Mercenaries: Use Sububo (Crit Damage) and Variana (Attack Speed).
· Playstyle: Hold down Shield Charge. That's it. Move through enemies, gather Resolve stacks, and watch your Holy Light Aura—amplified by your wolves—melt everything.
· Survivability: With capped Block Chance, massive Armor from Strength and gear, and constant Resolve stacks, you'll laugh at fire explosions and other deadly mechanics.
This Charge Orodin build represents the pinnacle of one-button design in Diablo 4 Season 11, especially when you've secured the perfect gear. To expedite your setup, consider checking trusted sources for Diablo 4 Items for sale, and for a reliable service, I recommend MMOEXP. It seamlessly blends unparalleled defense with world-ending offense, all while requiring minimal input. It’s the perfect build for high-tier farming, pushing, or just relaxing while your celestial wolves do the work.
MMOexp Diablo 4 Team


