Summary
This Season 6 guide covers Arena Breakout: Infinite's high-risk Armory map, detailing outer-zone loot spots, high-value keycard-locked bunker rooms, two practical looting routes and multiple extract conditions. It stresses proper armor, ammo and sound awareness for profitable raids. Boss Renoir and fallen opponents can drop top-tier gear. Operators may buy Arena Breakout: Infinite Koens to afford better kits and sustain frequent challenging Armory runs.
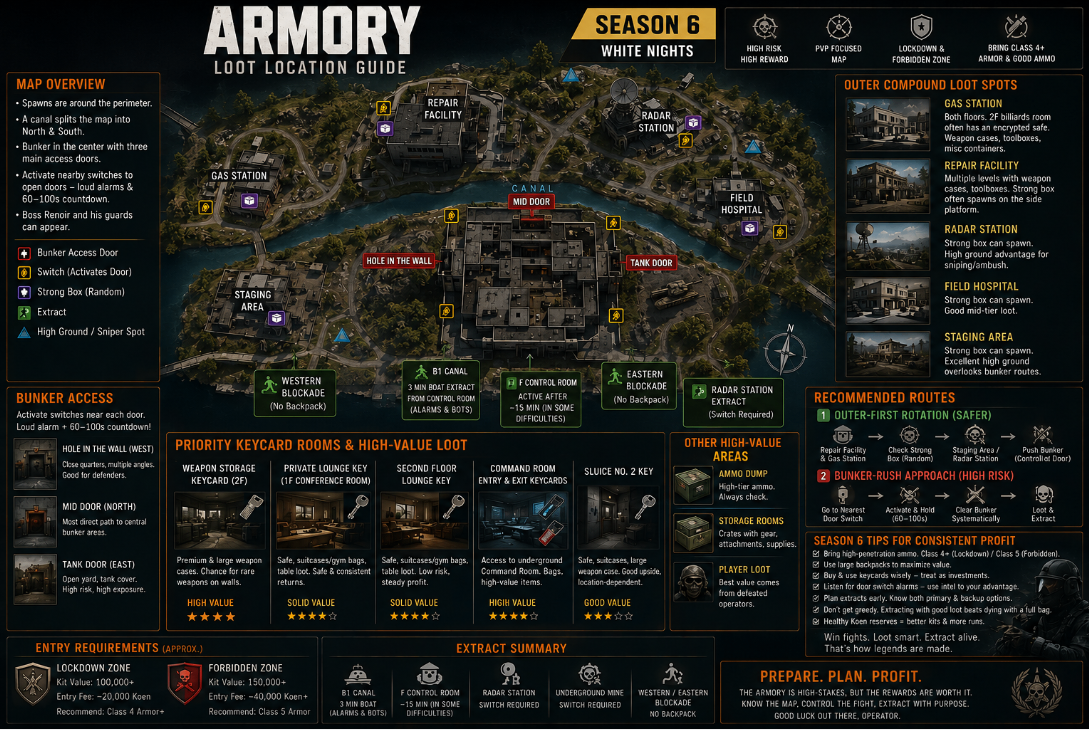
Season 6 of Arena Breakout: Infinite, titled White Nights, brings new systems, weapons, and modes while keeping the Armory one of the most rewarding yet dangerous maps in the game. Available primarily in Lockdown and Forbidden Zone difficulties, the Armory combines an expanded outer compound with a heavily fortified bunker. High-value gear, rare ammunition, weapon cases, and player loot make it a top destination for serious operators looking to build wealth.
This guide covers the best loot locations, key priorities, outer compounds, bunker routes, extractions, and practical tips for Season 6. Success here depends on preparation, map knowledge, and smart decision-making under pressure.
Understanding the Armory Layout in Season 6
Players no longer spawn inside the bunker. Instead, spawns are distributed around the perimeter of the expanded map. A canal divides the area into northern and southern halves. The central bunker remains the heart of high-tier loot, accessible through three main doors often called Hole in the Wall, Mid, and Tank. Each door requires activating a nearby switch. These switches trigger loud alarms and start a countdown (typically 60 to 100 seconds), alerting nearby players.
Outside the bunker, compounds such as the Gas Station, Repair Facility, Radar Station, Field Hospital, and Staging Area offer solid mid-tier loot and strong boxes. Inside, tight corridors, multiple floors, and keycard rooms create intense close-quarters combat. The boss Renoir and his guards can appear, carrying high-tier armor and weapons.
Entry requirements remain significant. Lockdown Zone typically needs a solid kit value and an entry fee around 20,000 Koen, while Forbidden Zone demands higher gear value and a larger fee. Bring Class 4 or better armor for Lockdown and Class 5 for Forbidden, along with high-penetration ammunition.
Outer Compound Loot Spots
Many successful runs begin by clearing outer areas before committing to the bunker. These spots provide reliable value with lower immediate risk.
The Gas Station stands out. Check both floors thoroughly. The second-floor billiards room often holds an encrypted safe. Weapon cases, toolboxes, and miscellaneous containers appear regularly. It serves as a strong early rotation point if you spawn nearby.
The Repair Facility offers similar value. Multiple levels contain weapon cases, toolboxes, and other containers. A strong box frequently spawns on a platform at the side of the facility. This location pairs well with the Gas Station for a northern sweep.
Other outer points include the Radar Station, Field Hospital, and Staging Area. A strong box can appear randomly at one of these. The higher ground around the Staging Area and Radar Station also makes excellent sniping or ambush positions for players moving toward the bunker.
Looting these outer compounds first builds your inventory and gives you options. You can then either push the bunker or set up to intercept other operators.
Priority Keycard Rooms and High-Value Bunker Loot
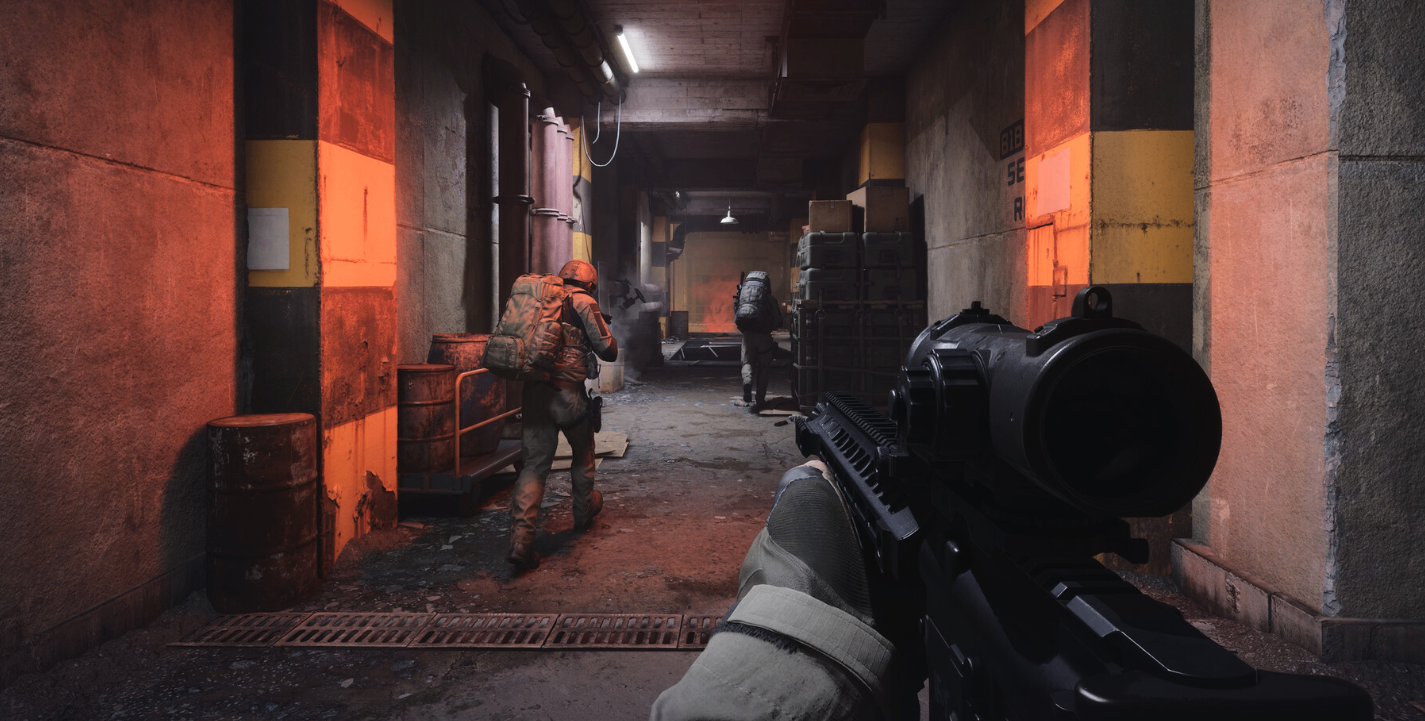
Keys and keycards unlock the best consistent loot inside the bunker. Prioritize them based on value and risk.
The Weapon Storage Keycard (second floor) is one of the strongest. It grants access to premium and large weapon cases plus a chance for rare weapons to spawn on the walls. This room delivers high upside and is worth the investment when you hold the key.
The Private Lounge Key (first floor conference room) and Second Floor Lounge Key provide safer, lower-variance returns. Both rooms typically contain a safe, suitcases or gym bags, and table loot. They are excellent for steady profit without the highest contested risk.
Command Room Entry and Exit Keycards open the underground Command Room. This area holds strong loot potential, including bags and other high-value items. Use these when your route and timing allow controlled access.
The Sluice No. 2 Key unlocks a locked room with a safe, suitcases, and a large weapon case. It offers solid upside but requires favorable timing due to its location and the alarms associated with nearby extracts.
Beyond locked rooms, the Ammo Dump is essential. It consistently provides high-tier ammunition that sustains long fights and sells well. Nearby storage rooms contain crates with gear, attachments, and supplies. Sweep these systematically after securing key rooms or after major engagements.
Player loot remains the biggest prize. Operators enter the Armory with strong kits. Winning fights and looting bodies often yields better returns than static containers alone. The boss Renoir and his elite guards, when present, drop Class 3+ armor, weapons, and ammo.
Recommended Loot Routes and Strategies
Two primary approaches work well in Season 6.
Outer-first rotation: Spawn on the northern side and clear the Repair Facility and Gas Station. Check for the random strong box. Move to high ground at the Staging Area or Radar Station to watch bunker approaches. Once the initial chaos settles or when you hold good gear, push into the bunker via a controlled door. This method builds inventory safely and sets up ambushes.
Bunker-rush approach: Head straight for a bunker door switch if you spawn close and bring a strong kit. Activate the switch, hold the position during the countdown, and clear the interior systematically. Prioritize Ammo Dump, storage rooms, and any keycard rooms you can open. This high-risk path targets the densest loot but expects heavy contest.
Always plan primary and backup extractions before engaging. Common options include:
B1 Canal (lever in the second-floor Control Room; 3-minute timed boat departure that triggers alarms and bots)
F Control Room extract (activates after about 15 minutes in some difficulties)
Radar Station and Underground Mine extracts (switch-dependent)
Eastern or Western Blockade (require abandoning the backpack)
Decide early whether you will fight for a full extract or accept a no-backpack option if the situation turns against you.
Season 6 Tips for Consistent Profit
Preparation is critical. Bring high-penetration ammo suited to the expected armor levels. Class 4 or 5 protection helps survive the close-range fights that define the map. Large backpacks maximize extraction value. Keys should be treated as investments-buy useful ones when prices are reasonable and use them efficiently before they degrade.
Sound discipline matters. Switch activations broadcast your presence. Use that knowledge both to avoid early contact and to set traps. Listen for other players activating doors and position accordingly.
In Season 6, the overall economy and new systems (including Hostile Sector PvE options on other maps) give players more ways to build resources. However, the Armory remains a pure high-stakes PvP environment. Successful operators balance aggression with survival. Extracting with solid loot is always better than dying with a full bag.
Managing your in-game currency carefully supports better loadouts and more frequent high-value runs. Players who maintain healthy reserves of Arena Breakout: Infinite Koens can afford stronger kits, key purchases, and recovery from losses. When natural farming is not enough to support aggressive Armory play, some operators choose to buy Arena Breakout: Infinite Koens to accelerate gear progression and maintain momentum.
Stay adaptable. Loot spawns have variance, and player behavior changes throughout a season. Learn the door timings, extract conditions, and common contest points. Review your deaths and successful extracts to refine routes.
Final Thoughts
The Armory in Season 6 rewards map knowledge, mechanical skill, and smart risk management. Focus on the Ammo Dump, keycard rooms (especially Weapon Storage and the lounges), outer compounds like the Gas Station and Repair Facility, and player gear. Plan your extracts, control information through sound, and never overstay once you have valuable loot.
Master these locations and routes, and the Armory can become one of your most profitable maps. Gear up carefully, move with purpose, and extract with purpose. The high-stakes environment is exactly what makes every successful raid satisfying. Good luck out there, operator.