Quick take: What happens when you jam a Protector jewel into a Witchwild String, stack "Cannot Be Frozen" twice for no reason, and refuse to run Call to Arms out of pure spite? You get a level 94 Amazon pushing damage from 1620 to over 2100 with a single socket swap. Can a "meme" bow actually out-damage meta gear? Can Manald Heal still earn a spot on a modern build? Let's dig into the numbers, the gear swaps, and the mercenary setup that's turning heads on the ladder.
The Nostalgia Ring Nobody Can Quit: Manald Heal Lives On
There's a reason veteran players keep circling back to Manald Heal, even in the comments section where everyone loves to clown on it. It's cheap, it's iconic, and with 10% Faster Run/Walk baked in, it's the kind of quality-of-life item that quietly makes every early-to-mid character feel smoother. Mana leech from a ring this accessible is still doing real work on characters that don't have leech locked down elsewhere.
Who this is for: Fresh ladder starts, budget rebuilds, or anyone rebuilding a mule after a wipe. If your stash is thin and your patience is thinner, Manald Heal is the low-effort, high-comfort pickup that lets you skip early grinding pain — which is exactly the kind of shortcut worth taking when you'd rather buy D2R Runes at mmoexp, save your sanity, and enjoy the real endgame instead of farming Countess runs for the hundredth time.
Witchwild String: The "Obscure" Bow That Refuses to Be Ignored
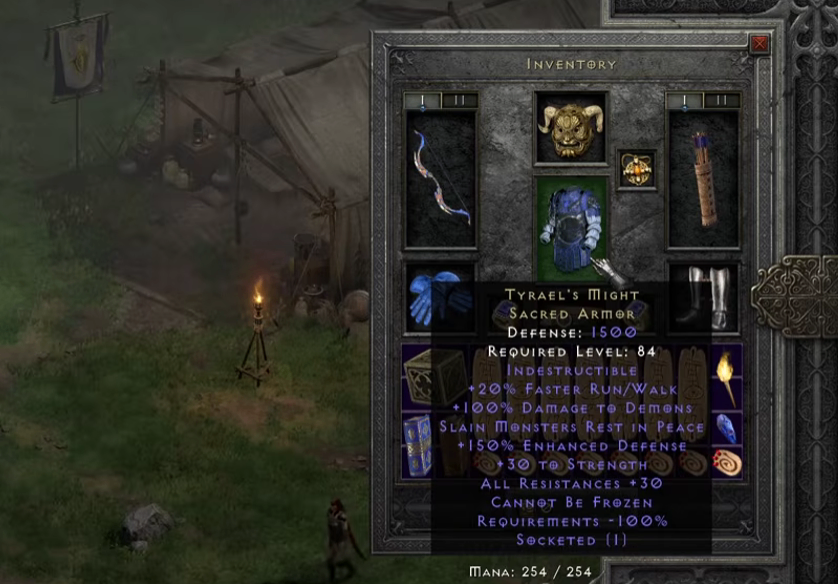
This is where things get spicy. A modified Witchwild String, upgraded into a Diamond Bow, turned into an unlikely damage monster once a Protector jewel — Ohm rune, Fade When Struck, hit-based bonus damage, 8% enemy physical resist reduction — went into the weapon instead of the helm. The jump wasn't subtle: base damage sitting around 1620 rocketed past 1937 with the jewel alone, then to 2042, and eventually cracked 2133 once an Ed/Deadly Strike jewel was layered in on top.
The build also leans on Tyrael's Might for Indestructible, Faster Run/Walk, 100% damage to Demons, and doubled Cannot Be Frozen — because in Chaos Sanctuary, getting frozen mid-Multishot is a death sentence, and doubling down on immunity is cheap insurance against a very real threat.
Who this is for: Bowazon mains and theorycrafters who are bored of cookie-cutter builds and want to see how far off-meta gear choices can actually push a character. If your gear is already itemized but your damage numbers feel stale, this is a legitimate direction to test.

Multishot Math: Why the Center Arrows Matter More Than You Think
One detail that trips up a lot of players: not every Multishot arrow benefits equally from Deadly Strike. Only the center two or three arrows in the spread actually apply the Deadly Strike proc — the rest are still doing solid raw damage, just without that extra crit layer. Practically, that means positioning matters more than people assume. Line up bosses or tough single targets in that center lane, and let the outer arrows handle trash clean-up. It's a small mechanical nuance, but it separates players who are "using" Multishot from players who are actually optimizing it.
Who this is for: Anyone running a Multishot-focused Amazon who feels like their single-target damage is underwhelming compared to their clear speed. This is the fix. Buy cheap D2R Runes at MMOexp with fast delivery, low prices, and 24/7 support.

The Mercenary Setup: Reaper's Toll, Chains of Honor, and Sheer Style Points
The Act 2 mercenary here is running Reaper's Toll (bare, no extra sockets — pure flex), Chains of Honor, and a Vampire Gaze with a charm rune, alongside Hsarus armor for the Faster Hit Recovery and resistance stack. Is it min-maxed to the last percentage point? Not quite. Is it an absolute unit that shreds through Frigid Highlands packs at a comfortable 105 IAS breakpoint? Also yes. Later experimentation swaps in Hustle for attack speed testing, along with considering Treachery versus Hustle for the character's own armor slot depending on how much Increased Attack Speed the build can afford to lose.
Who this is for: Players assembling a support mercenary who want proven, accessible gear rather than chasing perfect ethereal, 4-socket, max-roll items that never drop. This setup proves "good enough" mercenary gear can still carry serious weight.

Amp Damage Procs and the "Almost a GG Build" Moment
A 2% chance to cast Amplify Damage on striking sounds negligible until you watch it proc four times in a row during a single pack clear. That's when the idea of pairing Atma's Scarab with Hustle came up as a genuinely promising direction — potentially good enough to skip High Lord's Wrath's Deadly Strike bonus entirely in favor of the guaranteed physical damage boost from Amp Damage stacking with Decrepify from the mercenary. It's the kind of "wait, that actually might be better" moment that theorycrafting sessions are built on.
Who this is for: Min-maxers who enjoy chasing marginal build synergies rather than just following a guide verbatim. If you like breaking down why a build works instead of just copying it, this section is your rabbit hole.
Four-Socket Threshers and the Eternal Ethereal Debate
A non-ethereal four-socket Thresher still got plenty of love here, and for good reason — Threshers have absurd base attack speed, and even without the ethereal damage bonus, a well-socketed one is a fantastic mercenary or off-character weapon on ladder resets when perfect drops simply haven't happened yet.
Who this is for: Anyone doing early ladder gearing who's tempted to hold out for a "perfect" ethereal roll. Sometimes good-enough gear now beats theoretical-perfect gear that never drops — and if the grind for that perfect roll is eating your evenings, it might be time to buy coins at mmoexp, save your sanity, and enjoy the real endgame rather than running the same Mephisto lap for the fortieth time this week.
Quick-Hit Tips Before You Respec
· Test Protector jewels in weapons, not just helms — the damage swing can be dramatic depending on your base weapon type.
· Double-check which arrows in your Multishot spread actually carry Deadly Strike before assuming your crit uptime is higher than it is.
· Don't sleep on non-ethereal 4-socket bases; a good jewel loadout can outperform a mediocre ethereal roll.
· Treachery vs. Hustle isn't a universal answer — test both against your specific IAS breakpoints before committing runes.
· Keep a weapon-switch slot dedicated to utility (teleport staff) if you hate juggling Call to Arms mid-fight.
Who Gets the Most Value Here
· New or returning players: The Manald Heal section is your easiest, cheapest quality-of-life win.
· Bowazon veterans: The Witchwild String jewel swap and Multishot targeting insight are directly actionable damage upgrades.
· Theorycrafters: The Atma's/Hustle Amp Damage combo is a genuinely underexplored direction worth testing on your own character.
· Mercenary optimizers: The Reaper's Toll/Chains of Honor/Vampire Gaze combo is an accessible, high-value template.