
FC 26: Mastering the 4-2-3-1 (2) Formation
In EA FC 26, tactical precision is everything. While flashy skills and world-class strikers grab the spotlight, what separates elite players from the rest is structure — how your team moves, defends, and counters as a unit. Among the most reliable and deadly tactical setups this season is the 4-2-3-1 (2), a narrow version of the formation that's dominating Ultimate Team, Career Mode, and competitive play alike. It is very important to use FC 26 Coins to develop players and formations. Don't waste your precious resources and invest in the right players and formations to get the best value for money.
Used by pros and top Division Rivals players, this formation provides a perfect blend of defensive stability, passing rhythm, and lightning-fast counterattacks. Here's a full breakdown of how to master this meta tactic — from player roles and positioning to advanced build-up play and in-game adjustments.
Why the 4-2-3-1 (2) Is the Most Used Formation in FC 26
The 4-2-3-1 (2) — also called the narrow 4-2-3-1 — thrives in this year's gameplay engine, which rewards compact shape, smart positioning, and counter-driven offense. The formation's strength lies in three key areas:
Defensive Solidity: Two CDMs shield your backline from through balls and long-range attacks.
Ball Control in Midfield: Three central attacking mids create endless short-passing triangles.
Explosive Counterplay: Once possession is won, your CAMs and striker can slice through defenses with one-touch transitions.
It's a shape that punishes overcommitted opponents and rewards tactical patience.
The Foundation: Tactical Setup
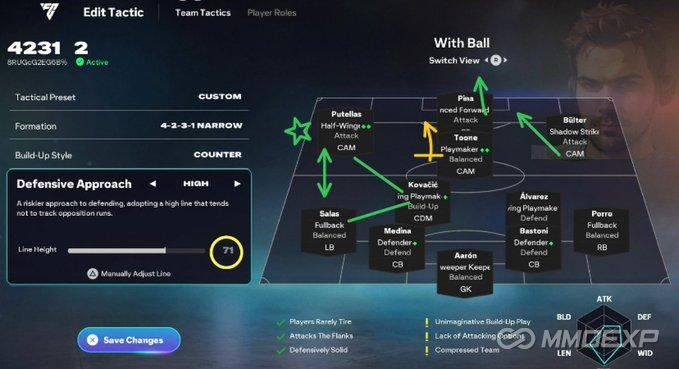
Formation: 4-2-3-1 (2) – Narrow
Tactical Preset: Custom
Build-Up Style: Counter
Defensive Approach: High Line (around 71)
Team Width: Medium-Narrow (40–50)
Depth: Moderate (60–70)
This setup focuses on counterattacks and structured possession, with a backline that stays compact but ready to step forward aggressively when pressing triggers activate.
Defensive Approach: "High and Tight"
The high line at 71 is crucial. It keeps your defenders active and ensures your team stays compact vertically, compressing the midfield space. It's a risk-reward tactic — too high, and you risk being exposed to through balls; too low, and you'll surrender control.
Press Style: Balanced or Counter-Press after Losing Possession.
Line Width: Narrow (40–45) to block central lanes.
AI Behavior: The two CDMs act as a double pivot, covering gaps behind the CAM line and helping recover loose balls quickly.
When executed correctly, it forces opponents into wide areas — exactly where they're least effective in the current meta.
Build-Up Play: Countering with Precision
The Counter Build-Up system in FC 26 suits this formation perfectly. After recovering possession, the ball moves swiftly through the middle, using short-passing triangles and positional rotations to break the press.
LAM and RAM act as half-wingers, darting into open channels.
Central CAM links transitions, often playing the crucial final through ball.
Striker stays high, ready for runs behind the line.
This approach ensures you dominate transitions without overextending. Instead of long passes, use quick one-twos and L1-triggered runs to slice through the opposition's defense.
Player Roles and Instructions
Here's how to set each position for optimal synergy.
Goalkeeper – Sweeper Keeper (Balanced Attack)
Your keeper (like Áaron Ramsdale in the example) should play as a sweeper, crucial for intercepting through balls behind the high line. Use Balanced Attack and Comes for Crosses traits to minimize vulnerability on aerial balls.
Center-Backs – Stay Central, No Nonsense
Medina (LCB) and Álvarez (RCB)
Instructions: Stay Back While Attacking
Role: Defend aggressively, play simple passes into CDMs.
In FC 26, composure and agility matter more than raw pace for CBs, especially since auto-defending is toned down. Use defenders comfortable on the ball to maintain smooth build-up.
Fullbacks – Balanced Width Support
Salas (LB) and Porro (RB)
Instructions: Balanced Attack, Overlap
Tactical Role: They push forward only when the ball reaches the CAMs, creating overloads down the flanks.
Avoid setting them to "Always Overlap" unless you're chasing a goal — otherwise, you'll risk being caught on the counter.
Double CDMs – The Tactical Core
Kovačić (Left CDM – Deep Playmaker)
Instructions: Stay Back While Attacking, Cover Center, Cut Passing Lanes.
Purpose: Controls tempo, links defense to attack.
Álvarez (Right CDM – Anchor)
Instructions: Stay Back While Attacking, Cover Center.
Purpose: Pure ball-winner who breaks up play and distributes cleanly.
This dual setup keeps your defense secure while ensuring smooth ball circulation. Kovačić orchestrates transitions, while Álvarez provides muscle and recovery pace.
Central CAM – The Playmaker Brain
Toone (CAM)
Instructions: Stay Forward, Get Into the Box for Cross, Free Roam.
Role: The creative engine. Everything funnels through this player.
Use technical midfielders here with high Vision and Agility stats. This CAM should drift between lines, receiving and distributing under pressure.
LAM & RAM – The Hidden Weapons
Putellas (LAM – Half-Winger)
Instructions: Get Into the Box for Cross, Cut Inside.
Role: The most important player in this system.
Your LAM serves as a hybrid winger/CAM, constantly exploiting half-spaces. In the current meta, the left channel is the most dynamic attacking lane — a skilled LAM can decide matches through late runs, disguised passes, or near-post finishes.
Büter (RAM – Shadow Striker)
Instructions: Get Into the Box, Cut Inside.
Role: Operates like a second striker, making diagonal runs behind the defense.
Together, the LAM and RAM stretch opponents while maintaining narrow structure. They're the creative pulse of your attack.
ST – Pressing Forward / Target Link
Pina (ST)
Instructions: Stay Central, Mixed Attack, Press Back Line.
Role: Initiates pressing triggers, holds up play, finishes off counter moves.
You want a striker with balance between strength and acceleration — someone who can hold defenders off but still break lines when needed.
When combined with the three CAMs, this striker creates a diamond overload in the opponent's defensive third, leading to easy through balls and late arriving finishes.
In-Game Chemistry: How It Flows
Here's how the 4-2-3-1 (2) works dynamically when you're in possession:
Build-up Phase: Kovačić drops between CBs, allowing fullbacks to widen slightly.
Midfield Phase: Toone and the wide CAMs form a triangle around the CDMs, ensuring constant short options.
Final Third: LAM and RAM cut inside as inverted creators, while Pina pins defenders to open passing lanes.
Finishing Phase: Toone feeds quick one-touch passes into overlapping runs or lays off for a shot at the edge of the box.
When defending, your shape compresses into a 4-4-1-1, with the CAM helping screen the CDMs. This transition between offense and defense is seamless — it's what makes this setup so strong in high-level play.
Pro Tips for Dominating with 4-2-3-1 (2)
1. Tempo Control Wins Games
Never rush possession. Use your CDMs to recycle the ball until gaps open. The narrow formation thrives on patience and timing.
2. LAM Is the Key
As noted in pro tactics, the LAM is your most influential player. Use players like Putellas, Musiala, or Nkunku who can dribble in tight spaces, shoot from range, and deliver disguised passes.
3. Quick Counters Over Crosses
This isn't a wide formation. Rely on short bursts of vertical passes and quick give-and-go moves, not traditional wing play.
4. Manual Line Management
Adjust your defensive line manually when facing fast opponents. Drop it to 65–68 against pace-heavy teams or push up to 75 when pressing aggressively.
5. Staggered Pressing
Trigger selective press using L1/LB and right-stick switching instead of full-team pressing. It maintains shape while forcing errors.
Ideal Player Archetypes
CDMs: High stamina, interceptions, composure (e.g., Rodri, Rice, Caicedo).
CAMs: Agile, creative, good balance (e.g., Foden, Musiala, Bellingham).
ST: Hybrid finisher-playmaker (e.g., Kane, Darwin Núñez, Lautaro Martínez).
Fullbacks: Fast but disciplined (e.g., Hakimi, Davies).
Choosing the right archetypes ensures your system functions under pressure — especially in Rivals and FUT Champs.
Why the Pros Use It
Top players gravitate toward the 4-2-3-1 (2) for its universal adaptability. It transitions smoothly between defensive and attacking states without formation changes. You can press high, drop deep, or switch play effortlessly — all while keeping the midfield anchored.
Its triangle-heavy passing network prevents turnovers, while the counter setup capitalizes on FC 26's faster transition speed. Simply put, it's the perfect formation for players who prefer calculated, control-oriented football over chaotic offense.
Final Thoughts
The 4-2-3-1 (2) remains EA FC 26's most used tactic for one simple reason: it's balanced, lethal, and built for consistency.
From its rock-solid defensive core to its sharp central passing lanes, this setup rewards players who can think one pass ahead. The narrow shape funnels every attack through intelligent movement, with the LAM as the heartbeat of creativity and your CDMs serving as an unbreakable wall.
Mastering this system isn't about spamming skill moves — it's about rhythm, structure, and discipline. Once you learn to control space, time your runs, and anticipate counters, you'll understand why pros rely on this shape to win at the highest level.
The 4-2-3-1 (2) doesn't just win matches — it defines how FC 26 is meant to be played.
MMOexp FC 26 Team