
NBA 2K26 Guide: 7'1" Center Build – How to Dominate with Shooting, Playmaking, and Rim Protection
This guide covers a versatile 7'1" center build designed to excel at every facet of the game. With elite shooting range, exceptional playmaking, and dominant rim protection, this build is optimized for maximum impact in any game mode in NBA 2K26.
Build Overview
Position: Center | Height: 7'1" | Weight: 226 lbs | Wingspan: 7'1"
This build combines size with mobility. At 7'1", you retain the ability to dominate the paint while maintaining enough speed to guard multiple positions and run the floor effectively.
Physical Attributes
Speed (70) and Agility (58): These ratings enable effective transition defense and recovery against faster opponents. The recommended motion styles are Isaac Jones and Alperen Sengun, which provide excellent chase-down capability and court coverage for a player of this size.
Strength (85): This is the sweet spot for setting massive screens in pick-and-roll and pick-and-pop situations. Brick Wall activates effectively at this level, creating separation for guards.
Vertical (80): This enables elite rebound animations, demoralizing blocks, and strong contests at the rim.
Finishing
Driving Layup (80): This is the optimal threshold. Higher ratings provide diminishing returns, so investing beyond 80 is inefficient. At 80, the build finishes effectively through traffic.
Driving Dunk (80): At this rating, you punish the rim with authority when given an open lane. Contact dunks become available.
Standing Dunk (75): This turns offensive rebounds and drop-off passes into potential highlight plays.
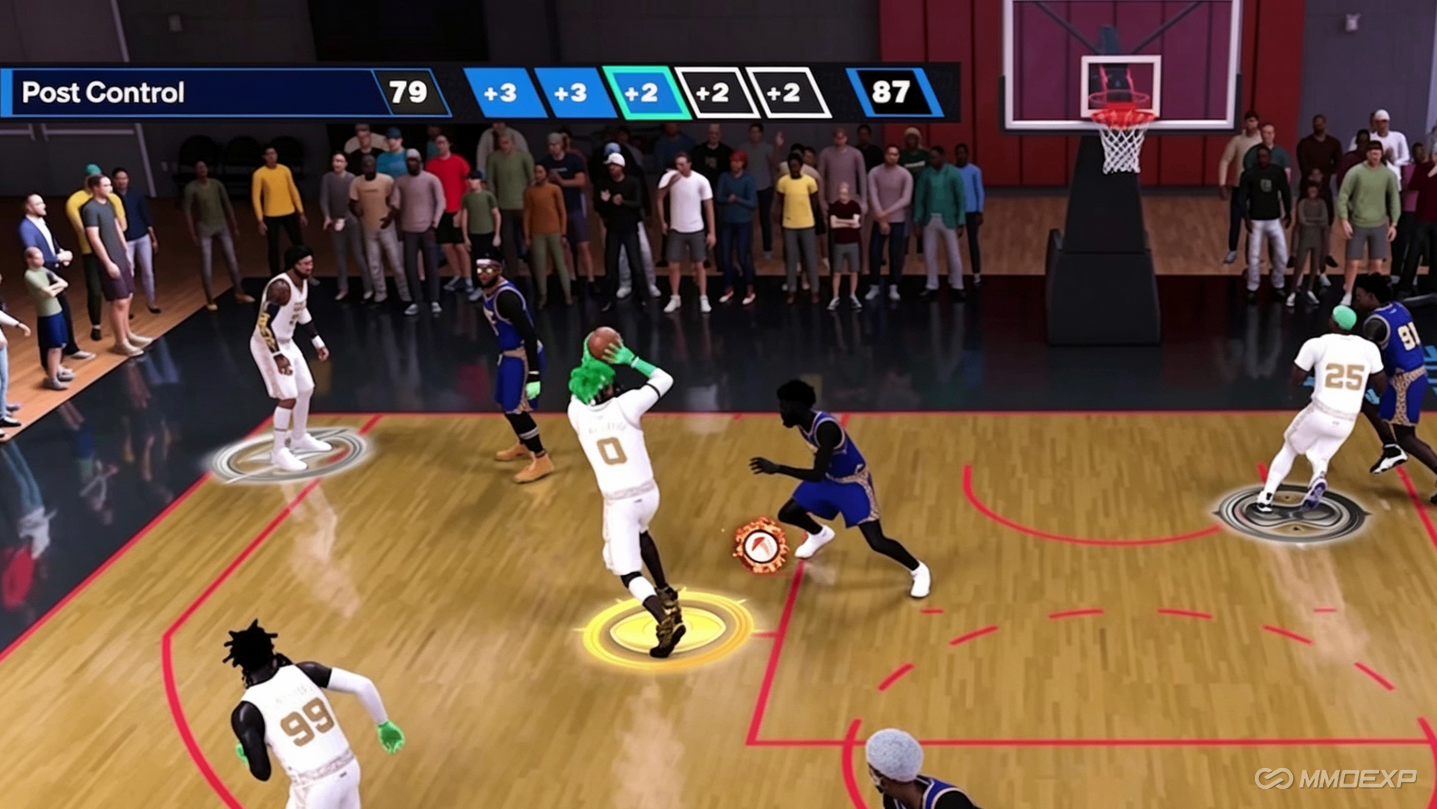
Post Control (87 with cap breakers): This unlocks a deadly post game. Against smaller defenders, back them down; against slower defenders, face up and attack.
Shooting
The Five Cap Breaker Investment: Apply five cap breakers to three-point shooting, pushing it from 70 to 90. This unlocks Deep Bomber Takeover, transforming a 7'1" center into a floor-spacing nightmare capable of hitting from logo range.
Mid-Range (93 with cap breakers): Fadeaways, hop jumpers, and pull-ups become reliable scoring options. If defenders sag off, knock down shots; if they step up, attack the paint.
Free Throw (80): Provides consistent conversion from the charity stripe.
Build Specialization: Select Shooting specialization for additional badge tiers. With Max +2 perks, key shooting badges can be elevated to Legend status.
Recommended Jump Shot
Base: Paul Reed | Release 1: Gorgui Dieng | Release 2: Paul Millsap | Blend: 68%/32% | Release Speed: Quick
This jump shot is difficult to contest. The hands reaching above the forehead creates a visual cue: release when the hands reach that position. Turn the shot meter off in settings to boost the green window and make percentage.
Playmaking
Pass Accuracy (99 with cap breakers): Applying cap breakers to push pass accuracy to 99 transforms this build into a full-court quarterback. Outlet passes become laser-guided missiles, enabling fast breaks before the defense can react. Key badges include Legend Break Starter and Gold Dimer.
Ball Handle (70): Provides enough control to keep defenders honest while creating opportunities for yourself and teammates.
Speed with Ball (55): At this threshold, the build becomes more mobile than most centers, allowing you to push the pace and attack open space.
Defense and Rebounding
Block (93 with cap breakers): Applying cap breakers to push block to 93 unlocks Gold Paint Patroller and Gold High-Flying Denier. With Max +2 perks, both become Legend. At this level, opponents are not attacking the rim; they are gambling.
Interior Defense (85): Provides the strength and presence needed to anchor the paint at an elite level. Post scorers, slashers, and rim runners all face a miserable experience inside.
Perimeter Defense (62): Unlocks Bronze Enforcer, contributing to stronger contests and better block animations.
Steals (40): This build is not designed to gamble. Attribute points are invested where they matter most: protecting the paint.
Offensive Rebound (80): Turns missed shots into additional possessions.
Defensive Rebound (85): Combined with size, length, athleticism, and Gold Rebound Chaser (via Max +1), provides consistent results.
Badge Strategy
Max +2 Perks: This system allows climbing two tiers higher, enabling Legend-level badges. Prioritize:
Legend Paint Patroller – Elite rim protection
Legend High-Flying Denier – Shot-blocking presence
Legend Deep Bomber – Extended shooting range
Legend Break Starter – Pinpoint outlet passes
Key Badges:
Rebound Chaser (Legend) – Essential for dominating the glass
Set Shot Specialist (Legend) – Consistent shooting
Brick Wall (Gold) – Screen setting
Rise Up (Gold) – Standing dunk dominance
Dimer (Gold) – Boosts teammates after passes
Takeover Selection
Custom Takeover: Include Three-Point (boosts Deep Bomber), Block (enhances rim protection), and Defensive Rebound (secures possessions). If you cannot create a Custom Takeover, select Glass Cleaner or Splash Tower, ensuring Defensive Rebound is included.
Cap Breaker Priority
Cap breakers are earned through Build Specialization quests, Season Rewards, and REP Rewards. The priority order:
Three-Point (+5): 70 → 90 (Deep Bomber Takeover)
Block (+5): 88 → 93 (Gold Paint Patroller)
Post Control (+8): 79 → 87 (Deadly post game)
Pass Accuracy (+5): 94 → 99 (Legend Break Starter)
Mid-Range (+2): 89 → 93 (Elite fades)
Gameplay Strategy
Offense: Set hard screens in pick-and-roll and pick-and-pop situations. Roll to the rim or pop to the three-point line based on the defense. Use post control to punish mismatches. With a 90 three-point rating, defenders cannot sag off, creating driving lanes for teammates.
Defense: Contest everything near the rim. Stay disciplined to avoid fouls. Box out before going for rebounds. Communicate switches, screens, and cuts — centers have the best view of the floor on defense.
Transition: After grabbing a rebound, use Legend Break Starter to launch outlet passes for fast-break opportunities.
Strengths and Weaknesses
Strengths: Elite floor spacing from a 7'1" center; Legend-level playmaking badges; elite rim protection; versatile scoring from all three levels; strong screen-setting; effective transition play.
Weaknesses: Ball handling and perimeter quickness are inferior to guards; limited steal rating; requires significant cap breaker investment; may struggle against exceptionally fast slashing centers.
Conclusion
This 7'1" center build is designed to dominate in any game mode. The combination of elite shooting, playmaking, and rim protection creates a versatile big man who can adapt to any matchup.
Key Takeaways: Five cap breakers to three-point shooting are essential (70 → 90). Max +2 perks elevate key badges to Legend status. Custom Takeovers provide flexibility. The build is optimized for both fun and competitive play, though fully upgrading your player and unlocking these features often requires a steady supply of NBA 2K26 MT to cover training and equipment costs. If you're looking to speed up the process, MMOEXP is a trusted source for NBA 2K26 MT to help you max out your build without endless grinding.