
OP FC 26 4-3-3 (4) Attack Tactics Guide
If there's one formation that's quietly taken over FC 26's Ultimate Team meta, it's the 4-3-3 (4) — a shape that blends structured buildup with chaotic attacking freedom. It looks simple on paper, but when tuned right, it becomes unstoppable: players overlap, attack from every angle, and yet your backline never loses shape.
This guide breaks down how to build, position, and play this exact 4-3-3 (4) setup for competitive modes — including custom tactics, player instructions, build-up options, pressing systems, and transition principles that mirror how top-tier players are dominating Rivals and Weekend League.
Formation Overview – 4-3-3 (4): The Aggressive Balance
The 4-3-3 (4) — also called the 4-3-3 Attack variant — is the most aggressive of the 4-3-3 family. It adds a central CAM who connects your midfield to the front line, turning simple build-ups into layered attacking movements.
Formation Layout:
Backline: LB – LCB – RCB – RB
Midfield: CDM – LCM – RCM (one being a CAM)
Frontline: LW – ST – RW
Why it's OP in FC 26
Perfect spacing for diagonal passes and cutbacks.
Automated wide runs from wingers pulling defenders apart.
CAM unlocks unpredictable through balls and second-line runs.
Midfield triangle allows fluid defensive recovery and transition cover.
Unlike narrow formations like the 4-1-2-1-2 (2), the 4-3-3 (4) gives width, balance, and constant vertical threat. It's ideal for players who want fluid attacks without losing defensive structure — making it extremely forgiving for non-pros but also flexible enough for pros.
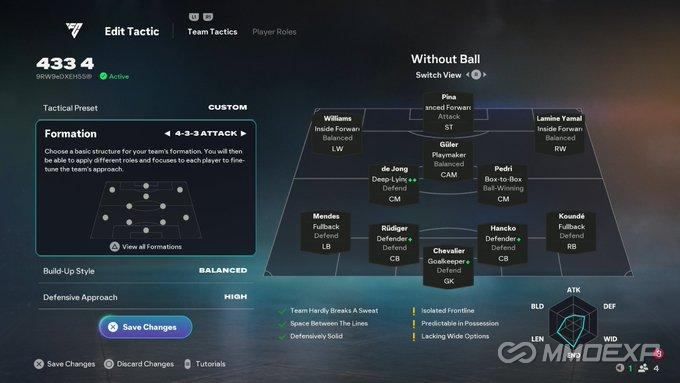
Tactical Setup (Team Tactics Menu)
Here's the exact tactical configuration from your uploaded image — optimized for Ultimate Team meta balance:
Build-Up Play: Balanced
Balanced buildup keeps your team reactive rather than pre-programmed. Players position naturally to create passing triangles, giving freedom to switch between slow possession or fast counter-attacks depending on the game's tempo.
Why it works:
You can mix tiki-taka passes or trigger long-ball counters without changing tactics mid-match.
Chance Creation: Forward Runs
This setting ensures all three attackers and your CAM make constant movements behind the defense. It's what gives the "player runs everywhere" feeling — wingers cut inside, the striker drags center-backs, and the CAM darts into gaps.
Pro Tip: Don't overuse through balls — mix short give-and-go passes to exploit defenders who track runners.
Width: 55
A moderate width keeps wingers wide enough to stretch play but close enough to combine with the CAM and overlapping full-backs.
50 or below: compact and possession-heavy.
60 or above: better for fast crosses, but risks isolating the striker.
Players in Box: 6
Pushes both your CAM and a midfielder into the box during attacks. It makes your box entries unpredictable and heavily pressures defenders during transitions.
5: Balanced but slightly safer.
7+: More attacking chaos but riskier for counters.
Defensive Style: Balanced Press
Balanced defense ensures your shape stays intact while still applying smart pressure when the ball enters your zone.
Press after possession loss is too risky in Rivals meta (stamina drain + high counter threat).
Balanced lets you control your own press manually — essential at higher skill tiers.
Defensive Line:
Depth: 60
Width: 50
This positioning allows you to keep a medium-high line that squeezes space between midfield and defense — forcing opponents into mistakes but not exposing you to through-ball spam.
Player Roles & Instructions
The magic of this tactic lies in the player instructions, which make your team dynamic without breaking shape.
Let's go position by position.
GK – Chevalier (or any modern sweeper)
Instructions:
Comes for Crosses
Sweeper Keeper
Having a keeper who can rush off the line and intercept long balls is vital — especially with a 60-depth setup.
CBs – Rüdiger & Hancko
Instructions:
Stay Back While Attacking
Default Defensive Position
These two act as anchors. Don't use "Step Up" — it creates dangerous gaps in the middle against fast players. Prioritize strength and aggression over pure pace.
Full-Backs – Mendes (LB) & Koundé (RB)
Instructions:
Stay Back While Attacking
Overlap
This combination gives flexibility: they stay deep by default but make smart overlaps when there's open space. It keeps the defense compact yet allows surprise width during transitions.
Tip: If you're leading, switch their runs to "Stay Back." If chasing a goal, change to "Join the Attack" for heavy overloads.
CDM – de Jong (Deep-Lying Playmaker)
Instructions:
Stay Back While Attacking
Cover Center
Cut Passing Lanes
He's your pivot — recycling possession, reading transitions, and covering behind the CAM. De Jong's balance and stamina make him ideal, but any press-resistant CDM (like Rodri or Zubimendi) works.
LCM – Güler (Playmaker)
Instructions:
Get Forward
Free Roam
This role creates the "players running everywhere" dynamic. Güler drifts between lines, sometimes acting like a second CAM. "Free Roam" lets him find creative pockets — vital for unlocking compact defenses.
RCM – Pedri (Box-to-Box)
Instructions:
Balanced Attack
Cover Center
Pedri mirrors Güler but stays more disciplined defensively. He links your right wing while supporting both ends of the pitch. This duality is what makes the 4-3-3 (4) so adaptable.
CAM – Pina (Advanced Creator)
Instructions:
Stay Forward
Free Roam
Get Into the Box for Cross
This is the engine of your offense. Pina drifts laterally to open central lanes while constantly pushing forward. He creates overloads in half-spaces and plays one-twos with wingers and full-backs.
Against low blocks, his "Free Roam" breaks defensive shape.
Against press-heavy teams, drop him manually to help link buildup.
LW – Williams (Balanced Winger)
Instructions:
Stay Wide
Get In Behind
Come Back on Defense
This creates space on the left flank while maintaining defensive cover. Williams' speed forces defenders to stretch, freeing your CAM and striker.
Pro Tip: Alternate between "Cut Inside" and "Stay Wide" mid-game to disrupt opponent marking.
RW – Lamine Yamal (Inside Forward)
Instructions:
Cut Inside
Get In Behind
Come Back on Defense
Yamal mirrors Williams but cuts inside to exploit weak-side gaps. "Come Back" prevents your shape from breaking under pressure, especially against players who abuse wing play.
ST – Pina or any Agile Finisher
Instructions:
Stay Central
Get In Behind
Mixed Support Runs
This striker must combine off-ball movement with tight dribbling. Think of this role as your vertical pressure point. He pins the defense, giving your CAM and wingers freedom to roam.
Transition Playstyle
Here's how to manage this setup in different match phases:
Build-Up Phase
Always play through your CDM → CAM channel.
Trigger L1/LB runs from wingers to stretch opponents.
Use your CAM's Free Roam to confuse defensive mids.
The 4-3-3 (4) rewards triangular passing patterns. Move the ball diagonally: LB → LCM → CAM → RW. The defense won't track every runner.
Midfield Control
This is where your shape shines. The CDM anchors, while both CMs move like elastic bands — one up, one back. When opponents press, simply recycle through your CBs and full-backs until openings appear.
Counter-Attacks
When you regain possession, look for the wide outlets. Wingers with "Get In Behind" automatically sprint forward. Pass early — not late — to exploit space before defenses recover.
If your opponent's line is too deep, drive through the middle using CAM and striker one-twos.
Defensive Structure – Why It's Rock Solid
Even though your wingers and CAM roam aggressively, the back six (LB–CB–CB–RB–CDM–RCM) maintain perfect spacing.
Key defensive principles:
De Jong protects your backline's central channel.
Pedri tracks cutbacks and back-post runs.
Full-backs hold width, preventing wide overloads.
When defending, manually switch between your CDM and RCM to close lanes rather than spamming tackles. This tactic's "High Defensive Approach" ensures you automatically compact vertically when opponents advance.
In-Game Adjustments
Kick-Off (0'–20')
Stick to Balanced Build-Up and High Defensive Line.
Let your wingers stretch the pitch and observe your opponent's press pattern.
Mid-Match (20'–60')
If the opponent clogs midfield, switch to Forward Runs for both CAMs.
Drop defensive width to 40 if you're facing fast counter-attacks.
Use Team Press after Possession Loss for 10 minutes to regain control.
Closing Phase (60'+)
Activate Ultra Attacking only when chasing a goal.
Bring your full-backs into Join the Attack mode for overlap overloads.
Use Hold Up Play with your striker to recycle possession safely.
Ideal Player Types
ST (Pina / Central Forward): Strong hold-up play, good first-touch, high finishing (≥85). Think hybrid of target man and false 9.
LW / RW (Williams & Yamal): 90+ pace, 80+ dribbling, use Balanced Width and Cut Inside.
CAM (Güler): Agile playmaker with 85+ vision and flair; triggers Third-Man Runs.
CMs (Pedri & de Jong): Box-to-box, stamina above 90, able to press and recover.
CBs (Rüdiger & Hancko): Physical defenders with 80+ acceleration to hold high line.
FBs (Mendes & Koundé): Two-way full-backs—crossing and defensive awareness both 80+.
GK (Chevalier): Sweeper-keeper archetype, 75+ kicking, reacts quickly to through-balls.
Pro Tips for Non-Pros
Don't overpress: The formation naturally squeezes space; rely on positioning.
Trigger manual runs: Use L1/LB runs from wingers and CMs to manipulate defensive lines.
Use driven passes: R1/RB + X/A cuts through midfield gaps perfectly in this system.
Master one-twos: CAM + striker interplay is your biggest weapon.
Switch play often: Opponents tend to overcommit — your opposite winger is usually free.
Final Thoughts
The 4-3-3 (4) attack formation in EA FC 26 perfectly balances chaos and control. It's what top-level pros love — dynamic, unpredictable, and brutally efficient — yet simple enough for non-pro players to dominate with.
Players "run everywhere," but every movement has purpose. Your CAM orchestrates, your CDM protects, and your wingers terrorize defenders on both flanks. It's plug-and-play perfection: no gimmicks, no reliance on meta exploits — just pure positional intelligence and tempo mastery.
So whether you're grinding Rivals or pushing deep into Champions, this is your ticket to consistent wins. Use your FC 26 Coins and players to build this formation! Learn its flow, master its rotations, and your opponents will never see your next attack coming — until the Hiveborn crowd roars behind your next goal.
Summary:
Formation: 4-3-3 (4) Attack
Playstyle: Balanced Build-Up + Forward Runs
Core Strengths: Dynamic movement, stable defense, intuitive structure
Best For: All skill levels, from casual grinders to top-tier players
In short: Play smart, press with intent, and let your players run wild — this 4-3-3 (4) will do the rest.
MMOexp FC 26 Team