
Path of Exile Bog Shaman Blade Vortex Build Guide – Life Stacking Made Simple
Summary
Blade Vortex is one of those skills that never quite shines in the regular game the way it does in Phrecia League. With the right setup, it becomes an absolute monster — and the Bog Shaman Ascendancy turns it into something truly special. This guide breaks down how the build works, how to level it, and why it's one of the most reliable starters for the upcoming event in Path of Exile.
What Makes This Build Work
The core concept is life stacking. The Bog Shaman's Sanguine Power node converts all your energy shield into life, and that life then scales your damage in multiple ways . With good gear, you're looking at 15,000 to 20,000 life — and that life pool becomes your primary damage source .
The Ascendancy – Bog Shaman
Toad Pact is your first node and it's insane for Blade Vortex. It gives massive increases to area of effect and skill effect duration at the cost of negative resistances. The downside is manageable with a Bismuth Flask or Purity of Elements early on .
Sanguine Power is where the build truly comes together. It converts all energy shield on your gear into life, and that life benefits from all your life scaling nodes. This is why you want hybrid ES/life gear — you get the best of both worlds .
Vile Imprecations gives you an extra curse and applies malediction to enemies nearby. That's 10% less damage taken and 10% more damage dealt — a massive bonus for a build that's constantly in melee range .
Nightblood is the late-game powerhouse. It adds a life cost to your spells and gives you flat physical damage equal to 80% of that life cost. When combined with Runegraft of the Witchmark, you're spending thousands of life per cast and gaining huge damage in return .
The Core Skill – Blade Vortex
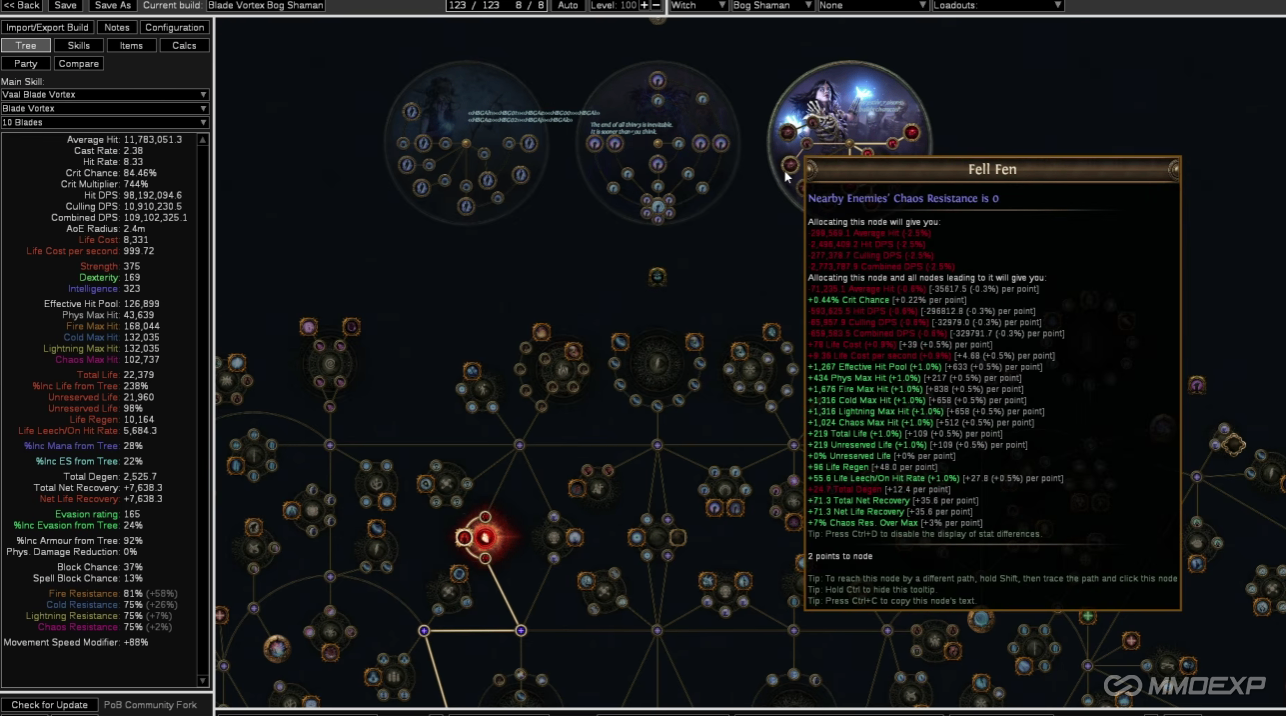
Blade Vortex summons ethereal blades that spin around you, dealing physical damage. You can have up to 10 blades active at once, and each blade increases both your hit rate and damage per hit .
The skill works best with Unleash Support, which lets you store up charges and cast multiple blades at once. With the caster mastery that gives four seals, one cast of Blade Vortex at max seals creates five blades .
At 10 blades, the skill's effective damage multiplier is roughly 33 times your base hit damage . That's why maintaining full stacks is so important.
Leveling the Build
Early Game (Acts 1-4)
Don't try to use Blade Vortex before level 38. Without Unleash Support, it feels terrible . Instead, level with Ethereal Knives (EK).
EK is easy to scale early with the same tree you'll use for BV, and the projectile speed and area effect from Toad Pact (once you ascend) actually makes EK clear quite well .
Recommended setup:
Link EK with Added Lightning or Added Cold Damage
Run Herald of Ice and Herald of Ash for clear
Pick up Practical Application early for dex requirements
When to Switch (Act 4/Act 5)
You get Unleash Support right before killing Malachai at the end of Act 4 . As soon as you hit level 38, pick up the caster mastery that gives you four Unleash seals, then make the swap .
Rule of thumb: You want your skill duration to be at least one second longer than twice the time it takes to generate max seals. This ensures you can maintain 10 blades comfortably without constantly spamming the skill .
Leveling Tree Priorities
Practical Application – solves early dex requirements
Discord Artisan and Presage – for reservation efficiency so you can run multiple heralds
Mana Mastery – helps fit all your auras
Iron Will – converts your strength into spell damage (you'll have a ton of strength from life stacking)
Skill Gem Setup
Main Damage Link (6-Link)
Vaal Blade Vortex – Awakened Unleash, Awakened Void Manipulation, Concentrated Effect, Increased Critical Damage, Awakened Increased Area of Effect
Vaaling Blade Vortex is worth it — the Vaal version gives you a burst damage option for dangerous packs and bosses .
Auras and Utility
Automation – Immortal Call (auto-cast defensive buff)
Mark On Hit – Assassin's Mark (applies to enemies when you hit with Shield Charge)
Shield Charge – Faster Attacks (your primary movement and mark application tool)
Righteous Fire – a huge damage buff that pairs well with your massive life pool
Curses
Despair – Cast When Damage Taken (lowers enemy chaos resistance)
Enfeeble – Cast When Damage Taken (defensive curse that keeps you alive in tough content)
Assassin's Mark – gives you power charges and extra crit damage
Gear Essentials
Weapons
Rathpith Globe is your best off-hand option. It gives critical strike chance and spell damage based on your maximum life — roughly 90% of your final damage comes from this item .
Dual Obliteration wands are great early on. They give physical damage as extra chaos and have a chance to explode enemies on death, which clears packs beautifully.
Body Armor
The Covenant is strong because it gives additional life and comes with a built-in level 29 Added Chaos Damage support. This adds a flat chaos damage component to every hit .
Twilight Regalia is another option — it provides a massive energy shield pool that gets converted to life through Sanguine Power .
Amulet
Marylene's Fallacy gives huge critical damage multiplier in exchange for reduced crit chance. Since this build's crit chance easily exceeds the cap, the downside is negligible .
Rune Crafting
Runegraft of the Witchmark is your endgame upgrade. It adds chaos damage equal to 2% of your maximum life to spells, at the cost of making spells cost 8% of your life per cast . This is where the build goes from good to insane — you're spending thousands of life per cast and gaining massive flat damage in return.
Playing the Build
Clearing Maps
The playstyle is simple: cast Blade Vortex at max Unleash seals, then Shield Charge through packs of enemies. Your 10 blades will spin and kill everything around you.
Obliteration makes this even smoother — enemies explode on death, dealing chaos damage to nearby targets and chaining through packs .
Pro tip: Always cast BV at max seals. Maintaining 10 stacks is much easier when you're getting 5 blades per cast instead of 1.
Bossing
For single-target damage, your damage loop looks like this:
Maintain 10 Blade Vortex stacks
Keep Righteous Fire running
Keep Assassin's Mark on the boss
Shield Charge into the boss to apply the mark
Let Blade Vortex do the rest
You can also use Vaal Blade Vortex for a damage burst when it's available.
Survival
Your defense is your life pool. At 15,000+ life, you can tank most hits. Immortal Call (triggered by Automation) gives you physical damage reduction when it matters.
Curses also help — Enfeeble on enemies drastically reduces their damage output .
Important Notes
Resistances matter. Toad Pact gives you negative resistances, so you need to overcap significantly. Purity of Elements or a Bismuth Flask can help early on .
Don't use Dissolution of the Flesh. It looks good on paper but is incredibly janky in practice and doesn't work with Righteous Fire at all .
The build isn't for everyone. Some players find the early leveling painful until you hit level 38 and get Unleash . Stick with it — once you're in maps, it's one of the smoothest builds in the event.
Final Thoughts
The Bog Shaman Blade Vortex build is a classic for a reason. It's reliable, it scales incredibly well with investment, and it's just plain fun to play. Running through packs with a storm of blades around you and watching everything explode is one of the most satisfying experiences Path of Exile has to offer. If you're looking to speed up your gearing process without the endless grind for POE currency, MMOEXP provides a trusted marketplace where you can stock up on the orbs and materials needed to fully kit out this build, so you can jump straight into the action with maximum power.