
Diablo 4 Beginner's Guide: Fast Helltide Hellwyrm Farming and XP Routes
Summary
Helltide is one of the fastest ways to level your character in Diablo 4, especially by hunting Hellwyrm spawns that generate large numbers of enemies and experience orbs. This guide introduces beginner-friendly farming routes across every major Helltide region, helping you level efficiently while collecting valuable rewards.

Step 1: Understand How Hellwyrm Farming Works
Hellwyrms are special enemies that can appear during Helltide events once your Threat Meter reaches at least 50%. When they emerge, they spawn additional monsters that drop large numbers of Experience Orbs, making them one of the best leveling methods for both fresh characters and later Paragon progression.
Instead of staying in one location waiting for enemies, continuously move between known Hellwyrm spawn points. The faster you rotate through spawn locations, the more Hellwyrms you are likely to encounter during each Helltide.
Step 2: Increase Your Threat Meter First
Before focusing on Hellwyrms, build your Threat Meter by defeating Helltide monsters throughout the zone. Once the meter reaches 50% or higher, Hellwyrms become eligible to spawn along their designated routes.
Keep moving while defeating enemies rather than clearing every pack. Maintaining momentum is more efficient than stopping to fight every monster.
Step 3: Fractured Peaks Route
Fractured Peaks offers one of the easiest starting routes for new players.
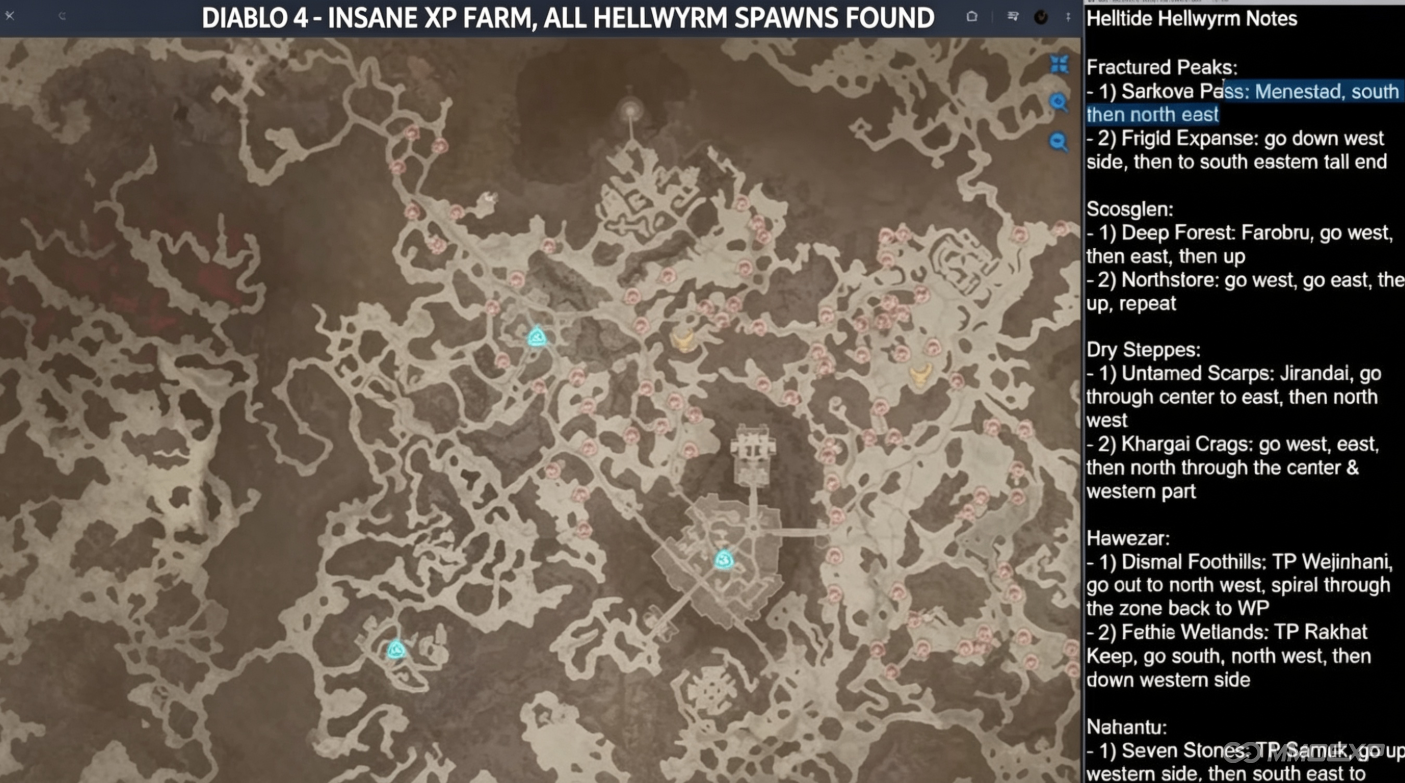
Sarkova Pass
Teleport to Menestad.
Travel south first.
Turn northeast and continue through the Hellwyrm spawn locations.
Skip the sparse northwestern section.
Frigid Expanse
Follow the western side while moving south.
Continue toward the southeastern edge of the region.
Ignore most of the eastern center, where Hellwyrm density is much lower.
This route minimizes travel time while maximizing encounters.
Step 4: Scosglen Route
Scosglen contains several dense farming paths when approached correctly.
Deep Forest
Start from Firebreak Manor (Farobru waypoint).
Move west.
Cross east through the center.
Turn north before looping back.
Northshore
Travel west.
Cross east.
Move north.
Repeat the loop while avoiding the far northern coastline where spawn density drops significantly.
These zigzag routes allow frequent Hellwyrm checks without unnecessary backtracking.
Step 5: Dry Steppes Route
Dry Steppes has multiple high-density farming areas connected by efficient travel paths.
The Onyx Watch Area
Begin from the Jirandai waypoint.
Move through the center.
Head east into the cluster of Hellwyrm locations.
Continue north before circling west.
Khargai Crags
Sweep west first.
Cross east through the center.
Continue north while covering the western side of the region.
Avoid isolated northeastern sections where few Hellwyrms appear.
Step 6: Hawezar Route
Hawezar rewards players who maintain continuous movement.
Bleak Foothills
Teleport to Wejinhani.
Move northwest.
Follow a large circular path around the zone.
Return toward the waypoint to begin another loop.
Fethis Wetlands
Travel to Backwater.
Head south.
Turn northwest.
Continue along the western edge while clearing Hellwyrm spawn points.
Because of the area's terrain, staying on a consistent route reduces unnecessary climbing and detours.
Step 7: Nahantu Route
Nahantu features some of the highest Hellwyrm density available.
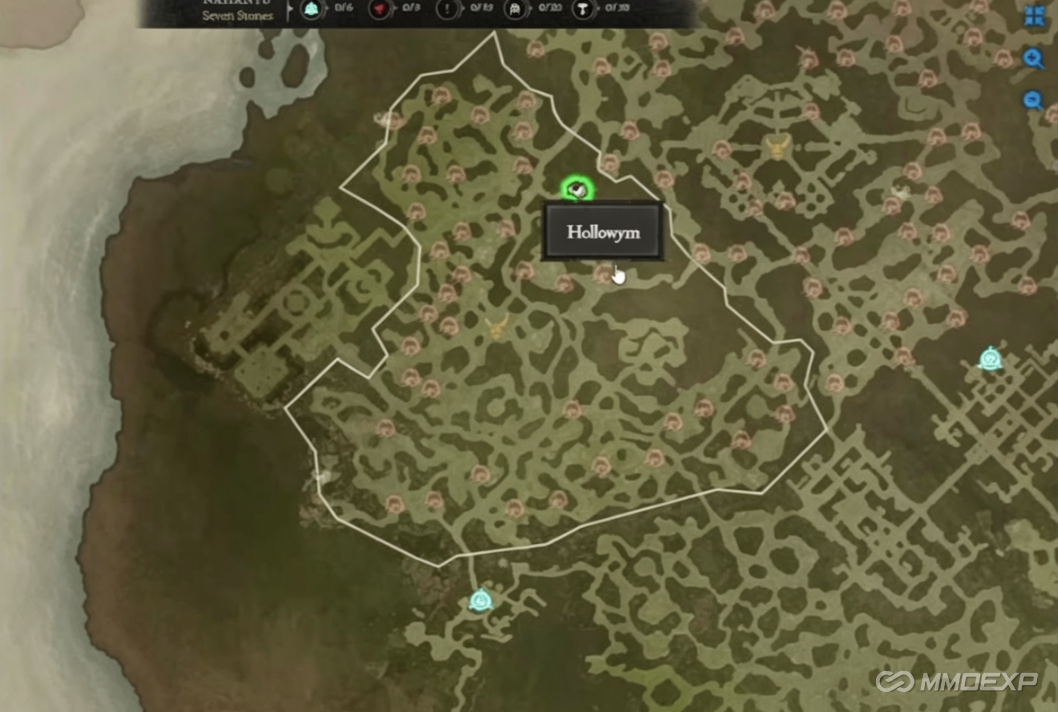
Seven Stones
Teleport to Samuk.
Travel north along the western path.
Turn southeast.
Continue through the central corridor into the next area.
This route contains long chains of potential Hellwyrm locations, making it an excellent choice for sustained XP farming.
Step 8: Keep Moving Instead of Waiting
Hellwyrm appearances are not guaranteed at every spawn location. Rather than waiting for one to appear, continue riding to the next point on your route.
Maintaining constant movement gives you more opportunities to trigger Hellwyrms and greatly increases your experience gained per hour.
Step 9: Use Shrines Whenever Possible
Some Shrine effects interact with Helltide mechanics by accelerating Threat Meter generation. Activating nearby Shrines while following your farming route allows you to reach the required Threat level faster, resulting in more Hellwyrm encounters during each event.
Although this optimization becomes more valuable later in the game, new players should still activate Shrines whenever they are conveniently located.
Step 10: Upgrade Your Gear Gradually
While fast leveling is the primary goal, don't neglect your equipment. Better weapons, armor, and defensive stats allow you to clear Hellwyrms more quickly and survive larger enemy groups. As you progress through Helltides, collecting stronger Diablo 4 Items naturally improves both your farming speed and overall efficiency.
Final Tips
Successful Hellwyrm farming is built around efficient movement rather than defeating every enemy you encounter. Learn each region's high-density routes, maintain your Threat Meter above 50%, activate useful Shrines when available, and continuously rotate between spawn locations. With consistent practice, Helltide becomes one of the fastest methods for leveling, earning rewards, and preparing your character for Diablo 4's endgame.