
Diablo 4: The Complete Pen Shot Rogue Guide
Summary
Pen Shot Rogue is one of the strongest builds in Season 14, capable of clearing T12 hardcore content with ease—especially when you complement your setup with well-rolled Diablo IV Items tailored to your playstyle. This guide covers everything from the core mechanics to resource management and endgame optimization, so whether you're crafting your own equipment or trading for upgrades, you'll have a clear path to maximizing your Rogue's potential.

Core Build Concept
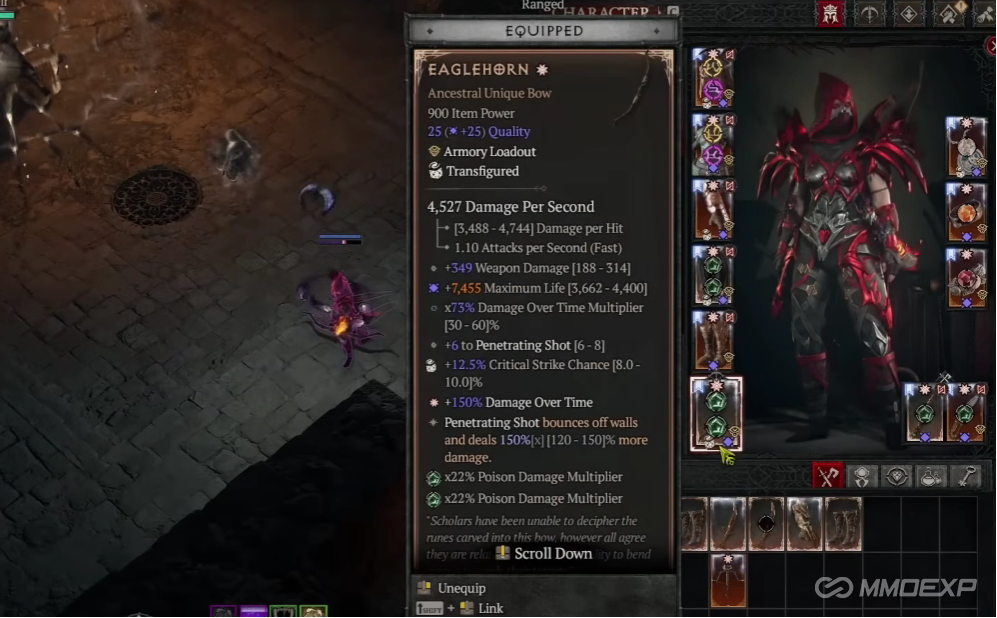
The build revolves around Pen Shot combined with Shadow Clone synergies. The key unique item is the Eagle Horn, which drops from Varshan and makes your arrows bounce, providing excellent screen coverage. Without Eagle Horn, Pen Shot fires a single arrow. With it, you get bouncing projectiles that clear entire packs.
The build features two main variants. The Shadow Shot variant gives you more arrows, better coverage, and faster clear. The Ballista variant is slower but hits harder and provides much better single target damage. The beauty is you can swap between them easily—use Shadow Shot for general farming, then swap to Ballista for tough bosses.
How the Build Works
The Shadow Clone Setup
The build uses the Starlight set, providing permanent Shadow Clone synergies. You have a permanent Shadow Clone that also shoots, the Shadow Clone ability that spawns extra clones, and Shadow Shot clones that appear, shoot once, then disappear. This creates a scenario where arrows fly everywhere, annihilating entire screens.
Eagle Horn Mechanics
Without Eagle Horn, you fire a single arrow. With Eagle Horn, your arrows bounce, providing much better clear and coverage. When combined with Shadow Clone, you get converging arrows from all directions bouncing around the screen.
Resource Management
Pen Shot is a resource-hungry build with no generator. Without proper resource sustain, you can only fire three times before running out.
Primary Solution: Tibault's Will
Upgrade your pants in the cube to get the Tibault's Will charm. Once you trigger Unstoppable, you can shoot almost forever. This is the most reliable way to sustain resources and the recommended solution for the Shadow Shot variant.
Alternative: Dark Shroud Method
The Overflow upgrade on Dark Shroud provides 200% extra energy regeneration when you have five dodge shadows. Baseline regeneration is 8 energy per second. With Overflow, this jumps to 23 energy per second. You can boost this further with energy per second rolls on your boots, reaching around 30 energy per second.
To keep Dark Shrouds up consistently, use the Neo and Mod runes together. Every 2 seconds you gain a Dark Shroud while barrier is active, and the Q rune provides your barrier. This method works well for the Ballista variant since it has slower cast speed.
Method Comparison
Tibault's Will gives you 50 energy per second and is the strongest option for resource sustain. The Dark Shroud method gives you about 23 energy per second baseline, or up to 30 with gear investment. Choose based on your variant and available gear.
Gear Priorities
Offensive Stats
The two most important damage stats are poison multiplier and damage over time multiplier. These should be on every slot where possible, including amulet, rings, weapons, and gloves. Together they scale your damage exponentially—we're talking about potentially five times more damage when fully stacked.
Defensive Stats
Focus on life, armor, and resistances. Movement speed is helpful but Rogues cap easily anyway. You don't need resource cost reduction if you're using Tibault's Will.
Key Items
Eagle Horn is your core build item. Harlequin Crest provides skill ranks that double-dip on both Puncture and Poison Imbuement, making it extremely valuable. Ednas provides both a damage multiplier and increased imbuement potency, but requires triggering a second elemental proc to activate.
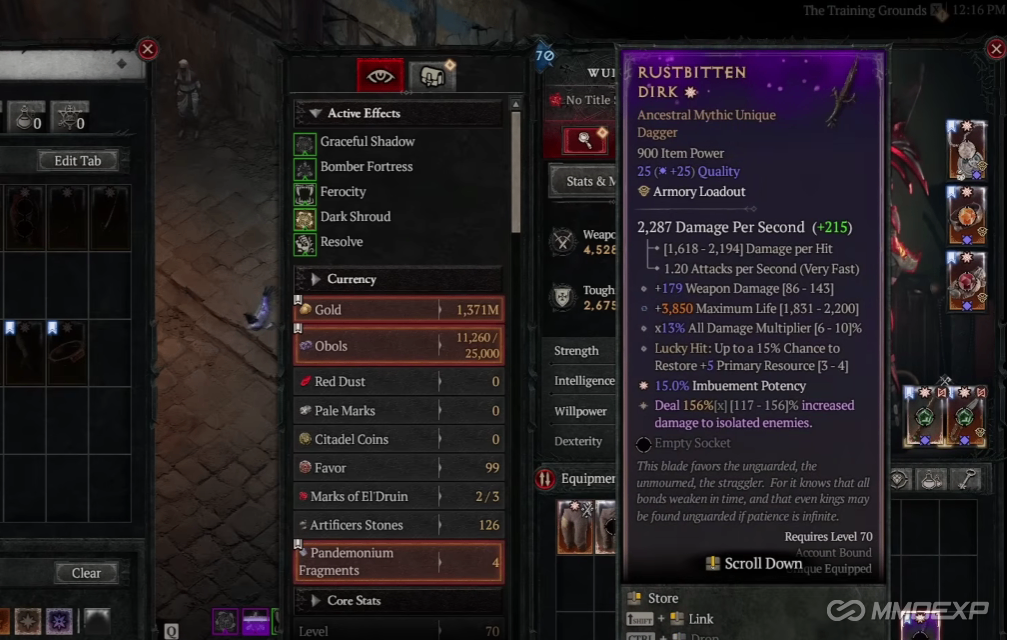
The Rust Bitten Dirk is a great swap weapon for boss fights, especially against Mephisto. It provides significant bonus boss damage. Just make sure you don't put a critical aspect like Imitated Imbuement on the weapon you plan to swap out.
Proc for Ednas
Ednas requires triggering an elemental proc that isn't physical or poison. This can come from a random charm with cold damage, an Elemental Surge temper on weapons, or an amulet proc. Once you have a +3 charm or core charm, you can swap a temper to guarantee the proc.
Tempers
For offensive tempers, you have two main options. Damage over time is additive damage, similar to Paragon nodes and glyph effects. Imbuement Potency is technically a damage multiplier, but it doesn't function for Shadow Clones.
Since a lot of your damage comes from Shadow Clones, you want about one or two Imbuement Potency tempers with the rest being Damage over Time. This balances your damage scaling across all sources.
Aspects
Imitated Imbuement is critical—it makes your clones also get the imbuement effect. Without this, your clones won't shoot the green poison arrows. Always put this on a weapon you don't plan to swap out.
Cursed Touch applies vulnerable to enemies consistently, and with good lucky hit chance, you'll have it active on everything all the time. Crushing provides fortify easily through Consummance. Disobedience is a strong defensive aspect that can push your toughness to 15-20 million when barrier is up.
Alchemical Advance gives you attack speed and extra lucky hit, which helps reset your Imbuement cooldown. The base cooldown is 20 seconds, but with high lucky hit, it resets much faster—about 8 seconds on single target and instantly on AoE fights.
Earthstriker provides overpower damage, which is a nice damage multiplier. You naturally swap weapons frequently while dashing and shooting, so building stacks is effortless.
Imbuement Management
Poison Imbuement has a 20-second base cooldown but resets easily through lucky hit. Alchemical Advance provides extra lucky hit to help with this. In AoE fights, the cooldown resets instantly. On single target, it resets in about 8 seconds instead of 20.
Simply press your Imbuement every 9 seconds. The cooldown reset makes this effortless, and the effect is easy to maintain permanently.
Paragon and Skill Tree
For the Paragon board, you want to use the Exploit glyph for farming since it applies vulnerable. Alternatively, Cursed Touch provides consistent vulnerable application on everything. Consummance is also important as it provides easy fortify through the Crushing aspect.
For the starter path, begin with the Death Trap Knife tree and transition to the endgame tree once you have better gear.
Variants and Swapping
The Shadow Shot variant is fast with excellent coverage but has lower single target damage and hungrier resource costs. The Ballista variant is slower but has much higher single target damage and easier resource sustain. You can swap between them with one button depending on the content.
Early Game Alternative: Dagger of Ice
Before you have Eagle Horn, start with a Dagger of Ice combo. The Fan of Knives upgrade throws five daggers at once, allowing you to shotgun at close range. It has excellent lucky hit for resource sustain. With one or two restore resource tempers on your rings, you can go forever.
Use this hybrid approach until you get Eagle Horn. Pen Shot handles AoE packs while Dagger of Ice deals with single targets.
Starter Build Overview
Before you have mythics, use Rust Bitten Dirk for boss damage and the Dagger of Ice hybrid for resource sustain. Focus on getting life, armor, and resistances while gathering your gear.
Your progression path is straightforward. Start with the Dagger of Ice and Pen Shot hybrid. Farm until you get Eagle Horn from Varshan. Transition to full Pen Shot once you have it. Add Harlequin Crest, Ednas, and other mythics as you acquire them. Finally, min-max your tempers and aspects for endgame optimization.
Final Tips
Rogue is in a great spot this season—almost everything on the class is viable. The build double-dips on skill ranks because ranks affect both Puncture and Poison Imbuement. This is why Harlequin Crest is so valuable, and if you're looking to speed up your progression, you can buy Diablo IV Items from trusted sellers to fill any gaps in your gear. For long fights like Tower pushing or Uber bosses, consider the Rifting aspect. It becomes extremely strong after 10 seconds of combat, making it perfect for extended encounters. If you need reliable equipment to support your push, I'd recommend checking out MMOEXP for quality items and competitive pricing.