
ARC Raiders Spaceport Guide:High-Ground Control, Item Usage, and Survival Strategies
Are you also experiencing in ARC Raiders Spaceport that you "enter the map, start fighting immediately, and then get wiped"? Why is it that on the same map, some players can consistently extract with 300K+ in a single run-along with a full bag of valuable ARC Raiders Items-while you keep getting third-partied or ambushed right after winning a fight? Is Spaceport really just a "chaotic map," or is there actually a hidden control logic behind it? What if the real issue isn't your aim, but your decision-making? If you start playing differently-don't take the first shot, don't rush down, secure high ground first, and wait for the situation to collapse-could this map turn from "hell difficulty" into your most reliable money farming zone?
SPACEPORT TRUTH:NOT CHAOS, BUT A PREDICTABLE BATTLEFIELD
Many players think Spaceport is random and chaotic, but in reality it is a structure-driven combat map.
All fights are naturally pulled into a few key zones because of building layout and vertical design.
Its core advantages are:
Combat routes are highly predictable
Multi-team fights naturally converge
High ground control is extremely powerful
Once you understand this, you are already ahead of half the player base.
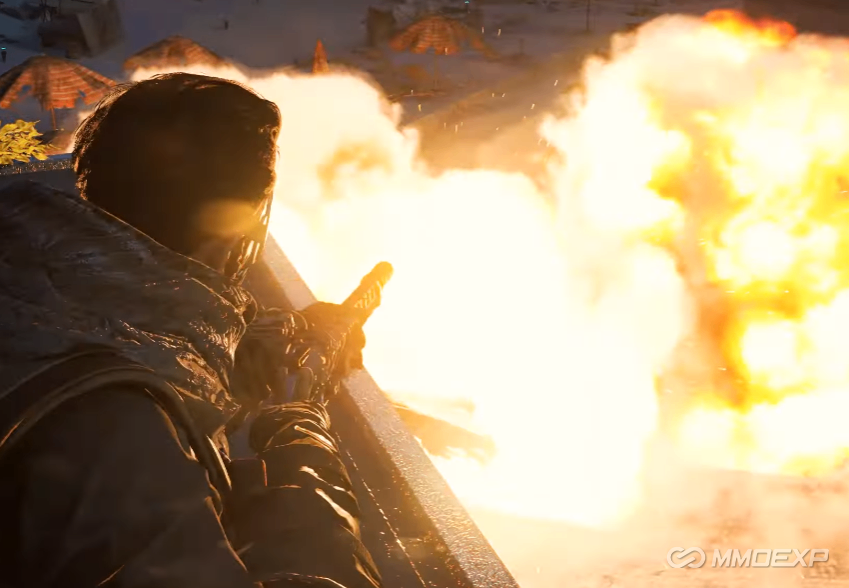
DEPARTURE HIGH GROUND:THE KEY TO WINNING THE ENTIRE RAID
The red high-rise, known as Departure, is the most important control point in Spaceport.
Whoever holds it controls both vision and tempo of the entire area.
The optimal strategy is:
Take high ground first and do not rush down
Observe multiple teams fighting below
Wait until enemies are weakened
Then drop in to clean up
The common mistake is the opposite:
See a fight and immediately jump down, losing all positional advantage.
SNAP HOOK:THE MECHANIC THAT CREATES SKILL GAP
Snap Hook is not just a movement tool-it is a combat rewriter.
High-level players use it to:
Instantly change rooftop angles
Escape unfavorable fights
Take unexpected side angles
Reclaim high ground control
If you are not using Snap Hook actively, you are effectively missing half of your combat potential.
TEMPO CONTROL:GOOD PLAYERS DON'T CHASE KILLS
Top Spaceport players do not blindly chase kills.
Instead, they focus on:
Breaking armor to force healing
Letting third parties weaken fights
Controlling engagement timing
Cleaning up only when fights are unstable
In short:let others fight, you take the results.
UTILITY AND AWARENESS:THE HIDDEN DECIDING FACTOR
In high-intensity fights, utility usage often matters more than raw gun skill-and knowing when to use items like smoke, barricades, and grenades can save you from burning through expensive gear, making even cheap ARC Raiders Materials stretch much further in long raids.
Key tools include:
Smoke grenades for revives and repositioning
Barricades for instant cover on rooftops
Explosives to interrupt revives or force panic
At the same time, third-party awareness is critical:
Listen for Snap Hook sounds to track rotations
Watch gunfire direction changes
Limit fight duration
The longer a fight lasts, the higher the chance of being third-partied.
EXTRACTION PHASE:THE MOST COMMON WIPE MOMENT
Many players lose their best runs during extraction, not during fights.
Correct habits include:
Avoid standing in open areas
Pre-place smoke before extraction starts
Expect Snap Hook rushes at the last second
Always watch flanks and rear angles
High-value raids often fail in the final seconds, not the fight itself.
WHO THIS GUIDE IS FOR AND WHAT YOU GAIN
This guide is designed for:
Players struggling to win consistent PvP fights
Players frequently third-partied in Spaceport
Solo or squad players aiming for stable high-value extracts
What you gain:
Better map control understanding
Fewer unnecessary deaths
More consistent raid profits
A shift from "aim-based play" to "map-based win control"
QUICK TIPS SUMMARY
Always take high ground before fighting
Do not chase kills-wait for fights to collapse
Use Snap Hook for angles, not just movement
If a fight lasts over 30 seconds, expect third parties
Treat extraction as a second combat phase
CORE VALUE FOR DIFFERENT PLAYER TYPES
New players:Learn map logic and reduce blind rushing deaths
Mid-level players:Improve tempo control and consistency
High-level players:Maximize efficiency and raid value per run
Squad players:Improve coordination around high ground dominance