
PoE Phrecia League 3.0 TotA Guide: Best ZDPS Farmer Build for Maximum Profit
Summary
Trial of the Ancestors is back in the Phrecia League 3.0, and we've got a massive update to the Zero DPS TotA farmer. This build is absolutely crushing the mechanic, and it's every bit as fun as we remembered. The best part? It costs less than one divine to put together and delivers over 200% movement speed with near-invincibility through evasion, dodge, and block. This guide covers everything you need to know: why ZDPS and Zero HP make sense for TotA, the Wildspeaker ascendancy, gear setup, skill gems, passive tree, and exactly how to play the build effectively.
Why ZDPS and ZHP for TotA?
Trial of the Ancestors reaches a point where many enemies will one-shot you regardless of your defenses. Chaos damage from specific enemies like Tofanuku and various Death Guides is particularly disruptive. While a normal build might survive a tick of ground damage, it's simply not worth investing in traditional defenses when you can instead focus on not getting hit at all.
This is why we run Chaos Inoculation and Eldritch Battery. Chaos Inoculation makes you immune to chaos damage, while Eldritch Battery reserves all your mana for auras and uses an energy shield to cast skills. You end up with one life, but you're also incredibly difficult to hit.
Traditional builds require massive investment to survive TotA at high ranks. Even with mirror-tier gear, enemies respawn quickly, making kills nearly pointless. Crowd control is simply more effective. Void Sphere and Ensnaring Arrow keep enemies locked down without killing them, allowing you to capture totems freely.
The entire setup costs less than one divine. You don't need life rolls on any gear, high resistances, six-linked gems, or expensive unique items.
Core Stats
The build delivers approximately 100 DPS, which is intentional since you don't want to kill anything. Your life pool is exactly one point thanks to Chaos Inoculation. Without flasks, you reach a 60,000 evasion rating, and with flasks active, that jumps to 96,000. Movement speed sits between 200 and 260 percent at all times.
Your Void Sphere has roughly an eight-second cooldown but lasts around twelve seconds, meaning you can maintain permanent uptime. The build also benefits from blind on hit and increased blind chance against enemies, effectively putting you over the evasion cap once blind is factored in.
Ascendancy: Wildspeaker
Wildspeaker is the ideal ascendancy for this build. Primal Instinct gives you a 100 percent chance to suppress spell damage, making gearing trivially easy. Great Wolf's Call provides an increased tailwind effect on you and nearby allies. A Flash of the Teeth grants Cat's Stealth and maximum frenzy charges. Fearful Symmetry extends your frenzy charges, making Phase Run last twelve seconds or longer.
If Wildspeaker isn't available in patch 3.29 or beyond, consider Pathfinder as your backup option. Nature's Boon, Master Alchemist, and Nature's Adrenaline provide flask uptime, move speed, and evasion. Warden is another alternative, providing evasion rating and spell suppression through defensive nodes.
Passive Tree Strategy
The tree focuses on three things: evasion rating, area of effect, and skill effect duration. Evasion scales Queen of the Forest's movement speed bonus. Area of effect makes Void Sphere cover massive portions of the arena. Skill effect duration keeps Void Sphere active longer than its cooldown.
Chaos Inoculation provides chaos immunity at the cost of reducing your life to one. Eldritch Battery converts your energy shield into mana, allowing you to reserve all your mana for auras. Whispers of Doom enables dual curses through Blasphemy. You'll take both areas of effect clusters near the ranger area. Evasion wheels like Revenge of the Hunted, Reflexes, and the Blind wheel provide massive defensive stats. The bow cluster gives increased area of effect while wielding a bow. Reservation nodes throughout the tree allow you to run all your auras simultaneously.
For your anointment, Avatar of the Hunt provides move speed and evasion rating. For tattoos, blind on hit tattoos help increase evasion effectiveness. Knockback on strength nodes is useful for Ensnaring Arrow.
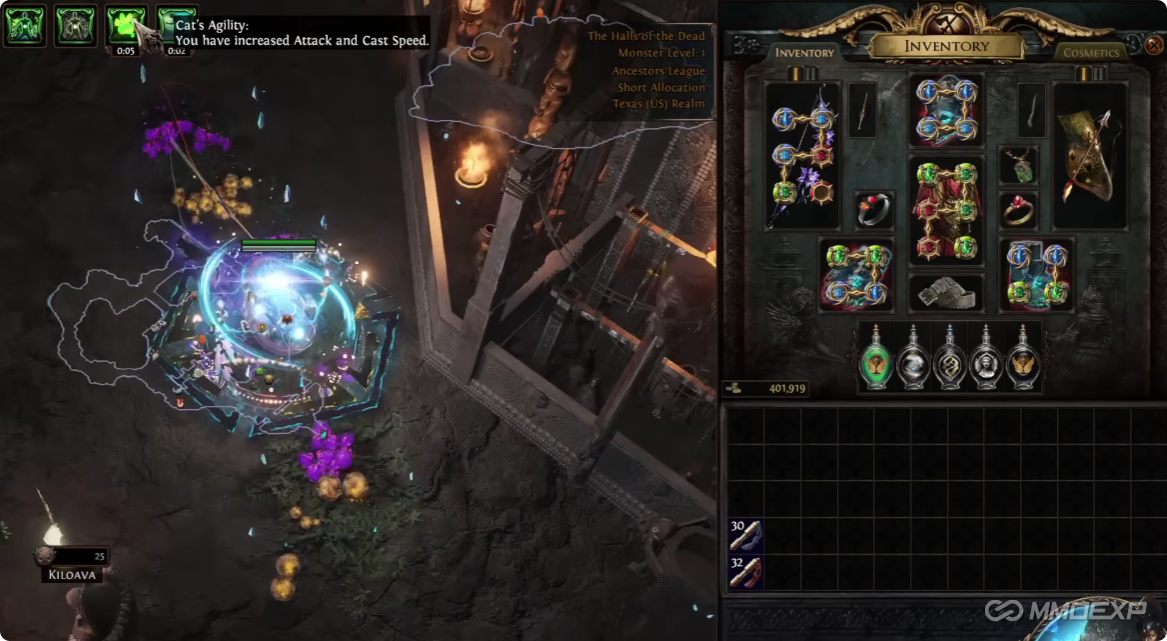
Gear Setup
Queen of the Forest is mandatory for movement speed. It grants one percent move speed per 600 evasion rating up to a maximum of 50 percent bonus, but it also reduces your base move speed by 25 percent. You need a 45,000 evasion rating to cap this bonus, which we achieve easily.
Widow's Hail and Rearguard work together to provide a block chance on a budget. These two items give you significant survivability without costing much. A well-rolled Widow's Hail can be expensive, but even a cheap one works perfectly.
Replica Karui Ward provides area of effect and move speed from an amulet slot. The regular version also works, but the replica's area of effect bonus is particularly valuable.
Evasion is king for this build. Every piece of gear should have high evasion or evasion and energy shield hybrids. You need attributes for gear and gem requirements. Resistances are not a priority since you're avoiding damage entirely. Cooldown recovery on your belt helps smooth out Void Sphere uptime.
Your flasks are Stibnite for evasion and blind, Jade for a massive evasion boost, Silver for move speed, and Quicksilver for move speed. Instead of a life flask, you run a second Quicksilver for even more speed. You can chug flasks while channeling on totems.
Skill Gems
Grace provides a massive evasion rating. Haste gives move speed and attack speed. Blasphemy linked to Enfeeble and Temporal Chains curses enemies automatically with dual curses.
Void Sphere is your primary crowd control tool. Support it with Increased Area of Effect, Intensify, More Duration, and Second Wind. Quality on Void Sphere is worth it since it gives cooldown recovery. The color requirements are three blue, one red, and one green.
Ensnaring Arrow provides additional crowd control. Support it with Greater Multiple Projectiles, Chance to Flee Support, Knockback Support, and Ballista Totem Support. If you add a sixth link, Multiple Totems Support lets you have up to five totems out at once.
Phase Run linked with Automation automatically triggers on cooldown. With frenzy charges, it lasts twelve seconds or longer, providing near-permanent stealth and speed.
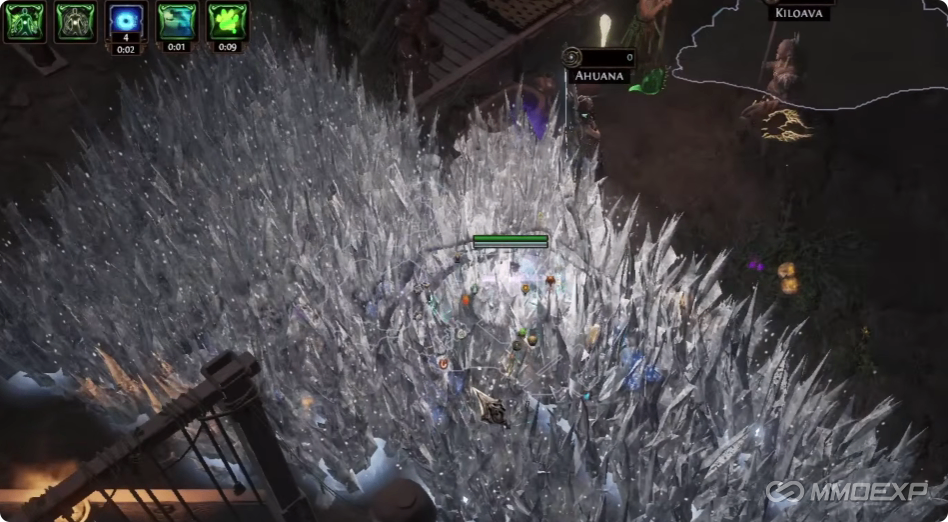
Arcanist Brand linked with Frost Wall, Increased Area of Effect, and Spell Cascade spawns Frost Walls that briefly shove enemies away from your totems. This is incredibly useful for disrupting enemy channels.
Flame Dash is your standard movement skill for quick repositioning.
Only Void Sphere and Enhance are worth qualifying. Void Sphere's quality gives cooldown recovery. Enhance boosts Phase Run effectiveness.
Gameplay Strategy
At the beginning of each match, blast to the back lines using your insane movement speed. Drop Void Sphere at the start of the match to disrupt enemies immediately. Place ballista totems to block projectiles and knock back enemies. Then work from the back to the front, helping your flankers capture totems.
Keep Void Sphere on cooldown constantly. It should be active at all times. Drop Frost Walls using Arcanist Brand to shove enemies away from totems. Never stop moving, as you have only one life point. Chug your flasks constantly to maintain evasion and speed.
When capturing enemy totems, you're vulnerable. But with 96,000 evasion, blind, and high dodge and block chances, you're incredibly hard to hit. Use flasks while channeling to maintain your defensive layers.
Switch to this setup as soon as you want to stop mapping and focus entirely on TotA. You can do this in your sixties, seventies, or eighties. This build reached level ninety-three from TotA experience alone.
Advanced Tips
With skill effect duration nodes, Void Sphere lasts longer than its cooldown. This means you can maintain permanent uptime, completely locking down enemy teams throughout the match.
Frost Wall only exists briefly in TotA, but Arcanist Brand spawns them continuously. Use this to push enemies off your totems, create temporary barriers, and disrupt enemy channels.
Since you have no life flask, all flask slots go to utility flasks. Stibnite, Jade, Silver, and double Quicksilver make you nearly impossible to hit while maintaining insane speed.

Frequently Asked Questions
Can this build kill anything? No. It has roughly one hundred DPS. Don't try to kill anything.
Does Frost Wall work in TotA? Yes, briefly. It spawns and shoves enemies before despawning.
What about chaos damage? Chaos Inoculation makes you immune to chaos damage entirely.
How do I sustain mana? Eldritch Battery converts your energy shield into mana. Your energy shield is reserved for auras, but you still have enough to cast skills.
Do I need a six-link? No. Void Sphere works fine on four links, and Ensnaring Arrow functions on five links.
How high can this build climb? Up to two thousand rating comfortably.
Conclusion
The ZDPS Wildspeaker TotA farmer is the most cost-effective way to dominate Trial of the Ancestors. With less than one divine invested, you get over two hundred percent movement speed, ninety-six thousand evasion rating, seventy-five percent dodge and block, permanent crowd control, and near-invincibility through simply not getting hit.
This build proves that in TotA, you don't need damage, life, or resistances. You just need speed, evasion, and crowd control. Whether you're farming valuable tattoos, POE currency, or just having fun, this build will carry you through the entire mechanic.
Good luck in Phrecia League 3.0. May your Void Spheres be massive and your totem captures be swift.