1. Class Identity
Role: a staff-wielding melee hybrid support whose main job is to empower the party and control combat tempo, without replacing the Cleric as the main healer. Players looking to speed up progression can also buy Aion 2 kina for extra resources.
This guide was submitted by a collaborating player and is based on data from the Korean and Taiwanese servers; discrepancies may exist, so please refer to official sources for specific gameplay details.
Pros
• Party-wide buffs (Attack Speed, Move Speed, Cooldown Reduction, Damage, Damage Reduction, Healing) — universally needed by any party
• Deals melee damage while fulfilling support duties, with almost no DPS loss
• Built-in sustained healing; strong solo open-world capability (can rival Cleric or Templar in output)
• High mobility, front-line positioning, tanky
• Extremely valuable in large-scale group PvP (Abyss, Arena, etc.)
Cons
• Jack of all trades, master of none — must swap builds flexibly by dungeon/battleground
• Severe MP drain (needs dedicated Arcana cards, specializations, and potions to solve)
• Lacks large instant single-target healing; the harder the content, the less it can solo-heal
• The sense of achievement from output/healing is less direct than a pure DPS or healer
• Late-game APM rises; must monitor the whole party's status simultaneously
2. Core Mechanics
Master these two systems and you've grasped the essence of the Chanter. Don't be deterred by the word "support" — play it well and you'll still chart on the DPS board.
Buff Core
Key point: keep multi-layer buffs (Attack Speed / Critical / Attack / Defense / Vitality) up at all times → weave sustained damage and combos → switch to defense / healing during high-pressure phases.
Core mechanic: Undefeated Mantra / Power of the Storm / Impeding Authority: provides Attack, Critical, Attack Speed, Defense, Vitality, Move Speed, Damage Reduction, and minor healing.
Output Core: Multi-hit
Damage-source mechanic: skills deal damage and additionally trigger 4 small damage numbers, values scaling with Attack.
Many Chanter skills come with "guaranteed Multi-hit" or can enable Multi-hit via specialization — this is the fundamental reason its output holds up.
Key: Combat Speed is the hidden core! Weapon, arms, and gloves can roll "Combat Speed" and directly raise left/right-click efficiency (Weaving frequency) — essentially raising damage. KR-server veterans have tested it stacking to 52% Combat Speed. |
3、Skill Breakdown & Specialization Choices (One-Pager)
This section is the watershed between experts and average players. Pick the right specialization and the same gear deals double damage; pick wrong and more investment yields half the result. Bookmark and cross-reference often.
Specialization: when each active skill reaches certain levels (8, 16, 20), it unlocks specialization slots, and you can choose from several optional effects to enhance that skill. Specialization options are numbered 1, 2, 3, 4, 5 in order.
Active Skill Specialization Recommendations
Skill | Specialization | Level Advice | Notes |
Crushing Blow (left-click) | Spec 3+4 (with 5: 3+4+5) | Max to 20 | High attack-speed triggers passives, resets Spinning Strike CD, core output skill |
Bursting Blow (right-click) | PvP: Spec 2+4 | Optional / skip | Healing builds can drag it to the bar; PvP can spec for block-triggered Fracturing |
Rushing Smash | Spec 3+4 | Stack to 12 | Dash triggers Fracturing Blow, CD only 10s, no need to charge and break tempo |
Impactful Crush | Trash 1+4 / Boss 3+4 | Usable at 1 | Mobile safe output, 15s CD略长, AoE damage not needed (refreshes Dark Crush) |
Dark Crush | Spec 3+4 (with 5: 3+4+5) | Max to 20 | Core #1! 5s CD ranged no-MP, lvl 16 breaks through to no-CD, delete CD and spam after 16 |
Gust Rampage | lvl 1 | lvl 1 | Use when Boss is Stunned to trigger Dark Crush and passives; healing builds don't main it |
Fracturing Blow | Spec 1+4 (or 3+5) | Max to 20 | Core #2! 10s CD guaranteed Multi-hit, strongest output skill; safer triggered with a dash |
Recuperation | Spec 1+3 | Max to 20 | Healing Chanter's foundation; lvl 16 doubles healing, single-heal baseline |
Tremor Crush | Spec 1+2 | lvl 1 or 12 | Movement + Stun gauge + triggers Dark Crush; 20s CD too long to main |
Wave Blow | lvl 1 | lvl 1 | PvE lvl 1 is enough; PvP can use Spec 3 for combo |
Spinning Strike | Spec 2+3 (with 5: 2+3+5) | Max to 20 | Core #3! Very high damage, field-farming main, transforms at 16 |
Passive Skill Priority
Priority | Skill | Effect | Notes |
1 (top) | Wind's Promise | Chance for extra damage on Critical | 加强后 far outclasses other attack passives, ~0.399% per level |
2 | Attack Preparation | Boosts own Attack and Defense | Direct number gain, ~0.17% per level |
3 | Impact Hit | Raises Impact-type hit and Smite | PvP-oriented, ~0.18% per level |
4 (next) | Inspiring Spell | Raises Critical, chance to CC on crit | ~0.05% per level, not worth chasing; accessory bonus levels acceptable |
Must-max | Protection Circle | Build stacks on hit for a shield | Must max; at 20 stacks gives a 10s shield, 7s without attacking clears |
Must-max | Blessing of Life | Increases Max HP and Healing Boost | Little early, more useful late; max at 45 |
Optional | Crossguard | Raises Block and block-HP-return | Worth it if you have the right-click; high value when stacking Crit and Block |
Optional | Raging Spell | Chance for extra damage on attack | Can trigger during trash Stun and Boss Stagger |
Level 16 Breakthrough Notes ★
Level 16 is the Chanter's golden breakthrough point; the following skills transform at level 16:
• Recuperation lvl 16: healing doubled, the baseline for single-target healing — reaching 16 lets you main-heal (below 2200 Combat Power)
• Dark Crush lvl 16: unlocks the key specialization (no CD), can be spammed infinitely
• Spinning Strike lvl 16: transforms into a high-damage main skill
• Crushing Blow lvl 16: Multi-hit bonus significantly boosts auto-attack DPS
Skill-Point Stage Advice
1. Prioritize pushing core skills to level 8 — 13 points for a three-choice specialization, best value
2. Level 16 is the golden breakthrough — Recuperation lvl 16 restores an extra 10% Max HP, Dark Crush lvl 16 unlocks the key specialization
3. At level 20 pick the 2-3 most core skills — points are tight; Dark Crush, Spinning Strike, Crushing Blow are top picks
4. Follow the order, not the numbers — global caps skills at 20; KR/TW can go higher; blindly copying high-level numbers hits a wall
4. Level 16 Breakthrough Priority
Level 16 is the threshold where the Chanter is reborn, and the section worth reading most carefully in this guide. Invest limited breakthrough resources where they cut hardest — far better value than blindly stacking levels.
When using gear or Arcana to push skill levels to 16 to unlock breakthrough specializations, the priority is as follows:
⚡ Skip-the-Grind Tip: farming breakthrough materials in dungeons is tedious. Buy materials straight off the Broker and push your core skills to the level-16 breakthrough in one shot — the time saved is enough for two extra Abyss runs. This is money best spent.
Priority | Skill | Reason |
1 | Recuperation | lvl 16 doubles healing, single-heal baseline |
2 | Gust Rampage | Big damage boost when Stigma points are sufficient |
3 | Dark Crush | Target-dummy burst DPS, lvl 16 no CD |
4 | Crushing Blow | Auto-attack DPS gain, sustained damage |
5 | Fracturing Blow | Abyss burst efficiency gain (defer if Dark Crush lvl 16 is enough) |
5. Stigma Setup
Stigmas are one of the Chanter's best-value growth lines — spend shards right and the gains are permanent; the earlier you plan, the more you save. The setup below is the "can't-lose" formula verified by countless veterans.
After the Stigma system unlocks, it takes 75 shards total to reach level 20, granting a permanent perk every 5 levels.
⚡ Skip-the-Grind Tip: shards drop stingily from dailies; a week of farming may not complete one Stigma. In a hurry to max Undefeated Mantra? Sweep shards straight off the Broker — a few dozen bucks saves a week of jail-time; max early, enjoy the permanent buff early.
Upgrade Order
5. Get 6 slotted before level 45, with 4 of them raised to level 5
6. Max Undefeated Mantra first (10 then 20) — the Chanter's most important Stigma!
7. Add Power of the Storm for party-oriented builds
8. Fill remaining slots by role: Sprint Mantra + Guardian Blessing or Healing Touch
Stigma Combo Recommendations
Stigma | Notes | Priority | Level Advice | |
Undefeated Mantra | Attack/Defense aura, the Chanter's name-card | Must | 10 then 20 | |
Recovery Mantra | Party sustain and group-wide healing | Recommended | Raise to 5~10 | |
Sprint Mantra | 10% Move Speed, positioning tool | Recommended | lvl 1 is enough | |
Word of Subjugation | 50 Stun gauge, burns Boss purple bar | Must for Conquest dungeons | lvl 1 | |
Power of the Storm | Bloodlust + party CD -20% | Replaces Word of Subjugation late | By Combat Power | |
Guardian Blessing | Big tankiness boost, huge HP | PvP / open-world optional | lvl 1 | |
Core Tip (KR guide): Power of the Storm's "CD -20%" cuts not only your own skill CDs but every party member's skill CD during the buff. Tested: Rushing Smash CD 13s → 10s. An S-tier party-contribution skill. | ||||
Combat Power Tier Stigma Combos
Combat Power | Recommended Stigma Combo | Core Notes |
~1700 (early) | Undefeated(5), Sprint(1), Recovery Mantra(1), Healing Touch(1) or Impeding Authority(1) | Can main-heal in this range |
1700~2200 (mid) | Word of Subjugation(1), Undefeated(10), Sprint(5), Recovery Mantra(5) | Can solo-heal after Recuperation lvl 16 |
2200~2500 (late) | Word of Subjugation(1), Undefeated(10), Sprint(10), Recovery Mantra(5) | Solo-heal in Dark Abyss / Subjugation; Conquest / Transcendence needs a paired healer |
2500~ (endgame) | Sprint / Undefeated + Power of the Storm + [Word of Subjugation or Recovery Mantra] | Gust Rampage lvl 16 spec makes Word-of-Subjugation chaining recommended |
Basic Rotation (PvE)
1. Open with Crushing Blow (left-click) → reset Spinning Strike CD
2. Follow up with Dark Crush (5s CD, ranged, no MP cost)
3. Fracturing Blow for the strongest Multi-hit (safer when triggered with a dash)
4. Spinning Strike as ranged main output (transforms at 16)
5. When Boss is Stunned: Gust Rampage + Dark Crush loop
Combo Chain
Impactful Crush / Fracturing Blow to build Stun gauge → Dark Crush 1st-2nd hit → Wave Blow → after Knockdown another round of Dark Crush → Dodge - Tremor Crush to build Stun again → another round of Dark Crush
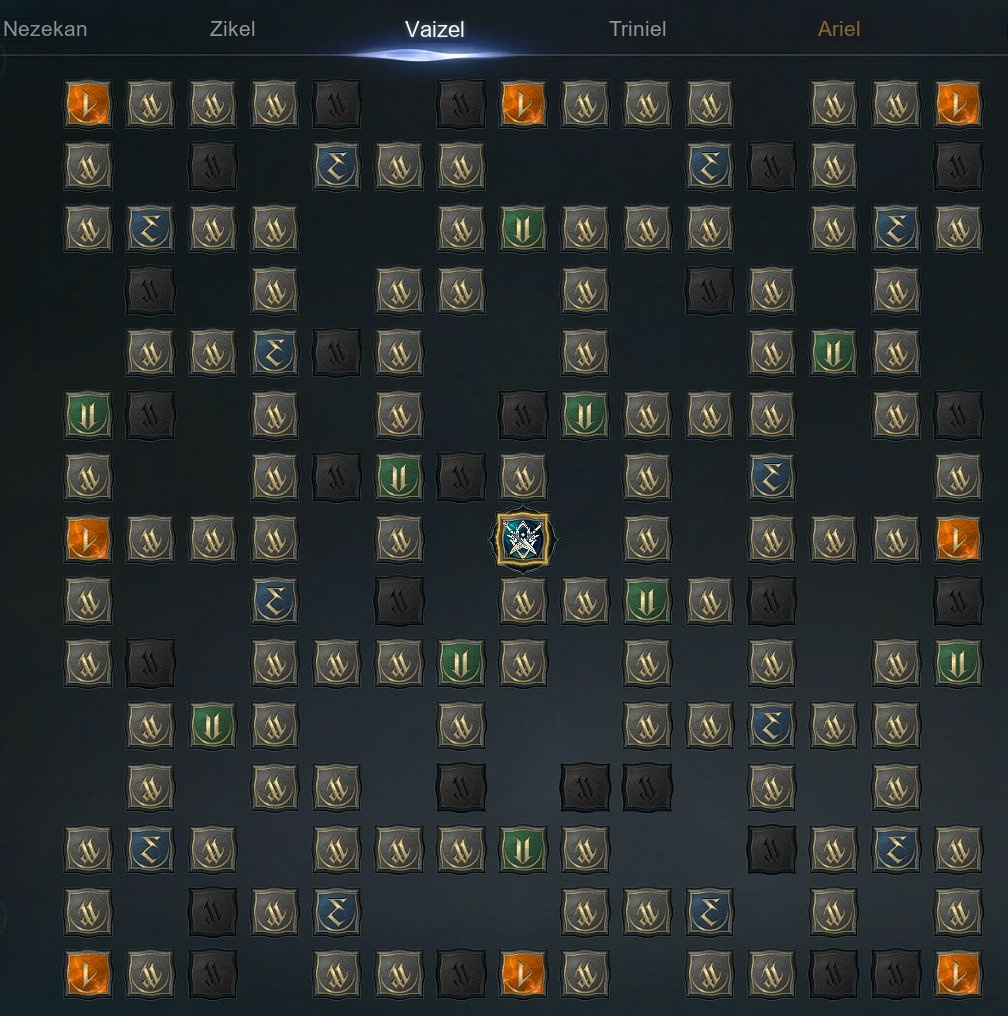
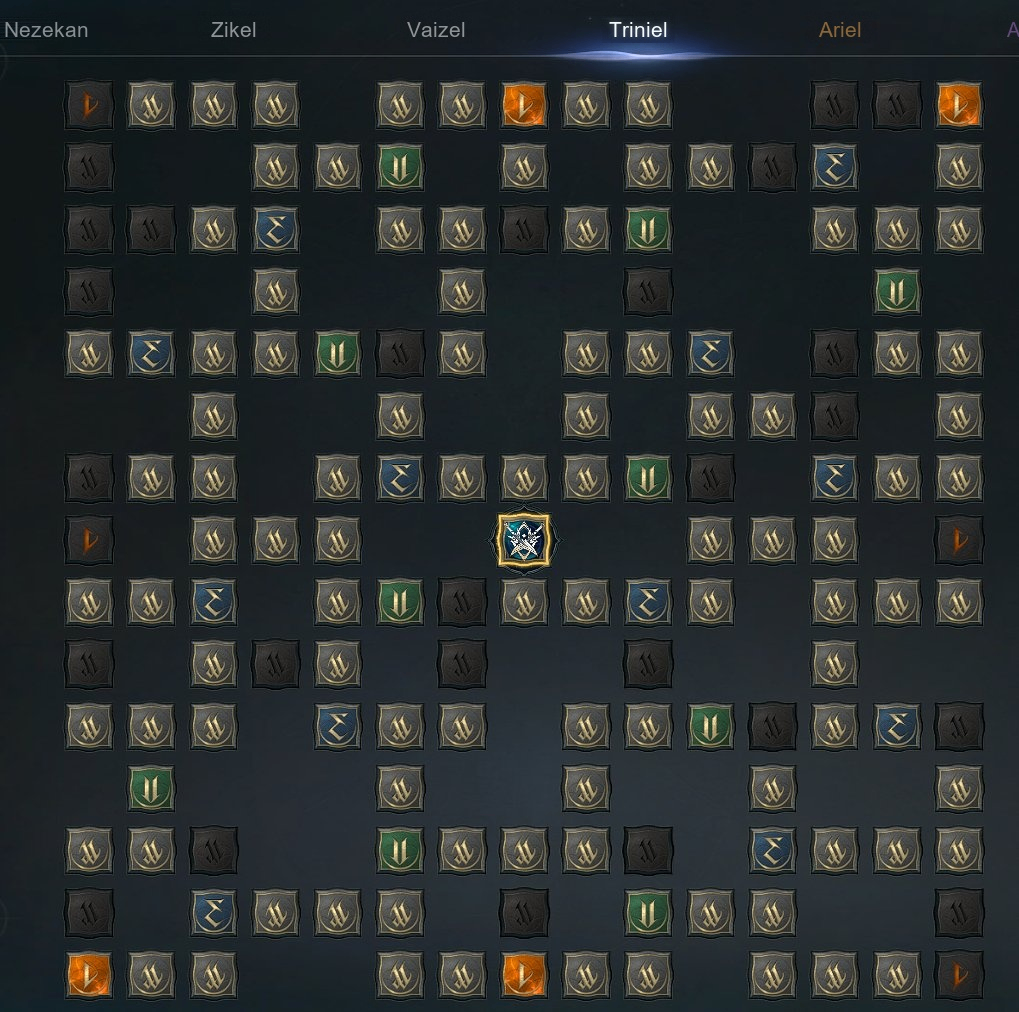
6. Daevanion System In Depth
Daevanion points are tangible combat power, and they cannot be reset — this section is worth reading three times. Route them right and every point invested turns into visible damage and survivability.
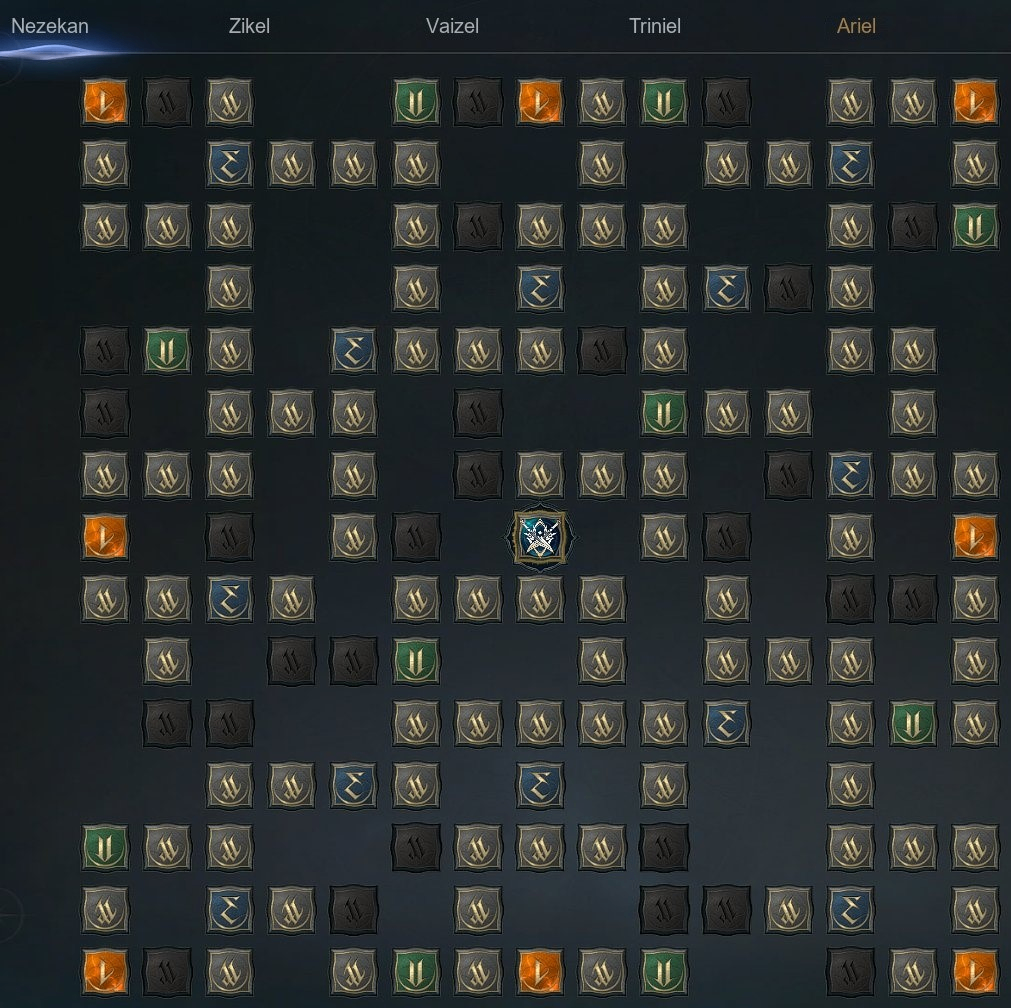
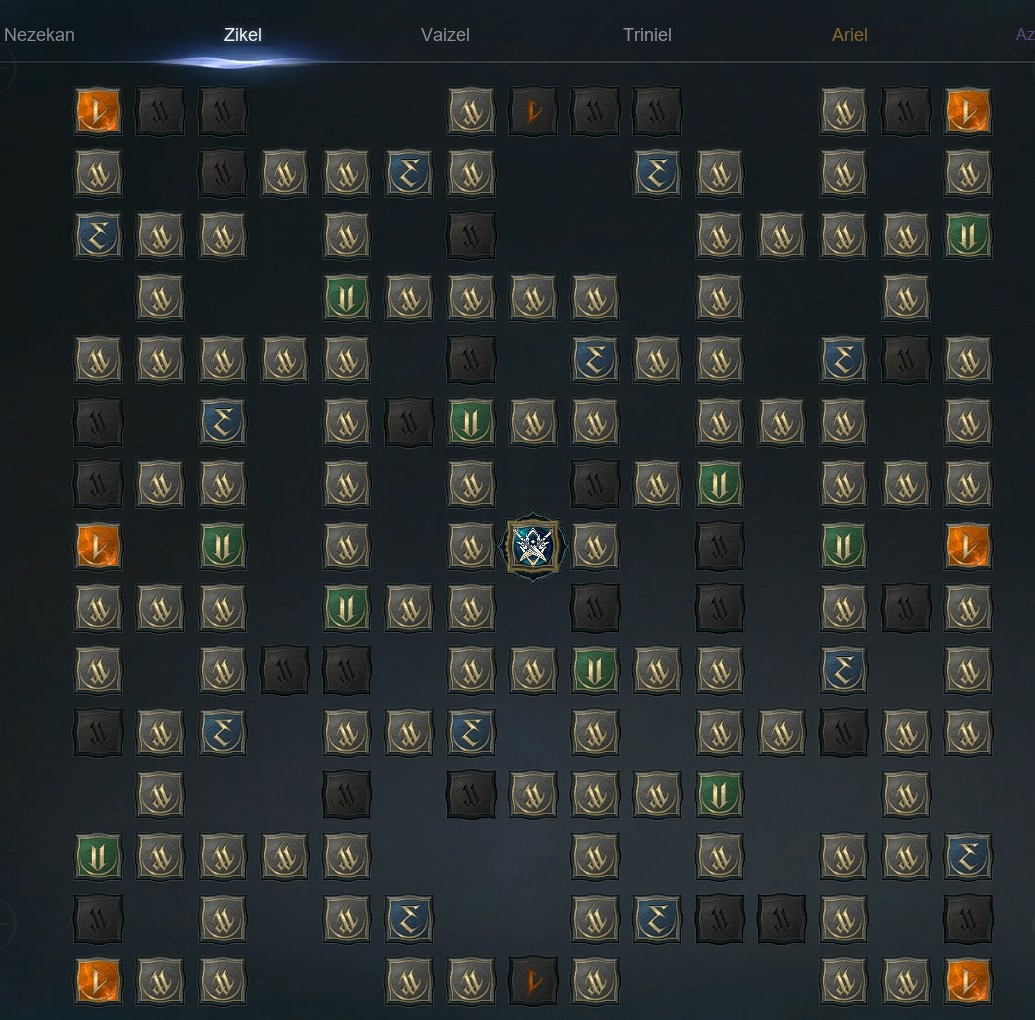
The Daevanion system works like a talent tree: spend Daevanion points to activate board nodes, permanently boosting character stats. Nodes by cost: white (1pt) / green (2pt) passive skills / blue (3pt) active skills / red (4pt) stat bonuses.
⚡ Skip-the-Grind Tip: Daevanion points are stingy from dailies, but you can buy them straight off the Broker — the best-value stat source in the entire game; spend a little and instantly max every node. Can't be bothered to plan a route? Just buy them out in this section's order; don't blind-pick and leave an irreversible point deficit.
Six Daevanion Boards
Order | Board | Unlock Level | Main Effects | Recommended Priority |
1 | Nezekan | Lvl 12 | Combat Speed up, skill cooldown down | ★★★★★ Top priority, Combat Speed is the hidden core |
2 | Zikel | Lvl 20 | Damage Boost up, Damage Tolerance up | ★★★★ Output builds complete ASAP |
3 | Vaizel | Lvl 30 | Critical Damage Boost up, Critical Damage Tolerance up | ★★★★ Crit builds must take |
4 | Triniel | Lvl 40 | Multi-hit chance up, Multi-hit Resist up | ★★★★★ Chanter core! Multi-hit is the output foundation |
5 | Ariel | Lvl 45 | PvE Damage Boost up, PvE Damage Tolerance up | ★★★★★ PvE must-max, needs dedicated Daevanion Crystal |
6 | Azphel | Lvl 45 | PvP Damage Boost up, PvP Damage Tolerance up | ★★★ PvP-oriented, needs dedicated Daevanion Crystal |
Daevanion Route Recommendations
Push Daevanion boards in the following order:
• Step 1: Nezekan → Combat Speed + Cooldown Reduction, mandatory for every Chanter build, complete first
• Step 2: Triniel → Multi-hit chance, the Chanter's output core mechanic; push ASAP after unlocking at 40
• Step 3: Zikel → Damage Boost, priority for output builds; support builds can defer
• Step 4: Vaizel → Critical Damage, pairs with crit-build gear
• Step 5: Ariel (PvE) / Azphel (PvP) → endgame boards, require dedicated Daevanion Crystals
Key principle: find your main skill's level nodes first, then patch in next-priority skills. If a skill's Daevanion route is too costly to reach, that itself becomes a reason to drop it (e.g. Bursting Blow sits poorly on the Daevanion board). |
Daevanion route images:
7. Playstyles
There's no strongest style, only the style that fits you best. Party core, solo master, or PvP frontline brawler — the Chanter can do them all.
The Chanter has three mainstream directions; choose by your fixed-party composition and main content.
Style 1: Mantra Support (Party-oriented)
Role: high-coverage buffs + backup healing, the "second core" of the party.
Core skills: Recovery Mantra, Undefeated Mantra, Healing Touch, Power of the Storm.
Playstyle: keep party Mantras up → use the AoE Regeneration Field for sustained healing → weave CC and melee clearing.
Stats: Intelligence (affects buff effects) > Willpower (MP regen + healing) > HP.
Fit for: group dungeons, Legion activities, fixed parties.
Stigma recommendations: Undefeated Mantra, Power of the Storm, Healing Touch.
Core logic: don't fish for HPS — drop Regeneration Field and let teammates cluster for AoE healing. This is the biggest operational difference between Chanter and Cleric.
Style 2: Output / Physical (Solo-oriented)
Role: play yourself as a half-DPS, support as a byproduct.
Core skills: Crushing Blow (left-click main output), Dark Crush (core #1), Spinning Strike, Impactful Crush.
Key points: Crushing Blow opens and refunds MP; Dark Crush follows for output; Spinning Strike is ranged and resets Dark Crush's CD.
Key technique: must weave auto-attacks (Weaving) — press left and right click simultaneously, one motion two damage instances. After the suppression-skill rework it fused the Gladiator's Weaving system; dropping the right-click = throwing away a damage instance.
Stats: Critical > Accuracy > Attack > HP.
Fit for: solo open-world, field farming, dailies.
Style 3: PvP Frontline Brawler
Role: control-oriented frontline, locking targets with CC chains.
Playstyle: stick to your tank → lock targets with Stun/Knockdown chains → AoE sustain and self-peel → protect the backline.
Core skills: Rushing Smash (gap-close), Assault Shock (3-4s Stun + DoT), Ensnaring Mark (bind 2.5s), Power of the Storm.
Must-have Stigmas: Undefeated Mantra (20% Damage Reduction + 10% Attack Speed, 15s), Power of the Storm, Healing Touch (instant 15% Max HP heal), Ensnaring Mark.
Stats: HP > PvP Defense > Critical > Physical Attack > Resistance.
Core principle: CC timing matters more than damage. Spend Multi-hit on the target that threatens your side most.
8. Gear & Stats
Gear is the foundation of stats and the most direct pay-to-win sector. Read this section and every Manastone and every enhancement lands where it lifts your feel most.
Stat Priority
Style | Priority |
Dungeon support | Healing Power > HP > MP regen > Defense > Physical Attack |
Output / solo | Critical > Accuracy > Attack > HP |
PvP | HP > PvP Defense > Critical > Physical Attack > Resistance |
Universal must-haves:
• Accuracy: bosses frequently block frontal attacks; Accuracy is mandatory, not optional
• Evasion: a key survival stat in PvE
Gear Direction
Weapons have two style directions:
• Support: Healing Boost + HP + Attack
• PvP: PvP Defense + HP + Critical + Attack
Armor: HP, Healing Efficiency, MP regen, Defense (PvP adds CC Resist)
Accessories: Healing Power, HP, Resistance, Attack
Manastones: Physical Attack + Critical main; for hard content swap to Evasion / Physical Defense for survival
⚡ Skip-the-Grind Tip: getting all 3 Manastone lines right is pure RNG; a month of rolling may not hit it. Tired of the RNG? Buy finished Manastones or rolling materials straight off the Broker — three minutes for a month's work; three lines early, graduate early, into dungeons early.
Key Details
9. Combat Speed is the hidden core! Weapon, arms, and gloves can roll "Combat Speed" and directly raise Weaving frequency
10. KR-server veterans have tested it stacking to 52% Combat Speed
11. Choose titles by stat needs; don't blindly stack gold titles (some titles beat them in specific builds)
9. MP Drain Solutions
Many players get stuck here! Below are tested, effective solutions:
Card Setup
• Recommended: 2+2 Magic Armor + 2 Pure Blood
2 Magic Armor cards → trigger Magic Armor 2-piece (auto-restores 1500 MP when MP < 20%)
2 Pure Blood cards → trigger Pure Blood 2-piece (+60 Attack when HP > 70%)
• Some ask "isn't Pure Blood 4-piece + 150 PvE Attack better?" — answer: with 150 Attack your MP runs dry and you lose the right-click; overall gain is actually lower
• Pure Blood and Magic Armor have different card passives: Magic Armor's Compass and Bell provide Damage and Critical, making up for part of the loss
Arcana Choice
• Illusion: cooldown-reduction + party-support line, provides 10-15% Cooldown Reduction
• Wisdom: raises Smite (double-damage) chance, suited for solo / personal-output players
⚡ Skip-the-Grind Tip: Arcana cards drop randomly; completing a Vitality / Magic set is pure RNG. Don't want to wait? Buy cards off the Broker or buy conversion materials and roll them yourself — money is cheaper than time; complete the set early, trigger the set effect early.
Pantheon Stats
• Illusion 51
• Wisdom 101
Above are the currently attainable peaks; check whether you've hit them.
⚡ Skip-the-Grind Tip: Pantheon statues and frames come mainly from events / gacha; they don't add to Gear Score but are real. Budget allowing, sweep them off the Broker; in a hurry, pull a few; F2P can hoard slowly but it can't be rushed
10. Macro Setup Tips
▎ A good macro presses three fewer keys and adds 20% output. This section is the best value of "least time for most feel" — a boon for the lazy, a lifesaver for the clumsy.
Advice
• Cut down on macro skill columns — putting two or more columns of skills in a macro reduces left/right-click and Dark Crush counts, dropping DPS
• Best attack rotation: Bursting Blow → Impactful Crush → Spinning → Dark Crush (sorted top to bottom)
• During Boss stagger: drop the left-click, only loop Gust Rampage + Dark Crush to boost DPS
Advanced
The following covers gear-affix refinement and collection elements that require heavy time or money investment
11. Best Gear Affix Combos
Affixes are the hidden battlefield where late-game gaps open up, and the real money sink. But don't fear — the table below is the optimal solution veterans paid real money to find; wash to it and skip the pitfalls.
Weapon Affix Priority
Weapon and arms are not recommended to roll skill affixes (unless you happen to roll a core skill and hit level 20); the output affixes below give more:
⚡ Skip-the-Grind Tip: affix rolling is a true money-pit, but it's where late-game gaps open. Don't want to trial-and-error? Buy / roll to the table here and skip half the detours; on a tight budget prioritize weapon and arms — the two highest-yield slots — and leave the rest for later.
1: Weapon / Arms Affixes
Slot | Recommended Affix Priority | Notes |
Weapon (Staff / Wand) | Combat Speed > Might > Weapon Damage Boost > Multi-hit hit > Attack | Multi-hit hit works for PvE/PvP; abnormal-status hit leans PvP |
Arms | Combat Speed > Might > Weapon Damage Boost > Multi-hit hit / Impact-type hit > Attack | Impact-type hit leans PvP |
Armor Affixes by Slot
2: Armor Affixes
Slot | Core Affix | Next-priority Affixes | Notes |
Head | Incoming Heal | Attack > Passive Skill x2 > Critical > Vitality | Incoming Heal raises how efficiently the Cleric heals you |
Chest | Damage Boost | Attack > Passive Skill > Critical > Accuracy | Some bosses have high Crit Resist; Crit isn't absolute core |
Shoulders | Critical Damage Boost | Attack > Passive Skill > Accuracy > Vitality | Core roll: Critical Damage Boost |
Legs | Damage Tolerance | Attack > Passive Skill > Critical > Vitality | Core roll: Damage Tolerance |
Gloves | Combat Speed | Attack > Passive Skill > Critical > Accuracy | Core roll: Attack Speed (Combat Speed) |
Boots | Move Speed | Attack > Passive Skill > Critical > Vitality | Move Speed raises positioning efficiency |
Blue gear with a special affix beats gold gear without one. Blue special affixes include: shoulders Critical Damage, gloves Combat Speed, pants Damage Tolerance, boots Move Speed.
Accessory Affixes
Accessories provide the unique "Knowledge" stat (abnormal-status hit rate), critically important in PvP:
3: Accessory Affixes
Slot | PvP Recommended | PvE Recommended |
Necklace | Knowledge > Attack > Passive Skill x2 | Attack > Passive Skill x3 > Critical |
Earrings | Knowledge > Attack > Passive Skill x2 | Attack > Passive Skill x3 > Critical |
Rings | Knowledge > Active Skill affix x3 > Attack | Active Skill affix x4 > Attack > Critical |
A fully-Knowledge pet + fully-Knowledge accessories give about 25 abnormal-status hit, crucial in high-level PvP.
Passive Skill Affix Priority
Gear affixes should prioritize those with these skill levels:
• Top priority: Blessing of Life, Protection Circle, Attack Preparation, Inspiring Spell, Impact Hit
• Second priority: Wind's Promise, Raging Spell
• Optional: Earth's Promise (lowers enemy Damage Tolerance), Survival Willpower (lifesaver when CC'd)
12. Collection Elements: Titles, Cosmetics, Pets, Wings
Titles, cosmetics, pets, wings seem like icing on the cake but actually hide solid stat bonuses. Treat them as part of progression and collect slowly; time will pay you back.
Title Recommendations
4: Title Recommendations
Title | How to Get | Notes |
Genesis | Needs heavy collection | One of the best-stat毕业 titles |
Ruler of All | Needs heavy collection | Excellent stats |
Oh My, Nothing to Wear | Collect 700 costumes | Ultimate goal for cosmetic mains |
Saint of Beleron | KR event / achievement | Solid all-around stats |
Title choice principle: go by stat needs, don't blindly stack gold titles. Some titles beat them in specific builds. If your damage is short, pick a title with an Attack bonus.
⚡ Skip-the-Grind Tip: titles go by stats not color, but some limited titles have strong stats. Short a title? Sweep it straight off the Broker; a few bucks fills the gap, far less hassle than grinding limited-time events — titles are one of the best-value patches.
Pet Recommendations
Pets come in 4 species; Chanter priority:
5: Pet Species Priority
Species | Priority | Provided Stats | Notes |
Intuition | Top priority | Critical, Wisdom, party Damage Boost | Chanter core stat source |
Metamorphosis | Second | Max HP, Status Resist | Boosts survival and CC resist |
Nature | Third | Willpower, Resistance | Healing / survival supplement |
Wildness | Optional | Accuracy, Attack Speed | PvP / output supplement |
Pet core affixes: party Damage Boost, Max HP, Attack/Defense aura, Status Resist, MP-star recovery
Pet raising strategy:
• Single-pick priority, raise each to 5 (1000 crystals each)
• Max out the species XP first
• Level 9 unlocks red affixes; prioritize locking Damage / Smite / Critical / Attack-Defense lines
• Slot 39 Smite affix recommended 2.0+
• Slot 6 Damage Tolerance affix recommended 2.0+
⚡ Skip-the-Grind Tip: full pet collection and max level give solid stats, but the raising cycle is long. In a hurry? Buy finished pets / buy crystals to max them straight off the Broker — 1000 crystals each, money is time; before level 9 affixes don't lock, just raise.
6: Wing Mechanics
Wings provide two effects: Equip effect (active when worn) and Possession effect (active just by owning, no need to wear). Currently 26 wings with stats, split into green (4·HP), blue (6·Defense)...
Key: yellow wings' Possession effect is needed by all players — i.e. "every wing must be maxed".
⚡ Skip-the-Grind Tip: yellow wings' Possession effect is mandatory for everyone, but good wings come from draws / events. Budget allowing, buy best-in-slot wings straight off the Broker; F2P can wait for free events — but can you afford to wait? Buy early, enjoy the party-wide stat bonus early.
Priority | Wing | Enhanced Stat | +10 Max Value | Value to Chanter |
1 | Nightmare Wings | Smite | +2% | Core output stat; directly raises Multi-hit damage |
2 | Tiamar's Citadel Wings | Damage Boost | +2% | Global multiplicative damage |
3 | Blue Lightning Wings | Weapon Damage Boost | +2% | Core boost to Chanter melee weapon damage |
4 | Fighter Wings | Weapon Damage Boost | +2% | Same as above, stackable |
5 | Wings of Fallen Redemption | Front Damage Boost | +2% | Chanter’s front-line damage output benefits greatly |
6 | Forest Spirit Wings | PvE Damage Boost | +3% | PvE multiplicative damage |
7 | Blue Wave Wings | PvE Damage Boost | +3% | Same as above |
8 | Phantasmal Echo Wings | Max Attack | +40 | Attack cap raised |
9 | Void Tarsla Wings | Bonus Attack | +30 | Flat Attack bonus |
10 | Top-grade Daeva Wings | Bonus Attack | +30 | Same as above |
11~14 | Splendid Love / Dark Curtain / Ancient Orom / Archdaeva | PvE Attack | +40 | PvE-only Attack |
15~17 | Blue Butterfly / Chrome / Splendid Gold Pattern | Critical | +50 | Crit triggers Multi-hit and passives |
18~19 | Spring Flower Butterfly / Anatta | Bonus Accuracy | +50 | Bosses block a lot; Accuracy is mandatory |
20 | Black Shard Wings | Penetration | +300 | Defense penetration |
23 | Glory Wings | Incoming Heal | +3% | Support-oriented: improves healing efficiency |
13. Pay-to-Win Summary
A hard truth: the Chanter is a class that gets "better the more you spend," but smart spending always beats blind spending. Put the budget into the high-return sectors this guide flags and every buck makes a sound.
Main spending sinks: the cosmetics and pet-collection stat bonuses above. No time? Boosting and the Broker for gear/items are pay-to-win with no ceiling. Above 500K Combat Power, each 1K runs about tens to 100 RMB.
⚡ Skip-the-Grind Tip: no time to grind? Boosting + Broker finished gear / items settles it — the most direct time = money exchange. Above 500K Combat Power each 1K is about tens to 100 RMB, clearly priced; buying progress is more honest than buying cosmetics.
Cosmetic advice: money's no object, go for looks!
Spending Tier Reference:
l F2P / Low spender: rely on main + side quests + Seal dungeons + Transcendence dungeons, push core skills to 16, Daevanion to skill nodes, gear affixes to usable — fully clears most PvE, PvP...
l Mid spender: Daevanion points maxed + gear +15 + Manastone 3 lines maxed — these are the best-value Combat Power gains; money on the cutting edge.
l Whale: all of the above + Arcana rerolled to a perfect skill spread + gear affixes all red + full pet collection + wing wardrobe completed — damage visibly climbs, though some systems...
Two reminders:
Pay-to-win damage really does climb fast — especially in gear enhancement, Daevanion points, Manastones; the gap is a tangible numbers gap, not a "feels stronger". In PvP whales suppress F2P players noticeably.
⚡ Skip-the-Grind Tip: skip-the-grind summary — the Chanter's three best-heard-money items: Daevanion points maxed, gear +15, Manastone 3 lines; next, Stigma shards, Arcana cards, pet crystals — if the Broker can solve it, don't grind. Time is money; if a little money trades for a lot of time, don't skimp.
But pay-to-win isn't everything — operation, rotation, positioning are hard skills money can't buy. Ranger stands far, Assassin hits front, Chanter swaps styles fluidly; even maxed spending won't deal damage without them. Master the mechanics first, then consider spending to amplify the effect.
AION 2's progression system is many and complex; pay-to-win's positive feedback is strong, and pay-to-win damage really can climb fast. But ordinary players needn't worry — taking it slow is also fun, especially the PvP content (Abyss, Arena, etc.).
This compendium is based on the Season 1 version, and specific values may change with future updates. Players looking to speed up progression can also buy Aion 2 Boosting for a smoother start. Please refer to the in-game values for the latest details.