Weekend Drop -














Summary:
Building your first trampler in SAND: Raiders of Sophie is one of the biggest milestones in the game. This guide covers the best solo and team trampler blueprints, explaining how to protect your reactor, maximize firepower, SAND: Raiders of Sophie Crown, and build efficient vehicles that can survive dangerous expeditions.
Step 1: Understand Why Your First Trampler Matters
In SAND: Raiders of Sophie, your trampler is much more than transportation. It serves as your mobile base, storage system, crafting station, and primary combat vehicle. A well-designed trampler can mean the difference between returning with valuable loot or losing everything during an expedition.
However, creating a powerful trampler isn't cheap. Every component must first be unlocked through the technology tree, requiring a significant investment of resources and money. New players often struggle because they want to build advanced designs immediately without having access to the necessary blueprints.
Fortunately, you don't need every upgrade to build an effective trampler. Starting with a practical foundation allows you to earn more resources, unlock additional technologies, and continuously improve your vehicle over time.
Step 2: Prioritize Reactor Protection Above Everything Else
No matter which blueprint you choose, the reactor should always be your highest priority.
The reactor powers your entire trampler, making it one of the most valuable and vulnerable components. Experienced players frequently target exposed reactors during combat because destroying it can quickly disable an enemy vehicle.
Several design principles help improve reactor survivability:
Position it near the center of the chassis.
Surround it with structural pieces whenever possible.
Add stairs or ladders above it to absorb incoming damage.
Place high-health rooms nearby as additional protection.
Avoid exposing the reactor roof whenever possible.
Thinking of your reactor as the "heart" of your trampler helps guide nearly every building decision.
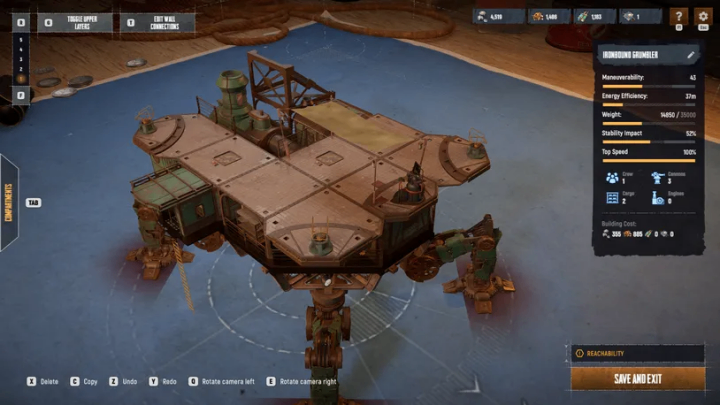
Step 3: Ironbound – One of the Best Solo Trampler Builds
The Ironbound is one of the strongest beginner-friendly solo designs.
This blueprint uses the 4x3 Middling Chassis, giving the trampler a narrow front and extended body. This layout allows efficient placement of important components while maintaining good maneuverability.
Key features include:
Long framed reactor positioned through the center
Wheelhouse facing forward
Two forward-facing cannons
Rear defensive weapon
Framed cargo compartments
Captain's room beside the reactor
Optional armaments workshop
The biggest strength of this build is its balanced layout.
Since most engagements happen while driving toward enemies, having two forward cannons provides excellent offensive capability. Meanwhile, the rear weapon offers emergency defense if enemies approach from behind or while retreating.
The optional armaments workshop also provides excellent protection because of its high durability. Even if you rarely craft while traveling, the room functions as additional armor shielding the reactor.
Players who have progressed further into the technology tree should also consider installing a battering ram on the front. A successful collision can sometimes deal devastating damage while allowing you to conserve ammunition.
Step 4: Sleepy – A Longer Solo Build for Defensive Players
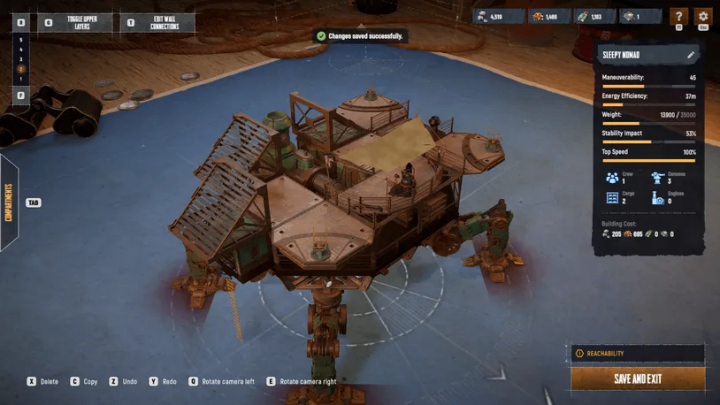
The Sleepy blueprint takes a different approach to solo survival.
Instead of using the 4x3 chassis, it utilizes the 3x4 Middling Chassis, creating a longer overall vehicle.
Unlike Ironbound, Sleepy focuses more heavily on defense and reactor protection than raw firepower.
Its layout includes:
Long framed reactor running through the center
Central captain's room
Elevated wheelhouse
Multiple stairs surrounding the reactor
Corner-mounted cannons
Two framed cargo rooms
Optional armaments workshop
One unique aspect of this blueprint is its heavy use of stairs.
Although stairs have relatively low health individually, they create multiple layers of protection. Enemy shells often destroy these inexpensive structures first, reducing the chance of direct hits against critical systems.
The wheelhouse sits on the second level, providing better visibility while keeping important controls farther away from incoming attacks.
Corner-mounted weapons also increase firing coverage, allowing players to engage opponents from multiple directions without constantly repositioning the entire trampler.
Step 5: Build Around Your Preferred Combat Style
Not every player enjoys direct combat.
Some players prefer aggressive encounters, while others simply want to collect resources and avoid unnecessary fights.
Fortunately, both Ironbound and Sleepy can be modified accordingly.
Aggressive players should consider:
Additional forward cannons
Battering ram
Heavy armor upgrades
Reinforced compartments
Exploration-focused players may instead prioritize:
Larger cargo capacity
Additional stair protection
Improved maneuverability
Extra repair supplies
Since every expedition is different, don't be afraid to customize blueprints rather than copying them exactly.
Step 6: Ironbound Team Version – Expanding for Multiplayer
Once you begin playing with friends, the original Ironbound blueprint can easily be adapted into a team vehicle.
The biggest modification is replacing the front lower compartments with a crew cabin.
Smaller groups can install a two-person crew compartment, while larger squads should use the four-person L-shaped crew cabin.
Unlike the solo version, every crew member should have access to a weapon whenever possible.
A typical team composition might include:
Driver
Two or three dedicated gunners
One repair specialist
Having a player constantly repairing damaged components during combat dramatically increases survival chances in prolonged battles.
Because multiplayer fights often involve heavily armed enemy teams, investing in stronger armor becomes much more valuable than it is during solo play.
Additional reactor protection, reinforced compartments, and a battering ram can significantly improve overall durability.
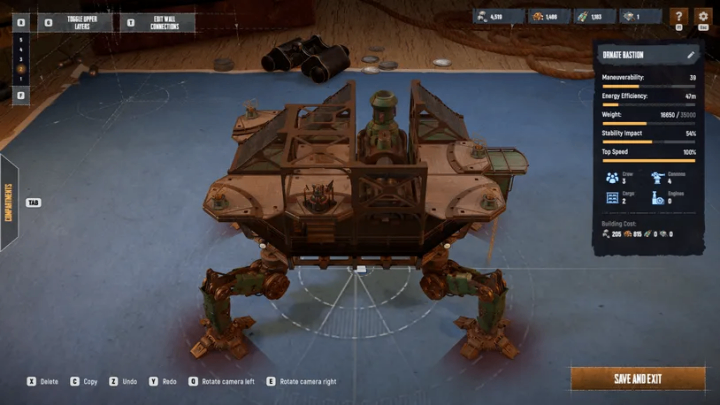
Step 7: Bastion – The Ultimate Team Trampler
For players regularly traveling with full squads, the Bastion blueprint is one of the strongest available options.
Like Ironbound, it begins with the 4x3 Middling Chassis paired with a framed long reactor.
However, Bastion focuses much more heavily on maximizing crew efficiency.
The design includes:
Four-player crew compartment
Captain's station
Long central reactor
Elevated defensive positions
Multiple second-floor guns
Ladder protection over the reactor
Optional armored compartments
One advantage of Bastion is its flexibility.
If your group only has two or three players, you can replace the four-person cabin with a smaller crew compartment and use the freed space for additional storage or armor.
Weapon placement also allows overlapping fields of fire, making it easier for teammates to defend multiple directions during intense encounters.
Step 8: Upgrade Your Trampler as Resources Increase
Your first blueprint should never be considered your final design.
As you gather better materials and unlock more technologies, gradually improve every major system.
Priority upgrades include:
Heavy armor pieces
Improved reactors
Better weapons
Stronger cargo compartments
Reinforced wheelhouses
Advanced crew cabins
Improved crafting stations
Making incremental upgrades is usually far more efficient than attempting to rebuild your entire trampler after every expedition.
Each successful run should move your vehicle one step closer to becoming a fully optimized machine.
Step 9: General Building Tips for Every Player
Regardless of which blueprint you choose, several universal principles can improve nearly every trampler.
Keep your center of mass balanced to improve handling.
Protect important systems with inexpensive structural pieces whenever possible.
Place weapons where they'll have the widest firing angles instead of simply filling every available slot.
Leave enough room for crew movement during repairs.
Always carry enough crafting materials for emergency ammunition and healing supplies during longer expeditions.
Finally, remember that no blueprint is perfect. Every battle teaches valuable lessons that can help refine your design.
Final Thoughts
Building an effective trampler in SAND: Raiders of Sophie takes patience, planning, and continuous upgrades. Whether you're playing solo with the reliable Ironbound, preferring the defensive Sleepy, adapting Ironbound for multiplayer, or commanding a full squad with the Bastion, SAND: Raiders of Sophie Crown for sale, each blueprint provides a strong foundation for survival.
As you unlock new technologies and gather better resources, don't hesitate to customize these layouts to match your own playstyle. The best trampler isn't simply the most expensive one—it's the one that keeps your crew alive, protects your reactor, and consistently brings valuable loot safely back home.