Weekend Drop -













Summary
Choosing the right DPS set in The Elder Scrolls Online is essential for maximizing damage in PvE content. However, the strongest set on paper is not automatically the best choice for every build. Some sets excel at sustained single-target damage, while others become stronger against groups, stationary targets, or when you can manage specific resources.
This ESO DPS Sets Tier List ranks the recommended sets into S-Tier, A-Tier, and B-Tier categories and explains when to use each one. To optimize your build quickly, buy The Elder Scrolls Online Items and secure the top-tier sets you need.
S-Tier ESO DPS Sets
S-Tier sets offer the strongest overall damage potential and are excellent starting points for players looking to optimize a serious PvE DPS build.
S-Tier: Slivers of the Null Arka
Slivers of the Null Arka is one of the strongest DPS options in the current list.
This trial set generates crystals when you deal Critical Damage and launches them at your target for significant burst damage. Because its effect works well with different types of DPS builds, it can be used by both Magicka- and Stamina-based characters.
Best for: General PvE DPS, burst damage, Magicka builds, and Stamina builds.
S-Tier: Ansuul's Torment
Ansuul's Torment is another highly versatile PvE DPS set.
It increases your damage against monsters, and interrupting enemies during combat provides an additional damage increase. This makes it particularly effective when you can consistently take advantage of interrupt mechanics.
Its combination of reliable damage and an extra reward for active combat makes it a strong choice for a wide range of group content.
Best for: General PvE, group content, and encounters where interrupts are frequent.
S-Tier: Coral Riptide
Coral Riptide increases Weapon and Spell Damage based on your missing Stamina.
The set can provide excellent damage, but its performance depends on resource management. To get the most from Coral Riptide, you need to deliberately manage your Stamina instead of allowing your resources to fluctuate without control.
Best for: Experienced PvE players and builds capable of managing Stamina effectively.
A-Tier ESO DPS Sets
A-Tier sets remain extremely powerful but are more dependent on build type, encounter mechanics, or positioning.
A-Tier: Berserking Warrior
Berserking Warrior, also known as Advancing Yokeda, has remained a dependable DPS option for years.
It increases Critical Chance when you deal Martial melee Critical Damage, making it particularly effective for melee-focused builds. Both Magicka and Stamina characters can use it successfully.
Because Berserking Warrior is a Heavy set, using its weapons and jewelry is generally more practical for DPS setups than relying on the full armor configuration.
Best for: Melee DPS and Critical Chance-focused builds.
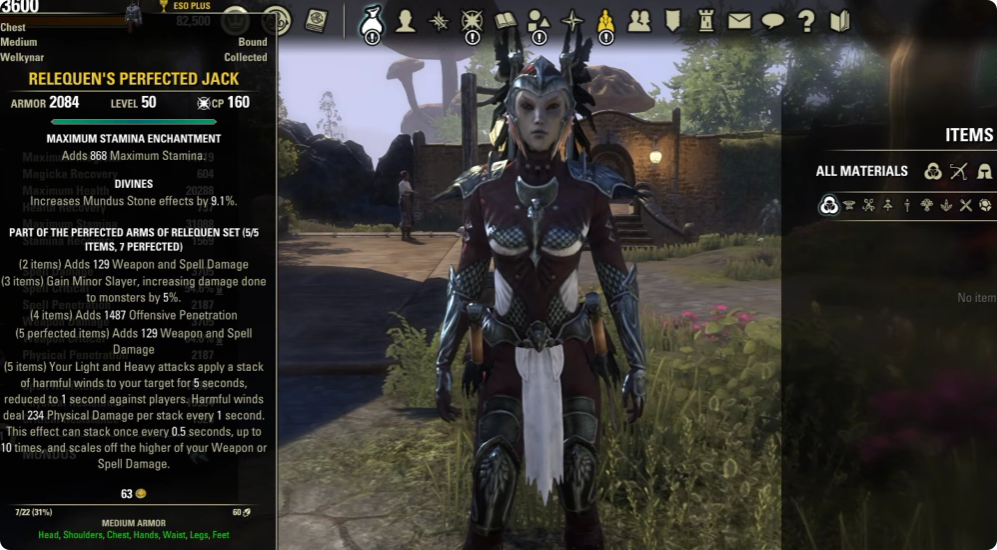
A-Tier: Arms of Relequen
Arms of Relequen was once considered the premier DPS set in ESO, and it remains a strong option despite no longer being the clear number-one choice.
The trial set applies harmful winds to your target, providing significant damage over time. This makes it particularly useful when you can maintain consistent pressure against a target.
You can obtain the set through the Cloudrest trial in Summerset.
Best for: Sustained single-target DPS and players who can maintain consistent attacks.
A-Tier: Sul-Xan's Torment
Sul-Xan's Torment is particularly effective against groups of enemies.
When an enemy dies, it leaves behind a Vengeful Soul. Collecting the soul increases your Critical Chance and Critical Damage, allowing the set to become increasingly valuable as you defeat enemies.
This mechanic makes it especially attractive for harder content involving multiple targets.
Best for: Multi-target encounters and group-heavy PvE content.
B-Tier ESO DPS Sets
B-Tier does not mean these sets are weak. Instead, these options are more specialized and can become excellent when their mechanics match the encounter.
B-Tier: Ice Shouter
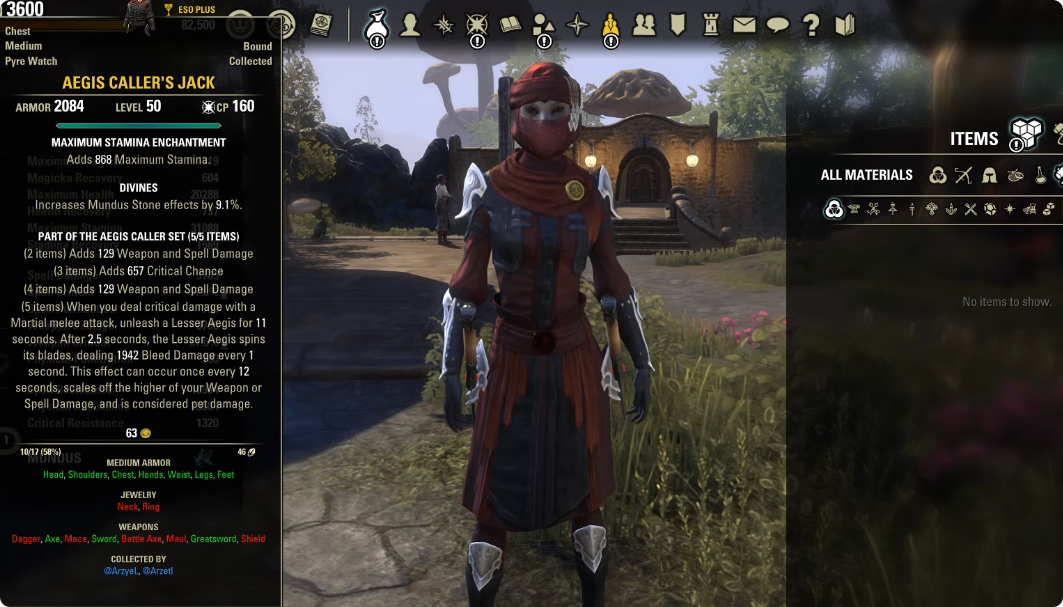
Ice Shouter is a dungeon set designed around Martial melee Critical Damage.
When its condition is met, it summons a Lesser Aegis that deals Bleed Area-of-Effect damage. However, the Aegis remains relatively static, so enemies need to stay within its effective area for the set to reach its potential.
Use Ice Shouter against tougher, less mobile enemies.
Best for: Melee builds and stationary or slow-moving targets.
B-Tier: Pillar of Nirn
Pillar of Nirn is another dungeon set that provides Bleed Area-of-Effect damage over time.
Its major advantage is flexibility. Unlike Ice Shouter, it can trigger from any attack, making it suitable for both melee and ranged builds.
This broader activation condition makes Pillar of Nirn a particularly useful option when you do not want your DPS setup restricted to Martial melee attacks.
Best for: Melee and ranged DPS builds that can consistently trigger its effect.
B-Tier: Highland Sentinel
Highland Sentinel provides strong Critical Chance, but it requires you to remain stationary.
Standing still generates stacks of Sentinel's Eye, increasing your Critical Chance up to three stacks. This can produce excellent results when you can maintain your position for extended periods.
However, movement-heavy encounters reduce its effectiveness considerably.
Best for: Parses, target dummies, and stationary enemies.
B-Tier: Wall of the Depths
Wall of the Depths is a trial set focused on Frost damage.
Its effect deals substantial Frost Damage when you deal damage with a Light Attack. This gives it broad DPS potential, while its Frost specialization makes it especially appealing for Magicka and Frost-focused builds.
Best for: Magicka DPS and Frost damage setups.
How to Use the ESO DPS Tier List
A tier list should be treated as a starting point rather than an absolute ranking for every encounter.
Choose Sets Based on Your Playstyle
Start by identifying how your character deals damage.
For a general-purpose setup, S-Tier options such as Slivers of the Null Arka and Ansuul's Torment provide strong choices. Coral Riptide is more attractive if you are comfortable managing your Stamina.
For melee builds, Berserking Warrior can provide valuable Critical Chance. If you prefer a flexible attack setup that works for both melee and ranged characters, Pillar of Nirn is a useful alternative.
Match the Set to the Encounter
The encounter itself can change the value of a set.
Use Sul-Xan's Torment when enemies are frequently defeated and you can collect Vengeful Souls. Choose Highland Sentinel when you can remain stationary. Ice Shouter becomes more effective when enemies stay inside its static Bleed Area of Effect.
For Frost-focused builds, Wall of the Depths can fit naturally into your damage strategy.
Combine DPS Sets for Better Results
You do not necessarily need to build around a single set. Combining two complementary sets can produce a stronger overall DPS setup.
Look for combinations that reinforce the same strengths. A Critical-focused set can complement another source of consistent damage, while a specialized set can be paired with a more flexible option to reduce its weaknesses.
You can also use crafted options such as Order's Wrath when building a flexible DPS configuration.
The important thing is to evaluate the complete combination rather than choosing two sets simply because they individually rank highly.
Final
The best ESO DPS set ultimately depends on your build, resource management, positioning, and target behavior. Start with the S-Tier options when you want broadly powerful choices, then consider A- and B-Tier sets when their mechanics better match your build or encounter.
By matching your gear to your playstyle and the content you are actually running, you can create a more consistent DPS setup instead of relying on a tier ranking alone. To make those adjustments easier, The Elder Scrolls Online Items can help you acquire the specific sets and pieces you need to tailor your build.