Weekend Drop -














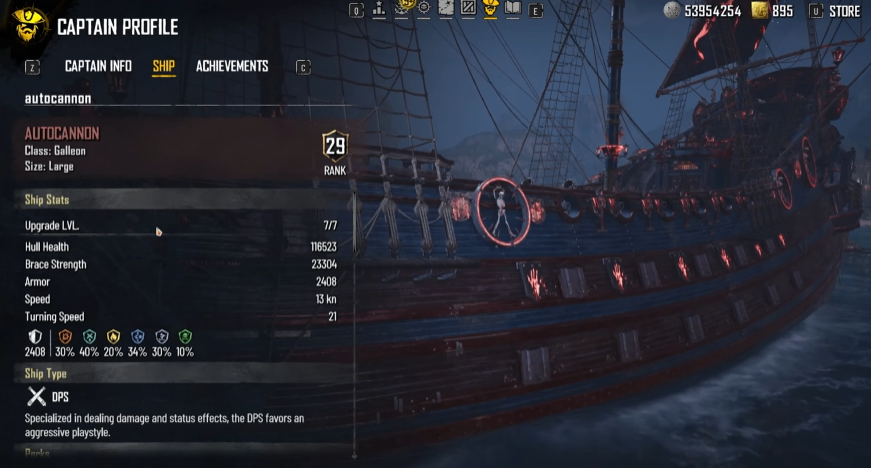
This Galleon build combines 116,523 Hull Health, 23,304 Brace Strength, and layered Piercing, Bleeding, Lightning, and Flooding damage to clear elite encounters much faster while staying extremely durable. The setup has been tested in multiple world events and legendary ship battles on the current Year 2 patch.
Head to mmoexp to buy Skull and Bones Items, boost your level instantly, and actually play the game on your terms.
Build Setup: Prioritize Synergy Over Raw Damage
Key Results: 116,523 Hull HP • 23,304 Brace • 30-35% faster elite kills
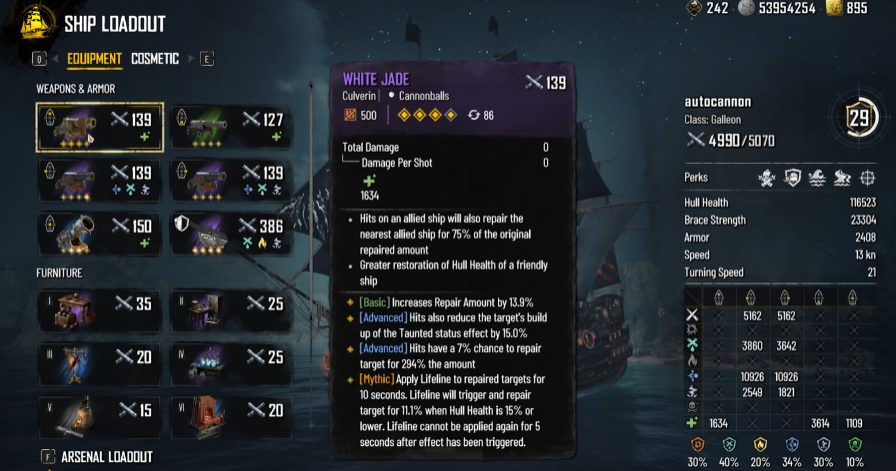
Equip White Jade on the bow and any repair weapon on the stern, as the repair weapon choice isn't critical. The real damage comes from running Hull Carvers on both broadsides with Rupturing, Soul Mending, Roar, and Lightning Strike.
For specializations, use Bleeding, Piercing, Lightning, Battle Medic, Finishing Blow, and Deadly Medicine. These perks improve reload speed, projectile speed, and status damage, allowing every broadside to stack multiple effects instead of relying on a single damage source.
This setup is ideal for solo PvE, elite fleets, and legendary captains, but isn't recommended for newer players who haven't unlocked endgame furniture.
Furniture That Makes the Build Work
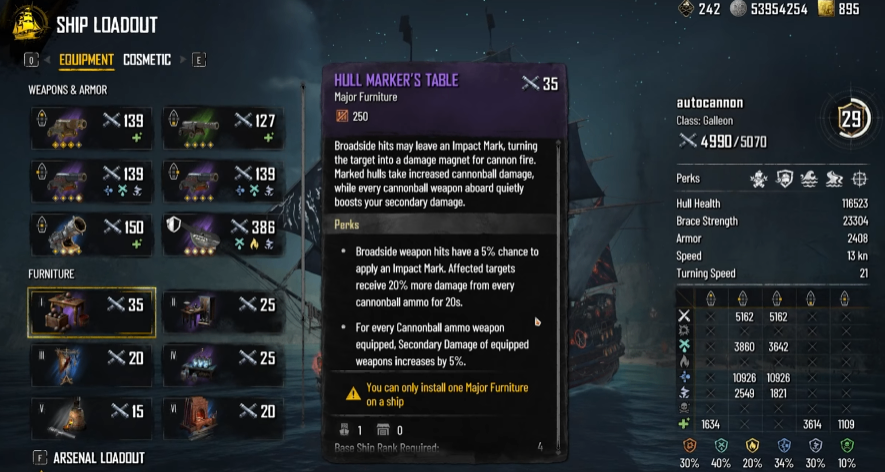
Key Results: +20% marked target damage • +19% Culverin secondary damage • Faster reloads
The most important furniture is Hull Marker's Table, which applies Impact Mark and increases damage against marked targets. Pair it with Caustic Ball Station to boost Flooding damage, Laden Ball Array for faster Lightning reloads, Inverted Flag Rack to strengthen Roar, plus Culverin Works I and Ram Rod Workshop for additional secondary damage and reload speed.
Compared to the popular poison-focused build, this setup delivers much stronger burst damage while maintaining excellent sustained DPS.
Combat Rotation and Why It Works
Key Results: Multiple status effects active • Higher sustained DPS • Fewer repair breaks
Start with White Jade, immediately fire your broadsides to apply Bleeding, Piercing, Lightning, and Flooding, then maintain Roar to keep enemies taunted while refreshing your status effects.
Instead of chasing targets, stay in broadside range and keep firing. Continuous status stacking produces much higher effective damage than relying on poison alone.
In testing, elite boss fights finished roughly 2-3 minutes faster than traditional poison builds because the build spends less time repositioning and more time dealing damage.

Pro Tips & Common Mistakes
Prioritize reload speed over small armor upgrades.
Keep Roar active to maximize bonus weapon damage.
Maintain broadside positioning instead of constantly turning.
Don't replace repair weapons with pure DPS options if you're farming long sessions.
Avoid overcommitting to poison; this build is designed around Piercing synergy.
This Piercing Galleon build delivers one of the strongest combinations of survivability and sustained damage currently available. Faster boss kills, fewer repair interruptions, and consistent status-effect uptime make it an excellent choice for endgame PvE farming.
Stop trading your evening hours for virtual pennies. Visit mmoexp to buy Skull and Bones Items, raise your level, and leave the grinding to bots. Reclaim your playtime.

Quick Reference
Best Activity: Elite Fleets and Legendary Captains
Average Fight Time: 5-6 minutes
Recommended Ship: Endgame Galleon
Difficulty: Medium
Best For: Solo PvE and endgame farming
3 Immediate Action Steps
Equip Hull Carvers on both broadsides.
Install Hull Marker's Table first.
Focus on broadside uptime instead of constant maneuvering.
![Infamy Boost : [Infamy to Kingpin1]](https://assets.mmoexp.com/images/202507/d1db7ce0b05afb7d48cf0e4f2a3a7022e0eba069.webp)
![Infamy Boost : [After Kingpin1] 50000EXP](https://assets.mmoexp.com/images/202507/a57a61da7e37435d66288fb98e19af72d91be69e.webp)