
Sunder Charms can completely change how a Diablo 2 Resurrected build handles some of the game's toughest enemies, making them one of the most valuable targets for Season 15 adventurers. But where do these powerful charms come from, which areas offer the best farming opportunities, and how can you prepare your character for efficient runs? This guide breaks down the core farming process, the importance of Terror Zones, and the strategies that can help you spend less time searching and more time collecting valuable loot. To strengthen your character even faster, buy D2R Items at Mmoexp to level up your game and prepare for tougher challenges ahead.

Why Sunder Charms Are So Valuable in Season 15
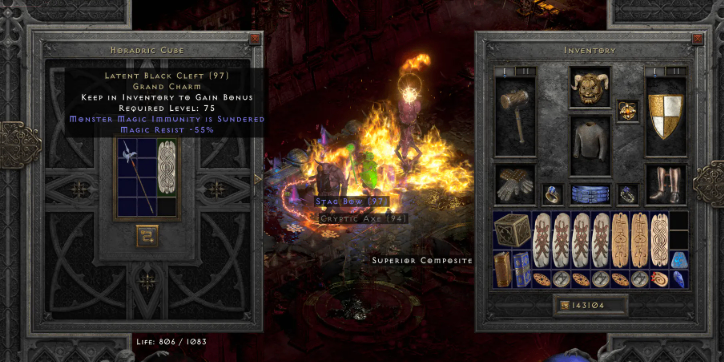
Sunder Charms are powerful unique Grand Charms that can reduce or remove an enemy's immunity to a particular damage type. This makes them especially important for elemental and specialized builds that might otherwise struggle against certain monsters.
The available Sunder Charms correspond to different damage types, including fire, cold, lightning, poison, physical, and magic. Their value comes from opening more areas of the game to builds that previously needed to avoid specific immune enemies or depend heavily on teammates.
However, using a Sunder Charm is not always a completely free advantage. Players should understand the potential drawbacks associated with each charm and adjust their resistances, equipment, and overall build accordingly.
Key Takeaway: Sunder Charms can dramatically expand a build's farming potential, but proper preparation is essential to maximize their benefits.
Where to Farm Sunder Charms: Terror Zones Are the Main Target
The key to farming Sunder Charms is understanding Terror Zones. These rotating areas can feature stronger monsters and higher-level loot opportunities, making them an essential destination for players searching for valuable seasonal drops.
Before beginning a farming session, check which area is currently affected and decide whether your build can clear it efficiently. The “best” Terror Zone is not always the one with the most difficult monsters. A zone that your character can complete quickly and safely may provide better results over a long session than an area where every encounter slows you down.
Fast movement, strong area-of-effect damage, and reliable survivability are all valuable when running Terror Zones repeatedly.
Key Takeaway: Efficient, repeatable Terror Zone runs are more important than chasing the most difficult area possible.
Build Around Speed, Safety, and Consistency
A powerful farming character does not need to defeat every enemy in a single attack. Consistency matters more. If your character frequently dies, runs out of resources, or struggles against certain monster types, your overall farming efficiency will suffer.
Focus on improving mobility and survivability alongside damage output. Faster movement allows you to locate and defeat more enemies, while stronger defenses reduce downtime caused by deaths. Players should also consider how a potential Sunder Charm will affect their existing build before committing to a specific setup.
For example, a charm that helps solve an immunity problem may also require additional planning around resistances or other defensive weaknesses. The goal is to create a balanced character rather than simply maximizing one damage number.
Key Takeaway: The strongest farming build is often the one that can clear content quickly, safely, and repeatedly.
Understand the Different Types of Sunder Charms
Different Sunder Charms are designed for different damage types, so the ideal drop depends heavily on your character. A Fire Sorceress, Lightning build, Cold-based character, or physical damage specialist may all prioritize different charms.
This makes farming especially rewarding because the same drop can have very different value depending on the build using it. Before you begin a long farming session, identify which charm would provide the biggest improvement to your current character.
Players should also remember that finding a Sunder Charm is only part of the process. The charm must work effectively with your skills, equipment, resistances, and preferred farming locations.
Key Takeaway: Know which Sunder Charm benefits your build before farming so you can better evaluate your results.
Who Should Use This Sunder Charm Farming Guide?
This guide offers value to several types of Diablo 2 Resurrected players:
·New seasonal players can learn why Terror Zones are important and where to focus their farming time.
·Solo players can improve their efficiency by choosing areas their builds can clear consistently.
·Endgame farmers can target charms that help overcome difficult immunity barriers.
·Build experimenters can use Sunder Charms to explore new farming possibilities and damage setups.
Core Value: Understanding where Sunder Charms come from and how they interact with your build can help you create a more efficient and flexible farming strategy.
Helpful Tips for Farming Sunder Charms
·Check the active Terror Zone before starting your farming session.
·Choose clear speed and survival over unnecessarily difficult encounters.
·Use efficient routes instead of wandering through every part of a zone.
·Identify the Sunder Charm that best matches your damage type.
·Review your resistances before equipping a new charm.
·Prioritize mobility to reduce downtime between enemy packs.
·Stay patient and focus on long-term efficiency, as valuable drops can require repeated runs.
Final Thoughts: Turn Terror Zones Into Your Best Source of Power
Sunder Charms give Diablo 2 Resurrected players an important way to overcome immunity barriers and expand the number of areas their builds can farm effectively. By focusing on Terror Zones, optimizing clear speed, and selecting charms that complement your character, you can make your Season 15 farming sessions more productive. Whether you are a casual adventurer, a dedicated seasonal grinder, or an endgame player searching for the perfect build upgrade, this strategy offers a clear path toward better efficiency. To give your character an additional boost, buy cheap D2R Items at Mmoexp to level up your game and spend more time tackling the challenges that matter most.