Weekend Drop -













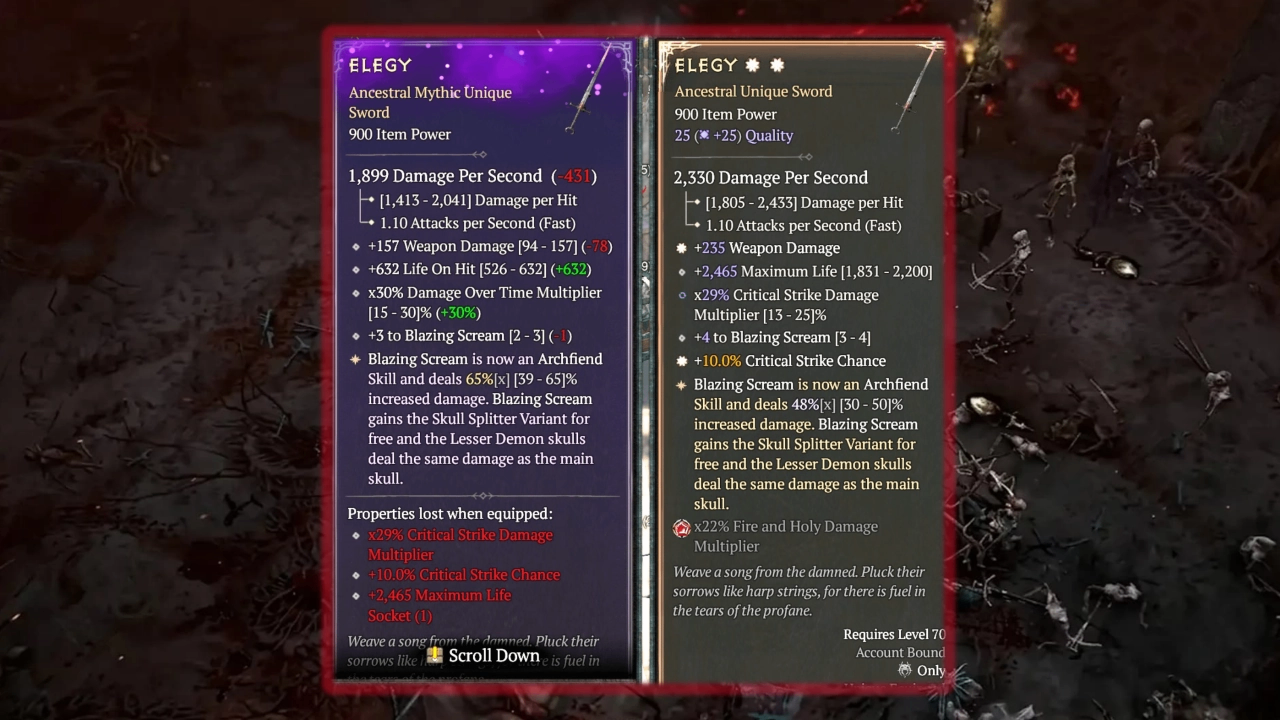
For an Elegy-based Warlock missing core gear, start with Elegy, then The Eightfold Idol, then Infernal Homunculus, unless survival requires Temerity first.
With the core equipped, fix interrupted casting, then insufficient effective Critical Strike Chance and Attack Speed, before chasing extra skill ranks. One Button farming has a separate weapon route: Elegy disables its automatic Blazing Scream casts.
For effective Diablo 4 Blazing Scream gear upgrades, reproduce the problem before spending materials.

Gear Upgrade Priority at a Glance
In Diablo 4, tackle the first unresolved row.
Current Situation | First Action | Hold Off On |
Elegy-based setup without Elegy | Obtain the sword before optimizing its supporting Archfiend equipment | Expensive work on a temporary weapon |
Elegy equipped, supporting effects missing | Add Eightfold Idol for trails, then Homunculus for the Archfiend package; finish Moloch next | Perfecting the sword's rolls |
Core effects present, low damage | Test uninterrupted casting; compare your variant's targets below; repair missing multipliers | Replacing the whole loadout |
Wrath or Life repeatedly collapses | Repair resource recovery or healing, then repeat the same encounter | Another offensive upgrade that you cannot sustain |
Comfortable clears at your target difficulty | Improve suitable long-term pieces or save for a deliberate variant change | Repeated rerolls without a stopping point |
Survival overrides the normal offensive order when deaths prevent completion. Keep working equipment until a replacement completes the same content.
Blazing Scream Underperforming? Find Your First Fix
Match your symptom, change one variable, then repeat the same Boss and opening. Compare two 20-second combat samples for cast interruptions and Life loss; compare full-fight completion times separately. The sample length is an editorial test method.
Your Problem | First Check | First Action and Success Test |
Packs melt, bosses barely move | Eightfold's Lava trails and Moloch activation | Keep the boss on trails, activate the buffs, then compare kill time |
Casting stops when Wrath empties | Recovery and Anguish's cost penalty | Restore your variant's resource tempers or runes; pass when casting continues through opener and sustained combat |
Demonform drains Life or you die repeatedly | Sadistic, Undying and Temerity | Restore healing; check Barrier formation. If deaths are sudden with healthy Barrier, check enemy mechanics and damage reduction |
Automatic skulls stop after a swap | Elegy in One Button | Restore its In-Geom weapon; confirm automatic casts resume |
Full equipment, low damage everywhere | Damage affixes, active sets, Glyph requirements, crit and speed | Fix irrelevant Physical Damage or inactive bonuses first, then compare the stat targets below |
Push damage drops while moving | Sigil, Sentinel and stationary bonus | In a safe opening, cast Sigil, then Sentinel; attack stationary and refresh within their 15/12-second windows |
Check Your Variant First
Standard Hellfire Setups
Elegy makes Blazing Scream an Archfiend skill, grants Skull Splitter, and lets lesser skulls deal the main skull's damage. Homunculus supports that interaction.
Diablo IV's Farmlock, mobile Endgame and stationary Push configurations still require different skills and resource support. Keep your farming configuration while assembling a transition.
One Button Farming
Hellhound's Sabatons trigger non-Archfiend Hellfire skills through Command Abodian while moving. Elegy's tag change excludes Blazing Scream from that trigger. If automatic skulls disappear after a weapon swap, restore your previous weapon and check the skill tags before spending materials.
One Button uses In-Geom and different supporting equipment. Keep Elegy separately for a manual endgame loadout.
Which Gear to Upgrade First
Complete the Missing Core Effect
For a conventional Hellfire setup with working healing, use this acquisition order. Skip anything already equipped; these are first-copy priorities, separate from Mythic conversion.
Order | Item | Farm Target | Change the Order When |
1 | Elegy | Lord Zir | You play One Button: follow its In-Geom route instead |
2 | The Eightfold Idol | The Beast in the Ice | It is already equipped and producing Lava trails |
3 | Infernal Homunculus | Urivar | Move ahead of Idol for a Homunculus-dependent Endgame transition |
Next | Moloch's Beating Flame | The Butcher | Missing Volatility scaling is now your largest incomplete interaction |
Survival override | Temerity | Harbinger of Hatred | Demonform burns through Life before you can finish fights |
These bosses offer targeted loot opportunities, not guaranteed drops. Keep farming in Farmlock while assembling the Homunculus and Ring of Starless Skies transition.
For an already complete set of Diablo 4 Items, use this spending order: repair Wrath and healing first; correct missing effects and active set bonuses; close the crit and speed gaps below; then compare damage rolls. A functioning Elegy can wait while another slot completes the build.
Check Moloch's Beating Flame
Moloch's Beating Flame rewards Volatility-empowered skills through Hellfire damage and Core Stat bonuses. Confirm activation with your equipped skills before improving the amulet.
If Moloch is only represented by a Charm, compare the actual power with the amulet version before polishing another Mythic. If the amulet is equipped, improve a weak Unique-power roll before replacing a usable base. Keep the same skill sequence when testing.
Repair Sustain before Polishing Leoric
Leoric's Crown improves socketed gems and supports Soul Splinters. Finish its socket arrangement before polishing affixes. Temerity converts overhealing into Barrier; without sufficient healing, better pants can leave the problem unresolved. Move sustain ahead of helm optimization whenever it determines whether you finish.
Stats and Affixes to Check
Use these Diablo 4 build-planning checkpoints with their named configurations. They are author recommendations, not universal engine caps or guarantees of a Pit clear.
Configuration | Numerical Reference | What to Improve First |
Chrix1848 Farmlock | Finished targets: 100% Attack Speed, 100% Critical Strike Chance, over 10 Wrath Regeneration | Stop casting gaps first; then close crit and speed deficits before extra ranks |
Published Endgame reference | 100% Attack Speed, 100% Critical Strike Chance, over 10 Wrath Regeneration, over 10,000 Fire Resistance rating | Stabilize Wrath; restore crit and speed; raise Fire Resistance if self-burn remains a problem |
Chrix1848 Push | Dominion lasts 12 seconds; Ritualism lasts 15 seconds | Check overlapping windows and stationary damage before another offensive reroll |
The Endgame numbers are Novaxcarry's configuration targets. Push has no separately verified universal speed or resistance cutoff. Start with working Endgame sustain, then test Push's timed sequence. Do not apply these targets to One Button.
Record town and combat stats with active Splinters and buffs. Count each bonus once; target-conditional crit may not appear in the general sheet.
Wrath Regeneration differs from percentage Resource Generation. Even above the reference, interrupted boss casting means recovery needs work.
For Chrix's setup, inspect Critical Strike Chance tempers on both weapons, Resource Generation on jewelry, Attack Speed on Leoric, and Maximum Life on chest and pants.
Once casting, crit and speed are satisfactory, compare Elegy's Critical Strike Damage and weapon damage, then useful Vulnerable Damage or skill ranks. Keep the existing healing arrangement throughout the comparison.
Choose Your Next Affix
When you can improve only one affix, use the observed failure to choose:
Choice | Pick This First |
Resource support or Critical Strike Damage | Resource support if Wrath interrupts casting; retest before adding damage |
Critical Strike Chance or Critical Strike Damage | Chance while effective crit is below your configuration's target; compare damage after that gap closes |
Attack Speed or recovery | Recovery if faster casting empties Wrath; speed if casting stays continuous and speed is below the target |
Skill ranks or another damage roll | With sustain and targets satisfied, compare equivalent upgrade states and keep the faster boss clear |
These are diagnostic priorities. There is no universal skill-rank cutoff or fixed gain from one more roll.
Low-Cost Fixes before More Materials
Audit Skills, Glyphs and Talisman
Before replacing Diablo 4 Items in MrRonit's manual Endgame variant, try Resource Cost Reduction tempers on rings, one Lucky Hit resource-restoration temper on the amulet, and Igni + Tir. Use this alternative as a complete arrangement; keep it separate from Chrix's jewelry Resource Generation setup in Diablo IV.
His Endgame Talisman uses four Flesh of Abaddon and two Nameless Charms with Seal of the Diamond Mind to reach their five- and three-piece bonuses. Restore those bonuses before adding a Charm that breaks them. Check each Glyph's activation requirement too.
Improve Suitable Existing Pieces
For suitable affixes with weak values, inspect the Cube's Affix Value Reroll. It changes eligible values while protecting specified modifications. Check the preview: improving an existing affix's value differs from obtaining another affix.
The October 14 patch fixed Cube reroll problems affecting Critical Strike Damage, Healing, Barrier Generation and Impairment Reduction. Recheck an item previously affected by that bug.
Before rerolling, reserve the materials needed for your next planned core-item farm or conversion. Use only the surplus; stop when that reserve would be touched.
Masterworking uses Quality in the current system. Avoid planning around older fixed-rank affix hits. Check the current Blacksmith preview before committing to a final upgrade; reserve repeated optimization for equipment you expect to retain.
Stabilize Demonform
For gradual self-burn, restore the healing-to-Barrier loop first: Sadistic and Undying supply healing; Temerity uses overhealing. Chrix Farmlock places Sadistic on boots and Undying on the amulet through Transfiguration. Its Push configuration moves Sadistic to the amulet. Preserve the appropriate arrangement when switching.
During the same combat sample, watch whether healing produces Barrier or Life keeps falling. If Barrier never forms, repair healing before improving the pants. If it forms but disappears, check Fire Resistance, Maximum Life and defensive uptime. For sudden deaths while Barrier is healthy, test enemy mechanics and damage reduction separately. Recheck a longer boss fight before raising difficulty.
When Major Investment Makes Sense
Invest heavily in Diablo 4 Items once the piece fits your long-term variant, its effect works with your equipment, and its affixes meet your needs. Set a measurable goal: completing a Pit tier or making your farm consistent.
With core effects and sustain working, Chrix's Push conversion order starts Moloch, then Temerity, then Leoric. Move Temerity ahead if survival is blocking progress. This is a quality-upgrade order, separate from acquiring your first Elegy.
Refine Moloch when its power is weak; refine Elegy when damage rolls are poor; refine Leoric when its socketed Splinters are already useful. Regular affixes can stay on farming armor, spare rings and temporary weapons if they satisfy your sustain and stat needs. Replace them when a specific missing roll limits your test.
Direct Mythic conversion through the Cube retains an item's configuration, but costs more than the alternative crafting routes. It produces a Crafted-tag item, and you can equip only one such item.
An Unmodifiable item is ineligible. Choose the slot deliberately before committing; a temporary piece can consume resources intended for your long-term weapon.
Use these stopping rules:
l Stop rerolling when casting stays continuous and your target clears are consistent, or when the reserved materials would be needed.
l Farm a missing core effect when it blocks your chosen variant; keep the functioning temporary piece without further polishing.
l Consider Mythic conversion only after the required effects and sustain work, the base is worth retaining, and a specific remaining limitation justifies it. If no limitation is identifiable, save materials.
When to Pause for Apocalypse
Continue investing in your Diablo 4 Blazing Scream setup when an affordable correction can achieve your next goal. Pause final optimization if you have decided to move to Apocalypse.
Compare the intended loadout slot by slot. Identify reusable defensive pieces and Blazing Scream-specific powers; include skills, Talisman and supporting equipment in the transition cost.
Keep your farming loadout, assemble the alternative's required interactions, then test at manageable difficulty. Return to the saved setup if the new one cannot sustain itself.