summary
The Cleric is AION 2’s only main healer, making it one of the most important classes for high-pressure PvE content. It has a relatively low barrier to party entry, strong emergency recovery tools, and excellent tolerance for mistakes. At the same time, Clerics can deal respectable damage, while their overall gear pressure is relatively low compared with many other classes. For players looking to accelerate gear progression and strengthen their build, buy Aion 2 Kinah can provide additional resources for upgrading equipment and other progression systems.
This guide covers the recommended Cleric settings, rotation, skill build, Stigma setup, Daevanion progression, gear stats, Arcana, Genus Insight, Empyrean stats, statues, wings, and titles.
1. Cleric Class Advantages
Cleric combines healing, support, defensive utility, and damage in a single class. Its biggest advantage is party reliability.
Key strengths include:
· Only main healer: Highly valuable in difficult group content.
· Strong emergency healing: Radiant Recovery can quickly restore party HP.
· Party protection: Salvation and Yustiel's Power provide powerful defensive tools.
· Revival utility: Summon Resurrection can recover multiple fallen allies.
· Respectable DPS: Condemnation, Bolt, and Earth's Retribution provide consistent damage.
· Lower gear pressure: Clerics can remain useful without requiring the same level of offensive investment as pure DPS classes.
For beginners, Cleric is therefore a practical choice for players who want consistent party demand while still contributing meaningful damage.
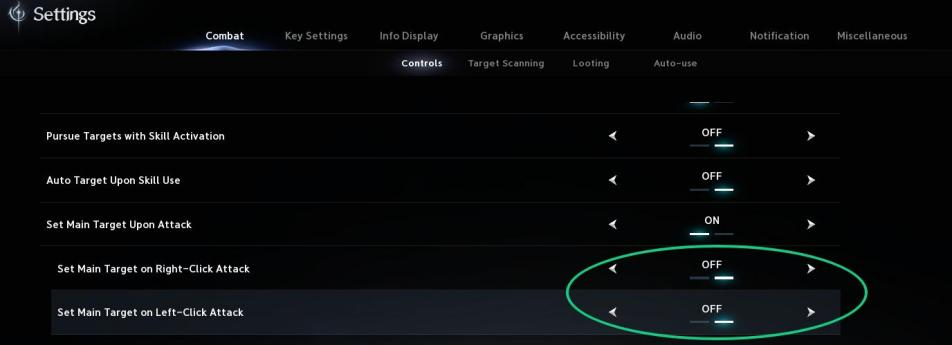
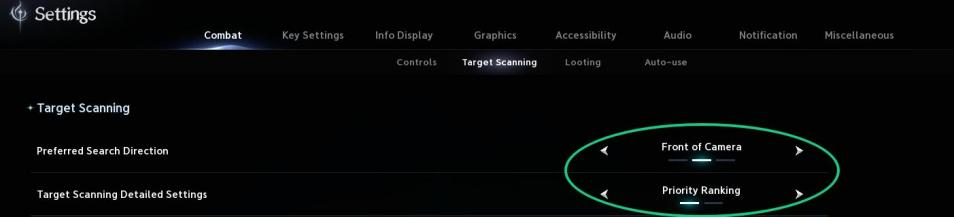
2. Recommended Control Settings
Before starting serious progression, adjust your combat settings. Proper controls make healing, debuff maintenance, and emergency reactions much easier.
Skill Bar Layout
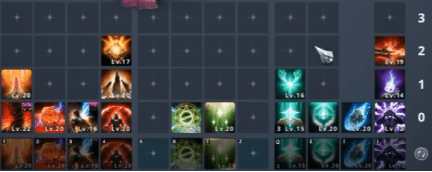
Organize the skill bar around three functions:
1. Healing skills
2. Damage and debuff skills
3. Emergency and Stigma skills
Keep frequently used healing and defensive skills in positions that are easy to reach. This reduces reaction time when multiple party members lose HP simultaneously.
Disable Skill Reservation
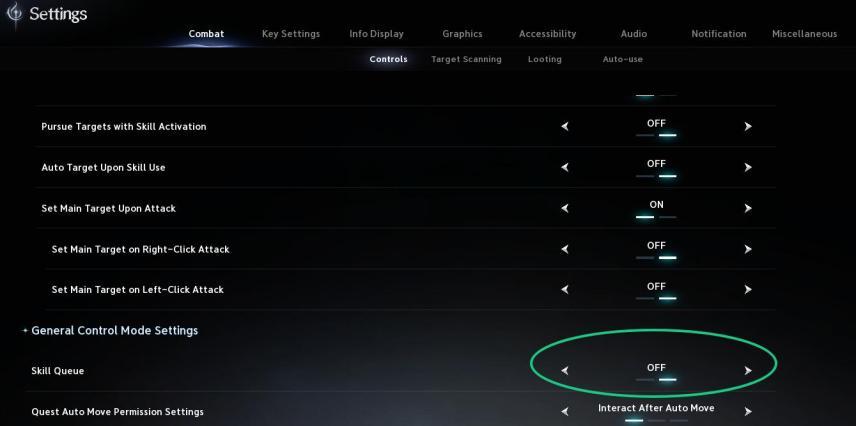
Disable unnecessary skill reservation settings so that important skills can be activated immediately when required.
Set Up Built-in Macro Hotkeys

Use AION 2's built-in macro system to simplify frequently repeated actions. Macros can help reduce unnecessary key presses and make the Cleric's rotation easier to maintain.
3. Cleric Rotation
The Cleric rotation revolves around maintaining debuffs, using damage skills efficiently, and keeping emergency healing tools available.
Before the Pull
Pre-cast Light of Regeneration to establish the healing field before combat begins.
After the Pull
Immediately apply:
· Debilitating Mark
· Chain of Torment
These two debuffs should be maintained throughout the encounter. Reapply them immediately if they expire.
Important: Chain of Torment must be active before using Condemnation.
For damage, prioritize:
1. Condemnation
2. Divine Aura
3. Other available damage skills
4. Earth's Retribution as a filler when no major skills are available
Healing Rotation
When party HP drops significantly, use Radiant Recovery for a large burst heal and cleanse.
Before a boss ultimate or major party-wide attack, prepare a defensive response:
· Salvation: Level 25 party-wide invincibility for 3 seconds
· Yustiel's Power: Level 25 party shield based on 20% of maximum HP
When several party members are down, use Summon Resurrection to recover the group.
The key principle is simple: do not spend every defensive cooldown immediately. Keep major protection skills available for mechanics that can threaten the entire party.
4. Cleric Skill Build
Active Skills
Skill | Recommended Build | Notes |
| Lv. 20 · Specialty 2, 4, 5 | 40%+ damage share; Specialty 4 refreshes critical effect |
| Lv. 20 · Specialty 1, 3, 5 | AoE burst heal and cleanse |
| Lv. 20 · Specialty 2, 3, 4 | Charged AoE damage |
| Lv. 20 · Specialty 2, 3, 4 | Around 15% damage share; filler |
| Lv. 16 · Specialty 4, 5 | AoE healing-over-time |
| Lv. 16 · Specialty 1, 5 | Heals self and the lowest-HP ally |
| Lv. 12 · Specialty 2, 4 | Debuff |
| Lv. 16 · Specialty 3, 5 | Fire-and-forget damage; around 5% share |
| Lv. 12 · Specialty 2, 4 | Required for Condemnation |
| Lv. 16 · Specialty 2, 5 | Useful for trash clearing |
| Lv. 12 · Specialty 2, 3 | — |
| Do not invest or slot | — |


Level 20 Priority
Radiant Recovery = Condemnation = Bolt = Earth's Retribution > Light of Regeneration > Healing Light
This priority balances Cleric's two main responsibilities: keeping the party alive and maintaining useful DPS.
5. Passive Skills
Passive | Recommendation | Purpose |
| Max out | Defense + Critical Resist |
| Max out | Crit, Hard Hit, Additional Damage |
| Max out | Critical Damage Boost + Accuracy |
| Lv. 10 | — |
| Lv. 10 | Healing boost now scales with Attack |
| Lv. 10 | — |
| Do not invest | — |
| Do not invest | — |
| Do not invest | — |
| Do not invest | — |


Max-Level Priority
Immortal Veil > Empyrean Lord's Grace = Earth's Grace
Immortal Veil should receive the highest priority, followed by the two offensive passive options.
6. Stigma Skills
Stigma skills do not have one fixed setup because Clerics can freely respec. Adjust the build according to the content and your party's needs.
DPS Route | Support / Heal Route |
Noble Aura Lv. 20 | Absolution Lv. 20 |
Prayer of Amplification Lv. 20 | Benevolence Lv. 20 |
Earth's Punishment Lv. 20 | Summon Resurrection Lv. 20 |
Voice of Doom Lv. 20 | Salvation Lv. 25 |
— | Light of Protection Lv. 25 |
— | Yustiel's Power Lv. 25 |
DPS Priority
Noble Aura = Prayer of Amplification > Earth's Punishment
Noble Aura can be raised to Lv. 25 when additional DPS is required, while Prayer of Amplification can also be increased to Lv. 25.
Healing/Support Priority
Light of Protection = Absolution = Salvation = Yustiel's Power > Benevolence = Summon Resurrection
Light of Protection can be skipped when the party already has a Chanter.
Recommended defensive Stigma levels include:
· Salvation Lv. 25: 3-second party invincibility
· Yustiel's Power Lv. 25: Party shield equal to 20% maximum HP
· Absolution Lv. 20: Cleanse + heal
· Benevolence Lv. 20: AoE HoT + stamina restoration
Avoid investing in Power of Explosion, Binding, and Assault Stigma for this setup.
7. Daevanion Build
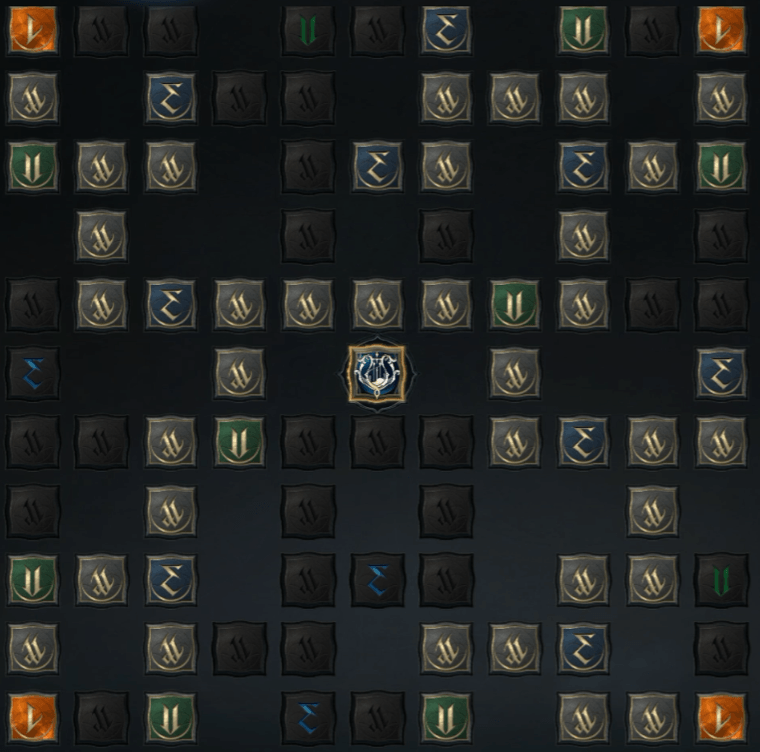
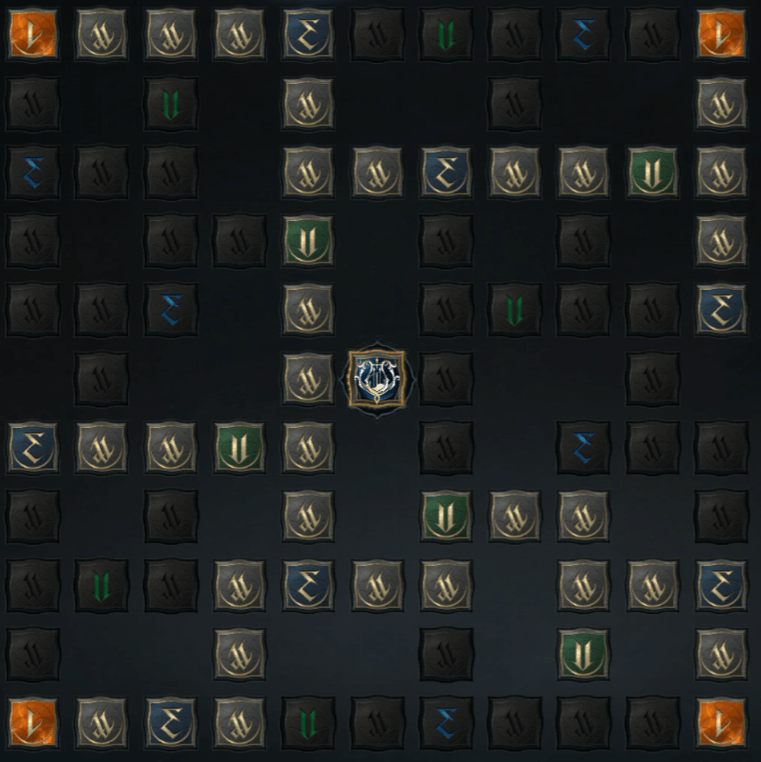
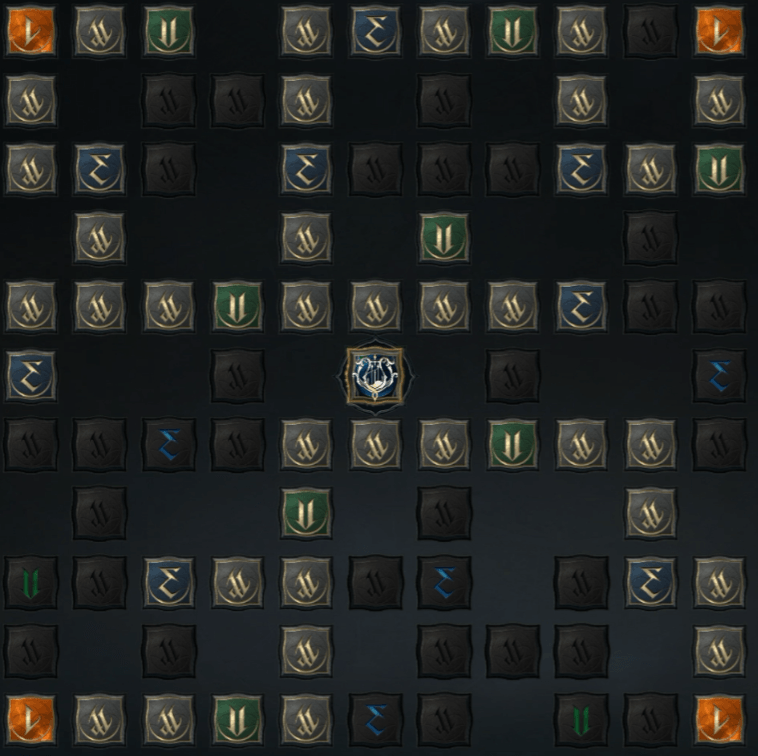
For early Daevanion progression, prioritize unlocking the orange nodes in the recommended paths.
The four relevant paths are:
· Nezekan
· Zikel
· Vaizel
· Triniel
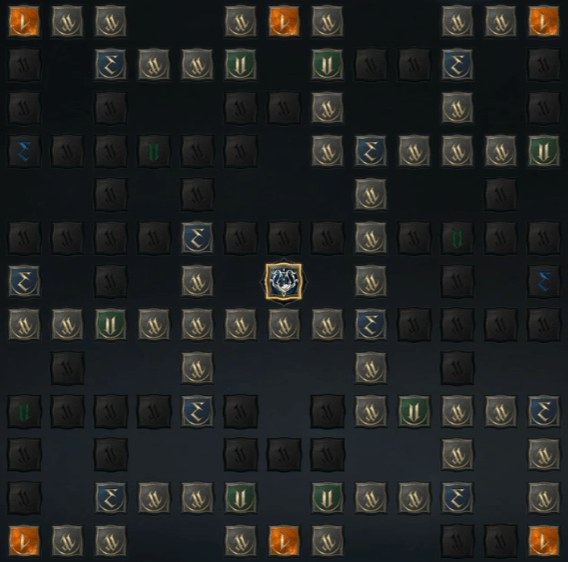
Daevanion Points are an important early-game progression resource. Besides main quests, they can primarily be obtained by clearing Sealed Dungeons on the map.
Players can clear these dungeons themselves or have them farmed. Since Daevanion Points are tradeable, purchasing them is another option for players who want to reach the first progression tier more quickly.
8. Cleric Gear Stat Selection
Gear optimization should focus on healing effectiveness, survivability, attack, and offensive secondary stats.
Slot | Recommended Stat Priority |
Helm | Incoming Heal, Double Chance, Attack Increase, Constitution, Attack, Crit/Accuracy/Passive |
Pauldrons | Critical Damage Boost, Defense Increase, Constitution, Attack, Crit/Accuracy/Passive |
Breastplate | Damage Boost, Defense Increase, Constitution, Attack, Crit/Accuracy/Passive |
Greaves | Damage Tolerance, Perfect Chance, Attack Increase, Attack, Constitution, Crit/Accuracy/Passive |
Gloves | Combat Speed, Perfect Chance, Defense Increase, Constitution, Attack |
Boots | Move Speed, Perfect Chance, Defense Increase, Attack, Constitution |
Cloak | Double Chance, Perfect Chance, Attack Increase, Constitution, Attack |
Necklace & Earrings | Attack, Critical Hit, Accuracy, 3 Passives |
Rings | All Skill-based |
Bracelet | Freedom, Illusion, Time, Destruction, Wisdom, Death |
Brooch | Might, Constitution, Precision, Accuracy, Critical Hit |
Gear stat reforging is RNG-dependent, so optimizing every slot can require substantial Kina. Players can either gradually improve their equipment or obtain finished gear when prioritizing faster progression.
9. Arcana Selection
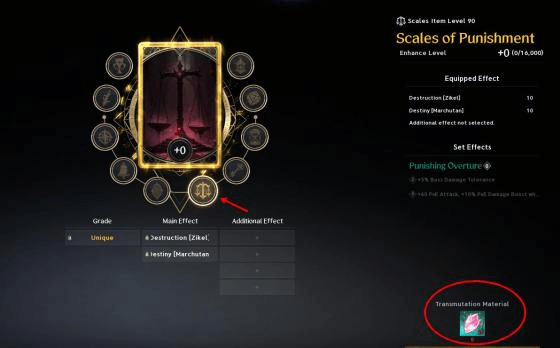
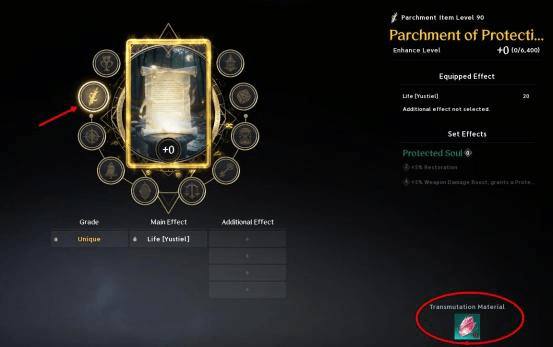
Only two Arcana sets are recommended for this build:
· Protected Soul
· Punishing Overture
Card skill selection should follow the priorities of your chosen skill build.
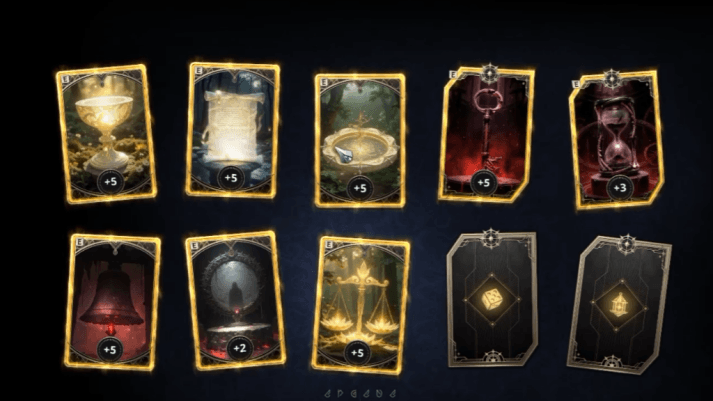
Craft Scales and Chalice First
Prioritize crafting the Scales and Chalice cards.
Both use Splendent Noble Crystal, while Scales requires twice the material cost. Crafting other cards first and later changing to Scales and Chalice can therefore waste materials.
Other cards use Noble Crystal, with:
4 Noble Crystals = 1 Splendent Noble Crystal
The Arcana system can consume significant Kina because players may need to reroll stats repeatedly. Casual players can progress gradually, while players pursuing faster optimization can invest more resources into rerolling.
10. Genus Insight Stats
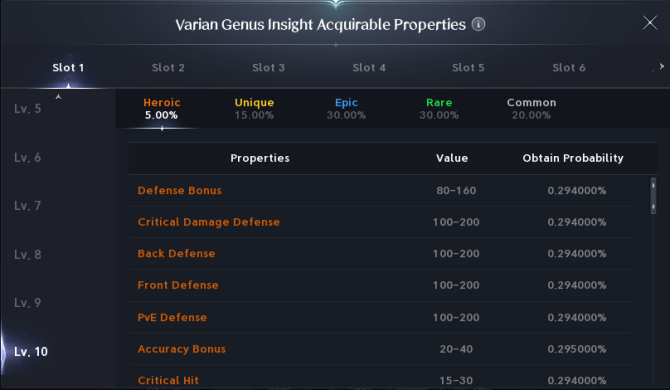
First Four Races
Slots | Recommended Stats |
1 / 4 / 7 | Critical Hit / Accuracy Bonus for DPS, or Defense for survival |
2 / 5 / 8 | Attack Bonus or Max Attack |
3 / 9 | Double Chance |
6 | Endurance / Damage Tolerance |
Special Races
Slots | Recommended Stats |
1 / 2 / 4 / 5 / 7 / 8 | Attack Bonus or Max Attack |
3 / 9 | Double Chance |
6 | Endurance / Damage Tolerance |
The pet system can provide substantial combat-power gains, but it requires considerable grinding. Reaching level 3 on a pet requires killing hundreds of duplicate monsters, and solo farming can take several days or longer.
11. Empyrean Stats
T0 — Must-Have
Prioritize:
· Illusion — Cooldown
· Wisdom — Double Chance
· Destruction — Attack
· Time — Combat Speed
T1 — Optional
Useful secondary choices include:
· Freedom — Accuracy & Evasion
· Space — Move Speed
· Death — Critical Hit
T2 — Backup
· Justice — Defense
· Life
Not Needed
Destiny — MP
For general Cleric progression, the T0 attributes should receive priority before investing heavily into optional combinations.
12. Statue Selection
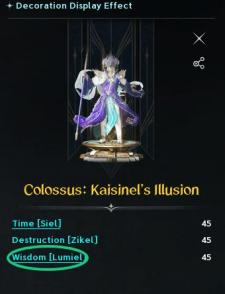
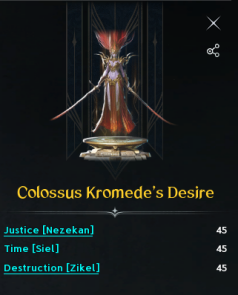
For the Colossus, use:
· Kaisinel's Illusion for daily gameplay and Double Chance through the Wisdom attribute.
· Kromede's Desire when additional survival is required.
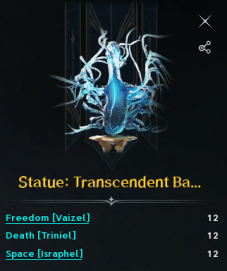
Completing 10 runs of Conquest Draupnir grants one Gold Statue. The remaining three statue slots can be filled with Blue Statues that match your preferred Empyrean Lord attributes.
13. Wings and Titles
Wings
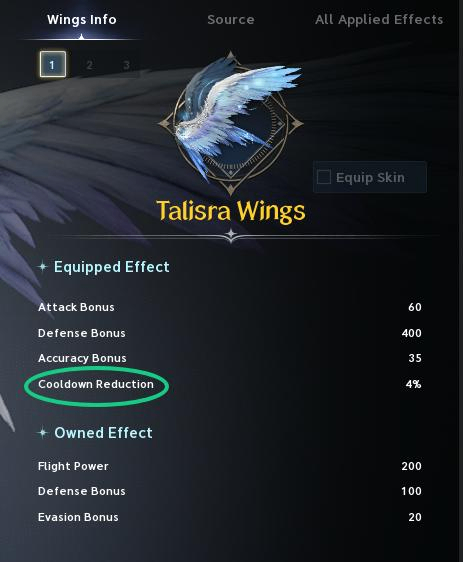
Void Talisra Wings are recommended because they provide the Cooldown attribute.
Titles
Use the following title setup:
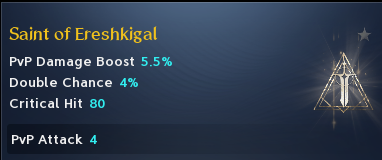
· Attack: Saint of Ereshkigal
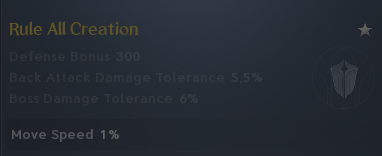
· Defense: Rule All Creation
· Other slots: Empty Closet

Empty Closet is particularly useful because it provides the Cooldown attribute.
Final Cleric Build Summary
The AION 2 Cleric is built around a balance of healing reliability, emergency protection, debuff maintenance, and respectable DPS. For most players, the priority should be to establish a reliable healing foundation first, then improve offensive stats and damage skills as equipment and progression allow.
For the core build, prioritize Immortal Veil, Empyrean Lord's Grace, and Earth's Grace among passives. For active skills, Radiant Recovery, Condemnation, Bolt, and Earth's Retribution form the main Lv. 20 priorities. Stigma choices can then be adjusted between DPS and support depending on the party composition.
AION 2 has a broad progression system spanning skills, Stigma, Daevanion, gear, Arcana, Genus Insight, Empyrean stats, pets, statues, wings, and titles. Players can progress gradually without optimizing everything immediately. For those who want to speed up time-consuming progression tasks, Aion 2 Boosting can provide additional support while they focus on building a stable Cleric foundation first and improving individual systems as more resources become available.