Weekend Drop -

















The ARC Raiders Amplified Il Toro Slug build pairs Slug Rounds with a Heavy Shield for close-range PvP. Prioritize the slug conversion, a Heavy-compatible augment and Used to the Weight; add attachments as your resources allow. The complete setup below is a target configuration, with optional parts ranked separately.
The appeal is a favorable damage exchange. One community practice-range test recorded a 1.03-second body-shot TTK against a Medium Shield dummy, compared with 2.08 seconds for the standard Il Toro.
The same tester reported two shots against medium shields and three against heavy shields. Those results give the build a useful benchmark, although moving opponents and missed shots change the outcome.
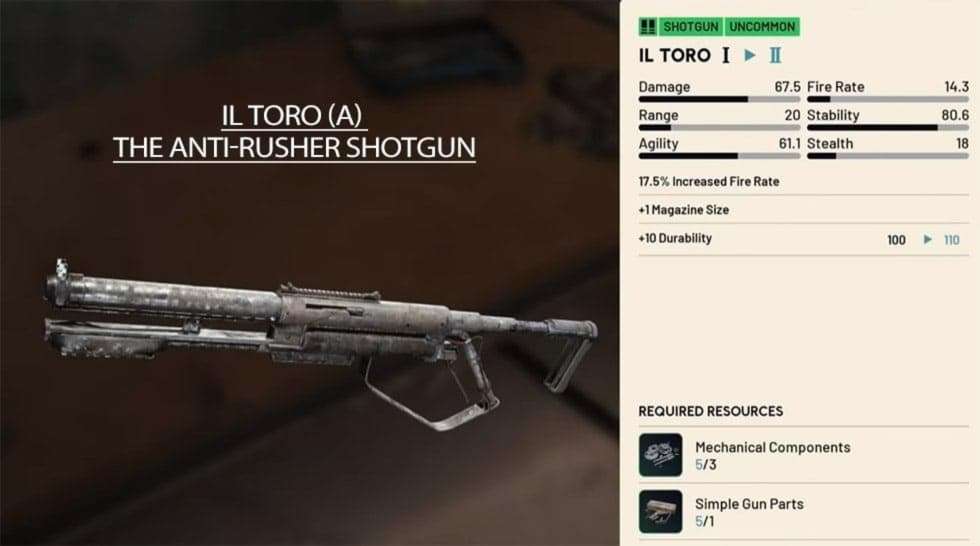
Amplified Il Toro Loadout
This ARC Raiders loadout follows Pip's showcased configuration, with optional parts ranked by investment priority.
Slot | Recommended Setup |
Primary weapon | Amplified Il Toro |
Core amplification | Slug Rounds |
Stock | Kinetic Converter |
Magazine | Extended Shotgun Mag III |
Grip | Vertical Grip II |
Muzzle | Shotgun Choke III, optional; slug benefit unconfirmed |
Shield | Heavy Shield |
Augment | Looting Mk. 3 (Safekeeper) or Tactical Mk. 3 (Defensive) |
Supporting skill | Used to the Weight |
Optional amplification | More Reload |
Equipment Investment Priority
Priority | Equipment | Reason |
Core | Slug Rounds | Supplies the projectile conversion this build depends on |
High for this setup | Heavy Shield | Adds protection during close-range exchanges; needs a compatible augment |
Recommended | Kinetic Converter | Favors faster follow-up fire |
Recommended | Extended Shotgun Mag III | Leaves more shells available for consecutive fights |
Optional | Vertical Grip II | Helps manage vertical recoil |
Benefit unconfirmed | Shotgun Choke III | Compatible, but its additional slug benefit has not been isolated |
If you already have Slug Rounds and can add only two weapon attachments, start with Kinetic Converter and Extended Shotgun Mag III. Favor the grip first if recoil is making you miss follow-up shots. This order is a practical recommendation, not a measured ranking of attachment combinations.
Heavy Shield is optional for the weapon itself. Keep Medium Shield if your route or replacement budget favors it. Choke III can wait: its slug benefit remains unconfirmed.
Safekeeper or Defensive
Both augments support Heavy Shields. Safekeeper has a safe pocket that accepts any item, making it useful when protecting valuable ARC Raiders items is part of the raid plan. That protection depends on putting the item into the pocket; an equipped shotgun does not become protected automatically.
Defensive allows Shield Rechargers to be used while running and includes an Integrated Shield Recharger. Favor it when maintaining shield charge during repositioning matters more than Safekeeper's storage benefit. Either choice still needs a loadout with enough ammunition and healing for the fights you intend to take.
PvP TTK and Damage Comparison
The most useful ARC Raiders performance evidence here is a community frame-counting test on practice-range Medium Shield dummies. The tester measured body hits from the first shot's muzzle flash to the muzzle flash of the final shot sufficient to down the target. The figures exclude the time spent finding an opponent and lining up the opening shot.
Slugs against Standard Il Toro
Weapon Setup | Reported Medium Shield Body TTK |
Standard Il Toro | 2.08 seconds |
Amplified Il Toro with Slug Rounds | 1.03 seconds |
Bobcat | 1.33 seconds |
Tempest | 1.40 seconds |
Within this test, the slug setup roughly halved the standard shotgun's TTK and finished ahead of the listed automatic weapons. The test does not isolate Pip's attachment package or establish a universal ranking across ranges and headshot conditions.
Two Shots against Medium Shields
The reported breakpoint is two body hits against Medium Shields and three against Heavy Shields. That makes the second hit an important opportunity to finish a medium-shield target before they reach cover.
This is why the shield pairing appeals to aggressive players. Against the tested slug weapon, a heavy-shield target takes an additional shot compared with a medium-shield target. That extra shot can create an opportunity to return fire or withdraw. It does not mean every opposing weapon needs three hits to down you.
What Slug Rounds Changes
Slug Rounds concentrates the shot into one large projectile and improves damage against ARC armor, while reducing projectile velocity. Aim carefully at moving targets and avoid assuming the shotgun's usual pellet coverage will rescue an inaccurate shot. The armor benefit gives it a secondary ARC role, but spending ammunition on machines can leave you short when Raiders arrive.
Is the Amplified Il Toro Worth Using against ARC?
With the PvE matchmaking test concluded in the October 20 update, plan this kit for regular PvPvE encounters. The slug weapon is a PvP-first choice with useful ARC capability. ARC Tracker lists Strong ARC Armor Penetration, supporting its use against armor without establishing it as an all-purpose machine killer.
For routine ARC encounters, use it when you have a clear shot and can spare the shells. Against heavily armored threats, the armor benefit gives it a role, but no controlled results here establish kill counts or ammunition efficiency for Bully, Skulker or Shredder.
Bring a second weapon if your route involves sustained ARC fighting, distant targets or machines you cannot comfortably handle with the shotgun. Choose one you already trust for that job. For short PvP routes, you can skip the extra weapon if you are willing to avoid or disengage from demanding ARC fights. Reserve shells for a Raider arriving mid-fight.
Heavy Shield and Movement Skills
Frozen Trail made Heavy Shield more practical for this ARC Raiders build. The October 8 update reduced its movement penalty from 15% to 10% and lowered its durability-decay parameter from 0.20 to 0.15. Its listed stats are 80 shield charge and 52.5% damage reduction.
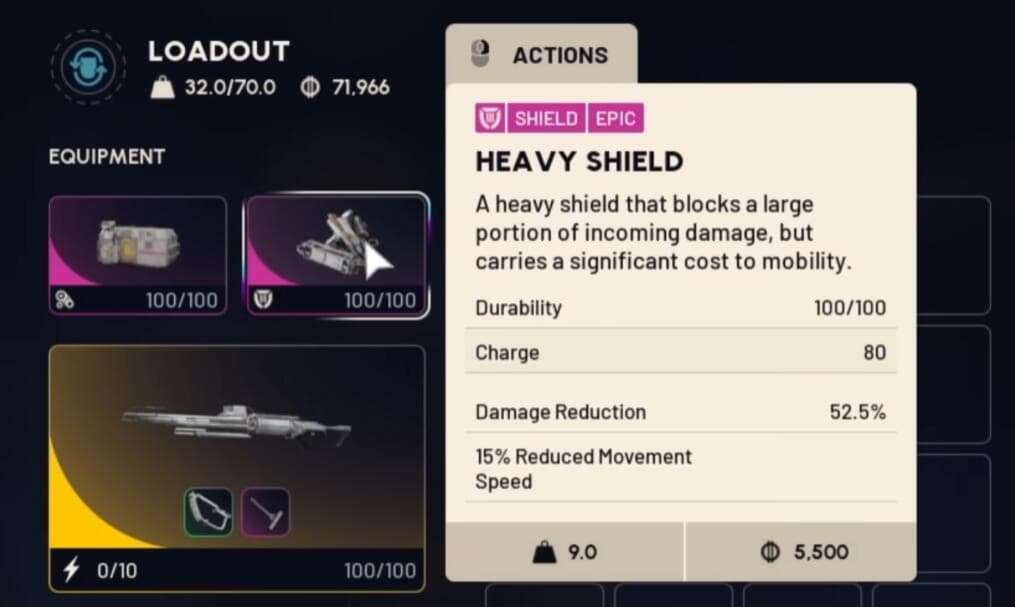
Protection between Shots
A pump-action weapon leaves intervals between attacks. Extra protection can help you survive that interval long enough to land another slug, especially when trading around a doorway or corner. The shield is most useful when you combine it with cover that limits how many opponents can shoot you.
Damage reduction does not remove the need to watch health. Reassess after taking a hit instead of assuming remaining shield charge makes the next exchange safe. A shield advantage against one opponent can disappear quickly when a second angle opens.
Used to the Weight
Used to the Weight is a Conditioning skill that reduces the slowdown from wearing a shield. Include it when building around Heavy Shield, then judge movement with the equipment you actually carry. Older skill calculations using a 15% heavy-shield penalty predate Frozen Trail and should not be copied into a current movement estimate.
No final post-skill movement percentage is established here. Check your movement between cover before committing to an expensive raid.
When to Keep Medium Shield
Heavy Shield fits players deliberately taking short-range fights. Medium Shield remains a reasonable choice for long rotations or scavenging routes where avoiding contact is the priority. You can also use the slug weapon without copying the defensive half of this build.
If your augment cannot equip Heavy Shield, resolve that compatibility issue first. If replacing the shield would strain your stash, keep the lighter setup while learning the weapon's timing. A more expensive kit offers little practical value when its cost makes you reluctant to use it.
Upgrade Requirements and Material Costs
Building a Slug Il Toro involves base progression, a research unlock and materials spent on the individual weapon.
If you're deciding which ARC Raiders items to farm first, focus on the materials required for the conversion before optional attachments. Four Turbine Compressors cover the slug installation step. They do not cover the Outpost, workshop progression, research or the shotgun itself.
Unlock and Amplify the Weapon
Follow this sequence for a fresh ARC Raiders build:
Unlock the Outpost through its project and expand it to level 4.
Bring the Gunsmith and Research Station to level IV.
Upgrade the Il Toro you intend to use to tier IV.
Select Amplify in the weapon upgrade screen using one Amplification Module Mk. II.
Complete Solid-Core Casting Tech and finish its research payment.
Install Slug Rounds on the amplified shotgun with four Turbine Compressors.
The October 20 update renamed the relevant button from Ascend to Amplify. If an older guide uses Ascend, look for Amplify in the current interface. Module marks follow weapon rarity, so the Il Toro's tier-IV upgrade level does not mean it needs a Mk. IV module.

Complete Solid-Core Casting Tech
ARC Tracker lists the research task as destroying 50 flying ARC using shotguns, followed by a payment of 5,000 Research Points and 20 Tick Pods. Take the research task before working on those kills, and check its progress counter during the process so you can catch a tracking problem early.
Completing research unlocks access to the perk. You still need the installation materials for each shotgun you convert into the slug configuration. If Slug Rounds remains locked, check research completion separately from the weapon's amplified status.
Installation and Maintenance Budget
Expense | Requirement |
Base weapon conversion | Tier-IV Il Toro and 1 Amplification Module Mk. II |
Slug research | Task completion, 5,000 Research Points and 20 Tick Pods |
Slug installation | 4 Turbine Compressors per weapon |
Optional More Reload | 2 Propellant Valve Assemblies per weapon |
Ongoing repairs | Amplified Fragments |
More Reload and Slug Rounds can coexist. Add More Reload if loading shells interrupts your fights. ARC Tracker lists 20 Amplified Fragments to restore 50% durability on the slug-only version, rising to 30 with More Reload installed. Check the repair screen before committing your reserve.
Where to Find the Materials
Scavenge destroyed Turbines for Turbine Compressors and destroyed Ticks for Tick Pods. For Amplification Module Mk. II, search cargo in the ARC Frigate event or containers inside the Fallen Emperor on Pendola Pass; entering the latter requires an Emperor Gateway Conduit. These are loot sources, with no guaranteed Mk. II yield established here.
ARC Data Modules can be submitted at the Research Station for Research Points. When sorting ARC Raiders items after a raid, keep the required Tick Pods and compressors intact instead of recycling them. Recycle surplus amplification modules or amplified weapons for repair fragments only after checking whether you still need them for another build.
PvP Tactics for the Slug Build
Use the Amplified Il Toro to control short sightlines in ARC Raiders. Slugs reward a clear aim point, and the pump-action interval gives you a reason to fight beside cover.
Effective Range and Positioning
ARC Tracker's simulator lists two medium-shield body hits and three heavy-shield body hits at 10 meters, with every shot connecting. Its listed projectile speed is 175 m/s. Use that 10-meter result as a reference for learning the build's shot timing, rather than an independently verified live-match result.
At around 25 meters, do not assume two shots will finish a moving Raider. The listed damage-range figures are inconsistent, and landing consecutive slugs becomes more demanding as distance grows. Favor short, covered sightlines and narrow crossings; close the gap through cover if lateral movement keeps making you miss.
When to Close the Gap
Advance when an opponent retreats or reloads and you have a covered route to the next firing position. In a duo, let your teammate watch the angle while you move. Stop at cover with a clear shot; running directly into the opponent is unnecessary. If closing means crossing open ground under aimed fire, hold your position or change the approach.
Aim at Strafing Opponents
Against lateral movement, keep your crosshair near torso height and track smoothly before firing. The single projectile gives you less coverage than a pellet spread, so avoid firing merely because part of the target touches the edge of your aim. Use a doorway or narrow opening to limit the space they can cross.
Reacquire the torso between shots instead of snapping the follow-up toward the opponent's last position.
Reset after Two Unfinished Shots
If two shots leave the opponent standing, return to cover by default. Check your health, remaining shells and escape route. Continue with a third shot when the opponent remains exposed, you have enough health to risk another exchange and no second enemy is opening an angle. Otherwise, reload or heal behind cover before re-engaging. Avoid chasing around an unseen corner to finish the sequence.
Handle ARC and Third Parties
Break contact if machine pressure forces you out of cover or another squad opens a second angle. In a duo, call your retreat before healing so your teammate does not push alone. Check the area before looting a downed player, and reserve ammunition for the route out. Heavy Shield cannot compensate for an empty shotgun during a Shredder interruption.
Investment Value and Best Uses
Slug Il Toro or Bobcat
The community test puts Slug Il Toro 0.30 seconds ahead of Bobcat and 0.37 ahead of Tempest on medium-shield body hits. That margin alone is a weak reason to spend four Turbine Compressors. If you already have a Bobcat or Tempest that suits your aim, keep using it while building material reserves; neither needs this slug conversion.
Invest if you prefer firing from cover and can land consecutive slugs. Include repair fragments and replacement-compressor collection costs in your budget.
Amplify Now or Keep Saving
If you already own an Il Toro IV in ARC Raiders, amplify it when Slug Rounds research is complete and you can fund installation, repairs and replacement raid gear. If the compressors would exhaust your reserves, keep using the IV while you finish preparing.
| Player Situation | Investment Recommendation |
Endgame PvP player | Prioritize one slug build if you regularly choose close-range fights and can absorb its loss. Assess the handling before preparing replacements. |
Midgame player | Finish facilities and research first. Save the installation materials without delaying the equipment you rely on for regular raids. |
PvE-focused player | Identify the ARC encounters you need to solve. The armor benefit alone does not prove better value than your existing machine-fighting kit. |
Low-budget solo player | Keep the last rare components in reserve. Continue with the IV until losing a slug shotgun would still leave you equipped for several raids. |