Weekend Drop -













Start MW4 DMZ with a free or inexpensive loadout, finish one manageable objective, and extract with supplies for your next deployment. Then work toward a Medium Backpack and use its Secure Slots to protect your most important finds. Once you have basic equipment in reserve, focus each trip on a specific upgrade or cash shortage.
Returning from MW2 DMZ? Start with crafting and loot protection below. Relearn these systems early: the Level 2 3D Printer turns resources into gear and FOB upgrades; Medium Backpacks add Secure Slots; Weapon Manuals unlock weapon construction once Gunsmith opens at Level 10. An eliminated Operator becomes MIA, adding a recovery decision to equipment loss.
New players should follow the first-run example before planning upgrades. DMZ early access began October 20, 2026, for eligible digital pre-orders, ahead of the October 23 full launch. Progress through the stages at your own pace and repeat them after losses.
Before Deployment: Keep Costs Low
Start with a Free Loadout
At the FOB, select an available Operator and check your current DMZ Orders before preparing equipment. In Ready Up, Equip Free Loadout provides randomized basic gear. Inspect what you receive and check your medical supplies before committing. For Dynamic Operations or Free Roam, Ground is the free infil option.
Save your best weapons while you learn Hajin. Basic AI weapons can handle early PvE encounters, so replace a weak starting gun when a useful weapon drops. Check its attachments and condition: damaged weapons can have problems such as a broken optic or reduced magazine capacity. A usable sight or suppressor is helpful, but avoid a dangerous detour just to find one.
Players looking into MW4 Bot Lobbies for easier combat practice should still learn to manage basic equipment. In DMZ, surviving with an inexpensive loadout matters more than risking your best weapon on an unfamiliar route.
Check Healing and Your Parachute
Bring a Medkit when available. Bandages temporarily restore maximum health lost through wounds; a Medkit repairs wounds, restores full health, and restores your ability to use the tourniquet to recover from Last Stand. After getting back up, treat the wound before assuming you have another recovery available.
Check the Parachute slot as well. You cannot assume every loadout includes one. Without a parachute, use stairs or another safe descent from towers and rooftops. For solo players, checking these supplies is particularly useful because a teammate cannot cover a mistake.
First Run: Complete Your Objective and Exfil
For your first DMZ deployment, enter Free Roam with Ground infil and a free or inexpensive loadout. Set a supply objective: find healing you lack and collect materials toward your first backpack.
Work on a compatible DMZ Order along the way. If your current Order specifically requires a Story Mission, select that mission instead and follow its briefing.
Follow a First-Run Example
Suppose you spawn with a basic weapon, no Medkit, and no Medium Backpack. Use this decision sequence:
1. Open the Tac-Map and locate an exfil plus an alternative. Read the Threat Level beneath the compass. Low Threat reflects AI difficulty only; enemy Operators may still appear.
2. If a nearby green clinic is accessible without a major fight, search it for medical supplies. If there is no practical clinic nearby, check medicine cabinets in houses along your route. A clinic is a search option, with no guaranteed Medkit.
3. Keep a Medkit if found, collect Synthetics as you loot, and retain Rigid Synthetics for the backpack recipe. Keep useful valuables after allowing space for healing and target ingredients. Replace your starting weapon only when a dropped gun improves it.
4. Check your current Order. Complete a nearby collection or looting requirement if its displayed conditions fit this route. Skip a new objective that sends you into heavier resistance.
5. Once you have replaced missing healing and gathered useful materials, head toward extraction. If healing remains unavailable and you take a wound, abandon further searching and reassess the nearest viable exit. Follow the helicopter procedure in Exfil: Leave with Time to Spare.
If your opening Order is nearby and manageable with your current kit, complete it first for its rewards. If it demands heavier fighting or a long detour, make this a supply run and return better equipped.
Unlike the controlled matches players may associate with MW4 Bot Lobbies, DMZ can put enemy Operators along even a simple supply route. A low AI Threat Level does not guarantee a safe extraction, so always keep an alternative exit in mind.
Switch Modes for a Reason
Choose Story Missions when their briefing and rewards match your current Order and supplies. They use the shared map, where other players can interfere.
Choose Dynamic Operations when you want an assigned activity for cash, XP, and supply rewards. Free Roam remains useful when a specific ingredient or equipment shortage determines where you should search.
Next Runs: Unlock Crafting and Secure Loot
Move to this stage once you have access to crafting and know which supplies you lack. If you lose your equipment, repeat the first stage with a free loadout. You can continue earning DMZ XP while rebuilding.
Unlock and Track Your Craft
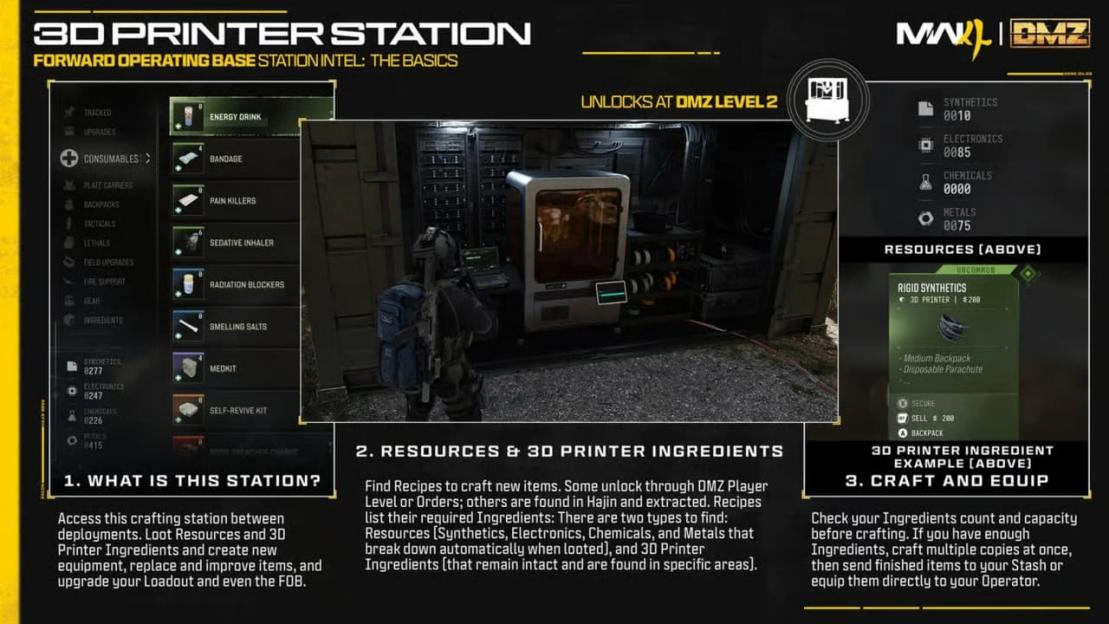
The 3D Printer and initial recipes unlock at DMZ Player Level 2. Its four basic resources are Synthetics, Electronics, Chemicals, and Metals.
These break down automatically during looting; separate Printer Ingredients occupy backpack space and need to be brought home for crafting.
At the FOB, select the recipe you need and use Track Recipe. Check Ingredient Locations for search guidance, then build your next deployment around the missing items. Those hints help narrow your search without guaranteeing a drop.
If the indicated area is too dangerous for your kit, collect useful supplies elsewhere and return better equipped.
Decide Whether to Craft a Backpack
The Medium Backpack adds carrying space and Secure Slots. Its value is highest when you are bringing home ingredients or unlock items that would otherwise be lost on death. The recipe requires:
Material | Quantity |
Synthetics | 50 |
Rigid Synthetics | 5 |
Synthetics are automatically collected basic resources; Rigid Synthetics are separate Uncommon ingredients. Check both totals. More ordinary Synthetics cannot fill a Rigid Synthetics shortage. Use your inventory and available rewards to decide:
Your Situation | Recommended Action |
A Medium Backpack is already in your Stash or earned rewards | Equip it and keep the ingredients |
You have the full recipe cost but no protected storage | Craft one if you can still equip and heal for the next run |
You lack several Rigid Synthetics | Track the recipe and gather them alongside Orders or operations |
A looted Medium Backpack becomes available | Equip it and stop treating backpack ingredients as the immediate goal |
You already have a suitable backpack equipped | Fund a replacement only after checking other shortages |
DMZ Level 6 awards two Rigid Synthetics: if you already hold three, that covers the five required, alongside 50 Synthetics. Level 8 awards a Restock Kit containing Medium Backpacks, a Munitions Box, and an Armor Box.
If you are near Level 8 and still short of ingredients, complete manageable Orders or operations toward that reward, then open the kit at Survival Kits. Craft earlier when materials are ready and protected storage would help your next runs.
Dedicate a run to ingredients when close to completing the recipe and Ingredient Locations suggests a manageable search. Otherwise, gather them alongside mission rewards.
Choose What Your Secure Slot Protects
Place your most important eligible item into a Secure Slot and confirm its position in the inventory. Only items actually placed there receive protection if you fail to extract.
Suppose you have one available Secure Slot, a needed recipe, and an ordinary valuable. Protect the recipe when it unlocks equipment you plan to use and the valuable merely adds cash.
Successfully extracted Recipes and Weapon Manuals each award 5,000 DMZ Cash. For an already unlocked recipe, compare that 5,000 payout with the valuable's cash value and any use in your tracked upgrade. Protect the item that better addresses your current shortage.
Leave with Manuals and Recipes
Weapon Manuals expand which weapons you can build through Gunsmith, which unlocks at DMZ Player Level 10. Finding a usable gun does not automatically unlock the ability to build another copy. Looted recipes can unlock additional crafting options after extraction.
Treat a needed manual or recipe as a reason to leave early. Secure Slot protection preserves the item; it does not establish that a successful-exfil requirement has been completed. After returning, check the relevant station for the unlock before planning around it.
After First Upgrades: Build Cash and Reserves
Once you have basic gear and understand what you need to craft, give each MW4 DMZ run a specific purpose. Decide whether you need cash, replacement equipment, or ingredients before leaving the FOB. Change that priority when your reserves change.
Keep Loot That Solves a Shortage
Dynamic Operations provide objectives with cash, XP, and supply rewards. Use them to give your deployment structure, but check whether another stage would leave enough supplies and time to extract. A longer operation is optional when your backpack already holds the item you came for.
Choose by your current shortage when space becomes tight:
Loot | Early Priority | Decision Rule |
Needed Weapon Manual or recipe | Very high | Protect it and plan extraction |
Missing tracked ingredient | High | Keep enough for the selected craft |
Medkit | High when short | Preserve healing needed to get out |
Valuables | High when saving cash | Use remaining space to fund upgrades |
Ordinary weapon | Depends on your kit | Keep a useful replacement |
Surplus consumables | Low | Drop excess when reserves are adequate |
Keep the ammunition and healing you need for the trip. Once those needs are covered, additional ordinary consumables compete with ingredients and valuables. Item color alone cannot tell you which shortage matters most.
Spend According to Your Bottleneck
Avoid committing most of your cash to an elaborate Gunsmith weapon immediately after unlocking the station. A lost gun needs replacing, and that expense can delay useful FOB upgrades.
Check Bank capacity before prioritizing another cash run. If you are at the limit, spend toward a needed improvement or pursue an available Bank upgrade before gathering more cash. If your Stash is constantly full, inspect capacity upgrades and clear excess stock. If healing is scarce, replenish it before funding another weapon.
Replace What the Run Consumed
Back at the FOB, unload the backpack, retain tracked ingredients, and sell valuables you do not need for another purpose. Inspect the next recipe before selling unfamiliar items. Replace spent healing, equip the next loadout, and check your cash reserve.
Switch toward valuables when you have the ingredients for the selected upgrade but lack its cash cost. Switch back to ingredients when cash is sufficient or Bank capacity blocks further saving. If equipment losses leave you unable to support either objective, take a free loadout and rebuild supplies first.
Exfil: Leave with Time to Spare
Extract when you have your target item, lack enough healing for another fight, or can no longer reach your preferred exfil safely. If that exit is compromised, switch to a reachable alternative immediately.
Read Radiation and Exit Locations
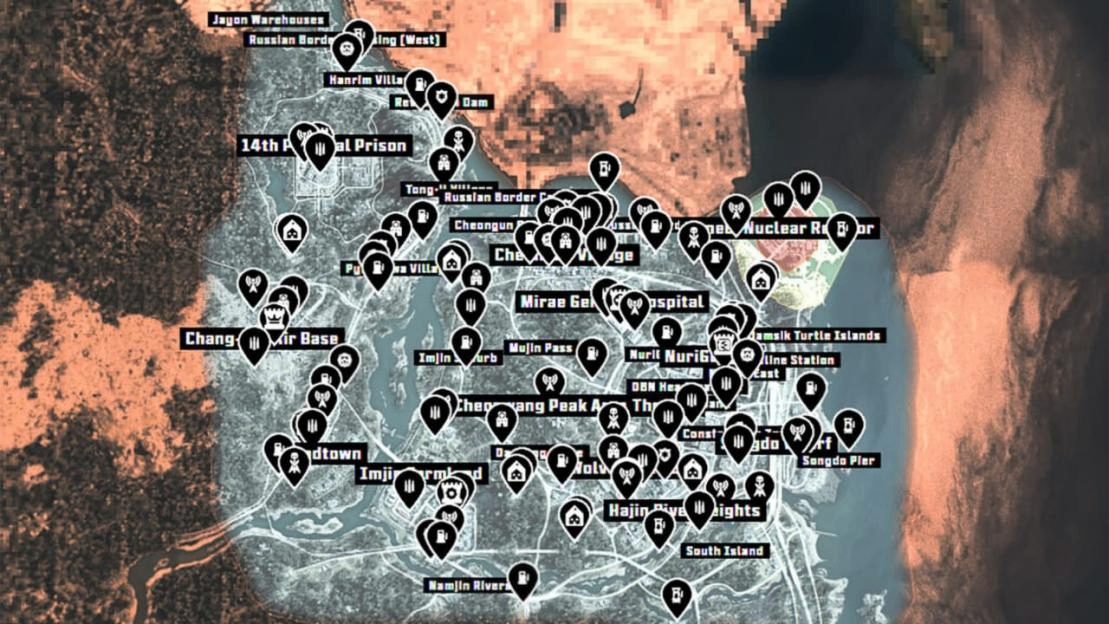
Open the DMZ Tac-Map early and identify an available exfil plus an alternative. Regular extraction locations vary, and spreading radiation can remove an exit you intended to use. Check the radiation's position as well as the timer when choosing where to go.
Allow for travel, resistance at the site, and the helicopter call. For a long crossing, a vehicle can reduce time spent moving through exposed ground, but check its fuel and expect its noise to attract attention. Do not turn a full backpack into a last-minute journey across Hajin.
Observe before Calling Extraction
Near the exit, listen for footsteps and gunfire, check nearby buildings and cover, and reduce unnecessary sprinting. If another team controls the site, consider your alternative before starting a fight over an exit.
Call the helicopter from the marked extraction point, then watch the approaches from cover while it arrives. Avoid leaving everyone exposed or searching inventories simultaneously.
A squad can assign someone to watch while teammates manage supplies; a solo player should finish inventory changes before approaching. Board the helicopter and confirm successful extraction before counting the run's loot as secured.
Recover after a Failed Run
Earned DMZ XP still counts toward your DMZ Player Level. Items placed in Secure Slots are protected, while ordinary carried loot remains at risk. Solo deployment does not guarantee solo opponents, so account for larger groups when deciding which equipment to risk.
If eliminated, your Operator becomes MIA. At the Operators station, recovery costs DMZ Cash and preserves Traits, but the Operator returns without gear. Compare that cost with your current reserve and the value of those Traits. You can instead use another available Operator or dismiss the missing one and start fresh.
After a loss, inspect what actually returned to the Stash, check extraction-dependent unlocks at the relevant station, and equip the next run from what remains. Rebuild healing and usable equipment before resuming an ingredient search that already proved too expensive.