Sign up to get Coupon with a
Shopping Cart
SECURE CHECKOUT orContinue Shopping

PoE 2 0.5 Gemling Spark CoC Comet Build Guide: Best Endgame Setup for 200% Delirium

POE 2 Jul-06-2026 PST

Summary

This Gemling Spark build can solo carry fully juiced 200% delirious maps with five extra players trailing behind doing absolutely nothing. To put that into perspective, unique monsters in a six-player party have literally six times as much life as normal, making this some of the hardest content available.

Being able to carry extreme group play has never really been a goal. This is not exclusively a group carry build-it is an incredibly strong, well-rounded build to play whether solo or in a party. Gemling Spark is extremely fast because it dramatically reduces the movement speed penalty from casting while moving. It is also tanky with an extremely large energy shield pool, and for the majority of content, this is a one-button Spark setup with an occasional Adorned Ego skill rotation thrown in.

This build tears through maps, melts bosses, and comfortably handles extremely difficult content. The price is also more flexible than it initially appears. Many expensive upgrades are plug-and-play rather than pieces the entire build revolves around, so players can delay high-end upgrades and add them individually as their budget increases.

 POE2

Part 1: Why Gemling Legionnaire

Gemling Legionnaire is incredibly overtuned and likely to be nerfed in the next patch. The ascendancy provides several powerful bonuses that make it the ideal choice for this build.

Gem Studded gives bonuses based on the most numerous socketed gem color. With equal strength, dexterity, and intelligence supports, all three bonuses apply. These include hits dealing no extra critical damage bonus, making damage less spiky; 30% less skill cost, which is massive for mana management; and 40% less movement speed penalty from using skills while moving, which makes Spark feel incredibly smooth.

Virtuous Barrier provides an energy shield and mana regeneration motes. While not the most important node, it is required to access the powerful nodes behind it.

Neurological Implants give a flat plus two levels to damage skills. Cast on Crit Arc, Cast on Elemental Ailment Comet, and Spark all benefit from this, providing a massive amount of damage.

Advanced Thaumaturgy grants additional quality to gems. This provides global crit chance from Cast on Crit, more damage multiplier from Arc, five extra Spark projectiles, and 62% increased reservation efficiency for Cast on Elemental Ailment.


Part 2: Adorned Ego and Power Charge Management

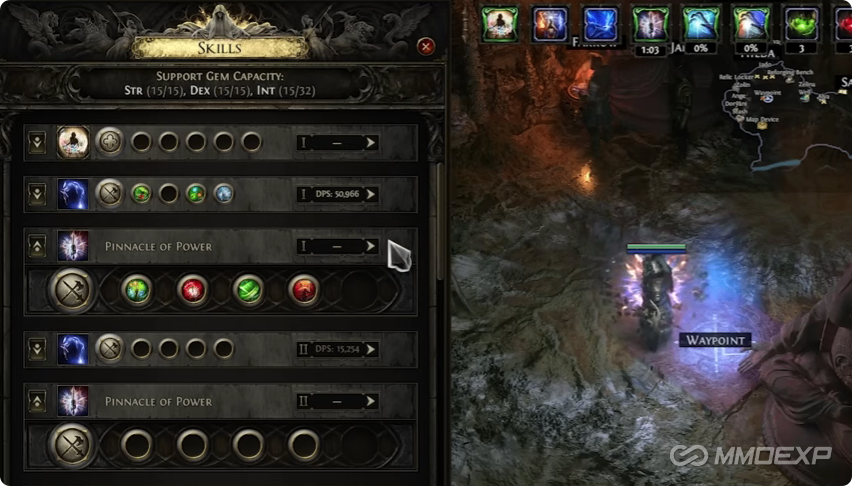
Adorned Ego is the unique wand that enables this build's extreme damage scaling. It provides the Pinnacle of Power buff, which lets all damage shock, ignite, and freeze as if it were 100% of that element. Since the build scales generic elemental and spell damage, all damage types contribute to a single pool.

The downside is -11% to all elemental resistances per power charge. This is solved through careful power charge management.

Power Charge Generation

On the second weapon set, equip "gain a power charge when you consume an elemental infusion." The rotation is: Frost Bomb → Powered by Veridian → Firestorm. This converts infusions into power charges. Since Firestorm is hidden on the bar, it is never pressed outside this combo, ensuring power charges are never generated accidentally.

With nine power charges, Pinnacle of Power provides 17% more damage per charge, totaling 153% more damage-an unheard-of multiplier.

Weapon Swap Requirements

The second weapon set must include:

Gain power charge when consuming elemental infusion

Maximum power charge increases

50% chance for an additional power charge (Zopex Soul Core of Power)

Adorned Ego with plus one maximum power charge

The first weapon set is used for all damaging skills and Pinnacle of Power activation.


Part 3: Frost Wall Tech for Maximum Damage

For carrying tough six-player parties, an optional Frost Wall tech provides another major vector of damage scaling.

Spark uses Pinpoint Critical, Efficiency Two, Rock Yard is Flow, Volantis Propulsion, and Virglas Support. Virglas grants damage as extra cold based on the life of destroyed ice crystals.

Frost Wall uses Glacier Support to increase ice crystal life, Uthred's Augury for more life, and Spell Cascade for three walls at once. The passive tree includes Ice Walls for 200% increased ice crystal life, obtained through a Megalomaniac jewel.

When ice walls are destroyed, Spark's damage skyrockets. This tech is overkill for solo play but essential for carrying six-player groups.

 

Part 4: Skill Gems and Supports

Mandatory Skills

Spark is the primary skill with Pinpoint Critical, Efficiency Two, Rock Yard, Flow, Volantis Propulsion, and Mobility. All on weapon set one.

Cast on Critical triggers Arc with Pinpoint Critical, Dominus Grasp, Cyons Temper, Efficiency Two, and weapon set one. Arc benefits from extra chains through quality scaling.

Cast on Elemental Ailment triggers Comet with Pinpoint Critical, Dialla's Desire (or Cold Mastery), Efficiency Two, and Orbit Storms. Living Bomb ensures Comet is always fire-infused.

Orbit Storms provides a damage steroid. When killing enemies, it grants 25% of the damage as lightning. When freezing enemies, it grants 30% of damage as cold. Drop it underfoot and continue casting Spark.

Utility Skills

Mana Tempest provides damage and mobility. Siphon Elements with Uthred's Omen and Remnant Potency generates elemental remnants. Mana Remnants with Harmonic Remnants and Remnant Potency sustain mana.

Convalescence recharges energy shield on demand with Prolonged Duration, Cooldown Recovery, Efficiency, and Second Wind. This provides a safety net when taking damage.

Elemental Conflux is optional if extra spirit is available. It cycles elements every eight seconds, providing 73% more damage for the active element.

 POE2

Part 5: Gear and Passive Tree

Mandatory Jewels

Split Personality for Sorceress allows pathing out of the Sorceress starting area while playing Gemling. This is mandatory. After socketing, all previous travel nodes can be unspecced.

From Nothing for Eldritch Battery provides access to seven passive points without pathing to them, saving an absurd amount of travel points.

Prism of Belief for Spark provides plus three to Spark. Plus two or plus three to Comet is also viable.

Megalomaniac provides three anoints: Archon of the Storm (more multiplier from Archon), Dominion (permanent Archon uptime), and Ice Walls (200% increased ice crystal life, only for Frost Wall tech).

Gear Priorities

Adorned Ego should ideally be corrupted for plus four, though this is expensive.

Focus should be a Tessalian base for Runic Ward. Stats include mana cost efficiency, flat mana, cast speed, and crit chance.

Rings should be rare or unset. Call of the Brotherhood is no longer needed. Stats include mana cost efficiency, flat mana, cast speed, and crit chance.

Helmet requires mana cost efficiency in the prefix. Craft this on, then perfect exalt slam hoping for percentage or flat energy shield. Use Omen of Light to finish prefixes. Suffixes should be perfected first.

Mageblood with double Quicksilver, Silver, and Bismuth flasks provides massive resistances and speed.

Boots with skill effect duration are nice but not required. Skill effect duration increases Spark duration and Pinnacle of Power duration up to five minutes.

Maligaro's Virtuosity eliminates the downside of Pinpoint Critical, providing 60% more crit chance while locking crit damage at 250. Without these gloves, the build would need to scale crit damage, which is inefficient. Excellent POE2 Boosting can help you significantly improve efficiency.


Key Takeaways

Gemling Legionnaire provides 30% less mana cost and 40% less movement speed penalty

Adorned Ego with nine power charges gives 153% more damage

Power charges are generated through weapon swap and are never used outside the Pinnacle of Power rotation

Frost Wall tech is optional but required for six-player carries

Maligaro's Virtuosity removes the downside of Pinpoint Critical

Skill effect duration scales Spark, Pinnacle of Power, and overall damage

The build is modular-expensive upgrades can be added as budget increases

 POE2

Conclusion

The Gemling Spark build is one of the strongest endgame setups in Path of Exile 2. With the ability to carry six-player 200% delirious maps, melt bosses, and clear content effortlessly, it represents the pinnacle of endgame power.

The build's strength comes from the combination of Gemling Legionnaire's overtuned ascendancy nodes, Adorned Ego's massive damage multiplier, and careful power charge management that eliminates the wand's downside. The optional Frost Wall tech pushes damage even further for the most challenging content.

While the full setup is expensive, the build remains functional on a lower budget. Many upgrades are optional and can be added over time. For players looking for the ultimate endgame Spark experience, this build delivers unmatched power, speed, and survivability.