Weekend Drop -














The Sunder Gemling build in Path of Exile 2 combines fast mace attacks with Concussive Runes, turning Heavy Stuns into extra area damage.
Advanced Thaumaturgy adds an attack-speed quality effect to Sunder, while triggered Lightning Warp helps the character move between enemies during mapping.
You control attacks and positioning around triggered teleports. Low Life adds damage, while Berserk can kill through Ward if recovery falls behind.

Sunder Gemling Build Overview
For this PoE 2 Sunder Gemling, establish Heavy Stuns, affordable attacks and replenishable Ward first. Add low-life Berserk after recovery checks, then build Lightning Warp automation. Quality and weapon speed determine how responsive the attack loop feels.
The fully optimized configuration includes Mageblood and requires substantial endgame investment, although the core Sunder setup can be tested separately.
Sunder and Concussive Runes
Heavy Stuns Trigger Shockwaves
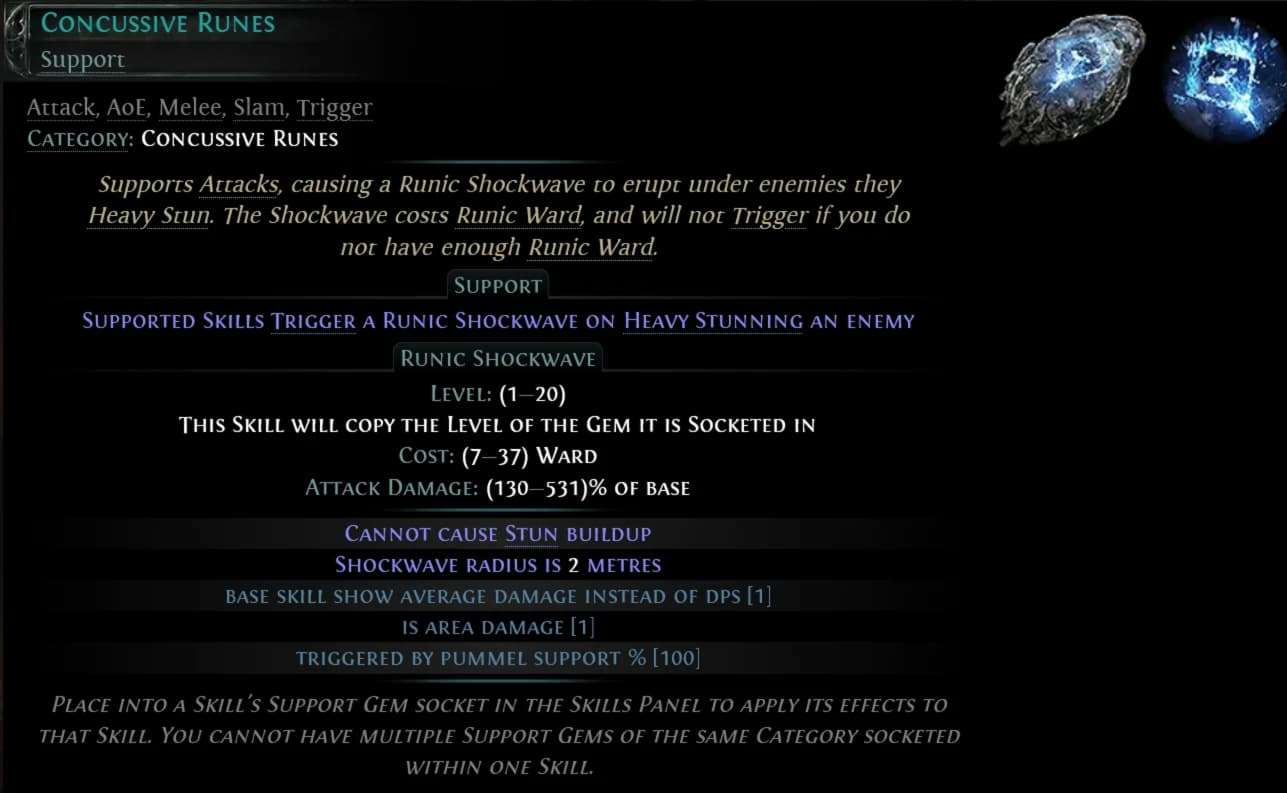
In Path of Exile 2, Sunder hits enemies along its fissure. When the supported attack causes a Heavy Stun, Concussive Runes triggers a Runic Shockwave beneath that enemy, adding another source of area damage. The shockwave copies the level of its host gem and spends Runic Ward. Without enough Ward, it cannot trigger, and the shockwave itself cannot build stun.
Physical damage and stun buildup establish the loop. Lethal hits can still produce runes when they meet the Heavy Stun condition. Faster attacks accomplish little without Heavy Stuns.
Quality and Attack Speed
Advanced Thaumaturgy gives Sunder an additional quality effect: multiplicative attack speed. Prioritize global skill quality alongside weapon speed.
Skills and Weapon Sets
Main Skill Assignments
Skill or Package | Function | Weapon Set |
Sunder with Concussive Runes | Main attack and additional shockwaves | Set 2 |
Boneshatter | Movement attack | Set 1 |
Wolf Pack | Minion-death trigger and recovery package | Set 1 |
Cast on Minion Death with Lightning Warp | Movement automation | Set 1 |
Cast on Elemental Ailment with Lightning Warp | Mapping trigger | Set 2 |
Cast on Critical with Lightning Warp | Critical-hit trigger | Both |
Berserk | Rage enhancement | Both |
Remnants of Kalguur | Ward replenishment | Set 2 |
Herald of Thunder | Additional attack damage | Both |
Herald of Ash | Additional clear | Set 2 |
Allow Boneshatter on Set 1 and Sunder on Set 2 in the PoE 2 Skills panel. Verify automatic swaps and reservations safely before combat.
Mapping Loop
1. Confirm moving recovery and Ward, then travel with Boneshatter.
2. Attack packs with Sunder; Heavy Stuns trigger rune shockwaves.
3. Let eligible Warp triggers carry you onward; reposition manually when no target qualifies.
Bossing Loop
1. Enter with stable resources and attack with Sunder.
2. Reposition for boss attacks; do not rely on normal-monster culling for movement.
3. If damage stalls, check mana during uninterrupted attacking, then whether Heavy Stuns actually trigger runes. Kill-based mana recovery cannot sustain an add-free boss; rune damage requires fresh Heavy Stuns, not every Sunder hit.
Confirmed Links and Configuration Access
Check skill slots before committing to the full PoE 2 package: the original configuration uses an Unset Ring slot-retention bug whose availability is unconfirmed. If legitimate slots cannot hold every package, the full setup is not ready to copy. Do not remove required recovery supports to make it fit. No verified bug-free full configuration or safe skill-removal order is established. If slots are insufficient, defer the full conversion.
Use Sunder with Magnified Area II, Rapid Attacks II, Garukhan's Resolve, Branching Fissures II and Concussive Runes. Wolf Pack uses Essence Harvest, Minion Instability and Amanamu's Tithe. Boneshatter's Minion Pact II participates in the minion-sacrifice package.
Cast on Critical contains Lightning Warp, Atziri's Communion, Boundless Energy II, Vitality II and Energy Retention. Atziri's Communion is part of the life-reservation arrangement; preserve Vitality II while balancing Berserk. Vitality I is linked to Remnants of Kalguur.
Cast on Elemental Ailment contains Lightning Warp, Energy Retention, Boundless Energy II, Soul Drain and Efficiency II. Cast on Minion Death contains Lightning Warp, Life Drain, Energy Retention, Soul Drain and Boundless Energy II. Keep their Set 2 and Set 1 assignments respectively.
Use 787prada's fixed character snapshot for the passive tree, equipment and remaining sockets. The live character can change. These creator-listed destinations have not been independently inspected here. Match reservations, weapon-set permissions and skill slots before copying the full package.
Gear and Upgrade Priorities
Establish the Core Equipment
Prioritize physical damage, speed and critical chance on the PoE 2 mace. Gloves and rings add physical damage. When allocating PoE 2 currency for upgrades, reserve ring affixes for low-life regeneration rather than damage alone.
Item | Requirement or Upgrade Role |
Palm of the Dreamer | Required for this full reservation and shrine package; not required to cast core Sunder |
The Brass Dome | Critical-damage protection for this defensive version |
Flesh Crucible | Pain Attunement and less maximum Life for the low-life version; defer during core testing |
Staunching Charm | Bleeding protection before low-life mapping; aim for two activations |
Olroth's Resolve | Additional Ward recovery and Guard; cannot replace sufficient life regeneration |
Match both the keystone and the less-maximum-Life modifier; another version is not an equivalent replacement. This Life reduction serves the specific Berserk balance.
Upgrade after Recovery Works
Next, improve global quality and skill levels. A Prism of Belief granting +3 to Sunder also raises the level copied by its Runic Shockwave. Melee skill levels on equipment provide another upgrade path.
Add fire and lightning for ailment triggers after physical damage and recovery.
Ascendancy and Passive Priorities
For this Path of Exile 2 build, Advanced Thaumaturgy supplies the additional quality effect. Gem Studded rewards the most numerous support-gem colours; a blue majority grants 30% less skill cost. Recheck that balance when changing sockets or weapon-set assignments.
Essence of Virtue grants Virtuous Barrier. Strength Motes raise maximum Life, while Intelligence Motes improve life and mana regeneration rates. This distinction matters when diagnosing changing recovery.
Prioritize physical damage, useful stun buildup and attack speed alongside regeneration and cost efficiency. Paragon supplies global quality, Augmented Flesh adds two skill slots, and Hunting Companion contributes culling threshold. Access to these notables must fit your actual tree and item setup.
Unwavering Stance prevents Light Stun but disables dodge rolling and sprinting. Have the movement package working before taking that tradeoff. Use the fixed snapshot for routing; these priorities are not a point-by-point tree.
Surviving Low Life and Berserk
Why Ward Does Not Prevent Death
Runic Ward in PoE 2 absorbs otherwise fatal damage, leaving you at 1 Life while it absorbs the remainder. It does not protect against life loss that is not damage. Berserk causes that life loss while you are not losing Rage, which explains how this Sunder Gemling can die with Ward remaining.
Its listed drain is 0.1% of maximum Life per Rage each second. At 61 Rage, that is 6.1% of maximum Life per second before recovery. Calculate against maximum Life, including the reserved portion.
Virtuous Barrier changes the balance as motes accumulate or disappear. Strength increases the life basis for the drain; Intelligence improves regeneration rate. Extra maximum Life alone does not establish that recovery has overtaken Berserk.
After a reset, check the current mote and recovery state before engaging. A fixed waiting period cannot establish readiness.
Check Recovery before Engaging
1. Equip the intended Flesh Crucible and retain Vitality II in Cast on Critical and Vitality I in Remnants of Kalguur.
2. Before spending more PoE 2 currency on damage upgrades, combine percentage regeneration with flat regeneration on equipment. Compare total recovery with Berserk's drain at your actual Rage.
3. Observe life while moving, without enemies attacking. Stationary recovery bonuses can conceal a shortfall.
4. Repeat after a fresh login or another reset that changes motes. If life trends downward, correct recovery before engaging.
5. Check Staunching Charm charges and leave damaging ground promptly. Additional damage or recovery penalties can upset a narrow surplus.
Maintain Ward and Guard
Remnants of Kalguur generates Ward remnants from stuns and kills; collecting them can overflow Ward. Olroth's Resolve regenerates Ward during its effect and grants Guard equal to current Ward when the effect ends. Its benefit therefore depends on the Ward available at that moment.
The Brass Dome removes extra critical damage, while Concussive Runes spends part of the same Ward pool that protects you. These layers need replenishment. A large displayed pool does not excuse unstable life recovery.
Mana and Lightning Warp Automation
Sustain Frequent Attacks
For this PoE 2 configuration, three jewels with 3% mana recovery on kill supplement cost reductions. Test sustained attacking against a lone target too.
Wolf Pack with Essence Harvest supplies another recovery source: a supported reviving minion's death recoups 8% of maximum Mana. Recoup arrives over time. Confirm wolves actually die in the movement package and that mana recovery follows; their presence alone does not activate the benefit.
Make Teleporting Reliable
Lightning Warp teleports into eligible targets and destroys them. The critical, ailment and minion-death packages supply different trigger opportunities. If teleporting stops, inspect weapon-set permissions, energy generation, reservations and target eligibility.
The full automation setup targets 186% increased culling threshold for full-life normal monsters. It is not a universal threshold for rare enemies or bosses. Match threshold modifiers before expecting that movement.
Mapping and Bossing Expectations
This PoE 2 configuration emphasizes area attacks and movement between eligible enemies. Investment improves damage, quality-based speed and automation, while recovery keeps them usable. On an isolated boss, test sustained Sunder separately from clearing: kill-based recovery and normal-monster culling cannot provide the same assistance. Clear times and comparative boss results are unverified, so neither top-tier farming efficiency nor extreme-boss capability is established.
Before Switching to Sunder Gemling
For the PoE 2 attack core, have a compatible mace, Sunder with Concussive Runes, reliable Heavy Stuns, affordable mana costs and replenishable Ward. Advanced Thaumaturgy and quality supply this version's speed. These are functional requirements, not a tested minimum-cost loadout.
Low-life Berserk needs additional recovery and reservations; Palm of the Dreamer supports the buffs. Warp improves travel; Brass Dome and Olroth's Resolve support defenses. Replacements must preserve those functions.
Mageblood's bonuses depend on its Legacies. Losing Silver can reduce skill speed, Diamond critical chance, and Bismuth elemental resistances. Recheck these without it. Substitute performance is unverified; repeated cleanup attacks or resource stalls fail the readiness test.
Build Progression: Core Sunder to Automation
Stage 1: Core Sunder
Keep Berserk and the low-life conversion off while testing. In an easier PoE 2 map, check accuracy, Ward and reliable rune triggers without repeated cleanup attacks. Judge mace damage and speed together; faster attacks that lose reliable stuns fail. No verified universal weapon-DPS minimum is established.
Stage 2: Ward and Recovery
Establish Ward before relying on rune damage. Its usable pool must exceed the displayed shockwave cost, with room for incoming damage. Watch sustained combat: if Ward drains until runes stop, improve replenishment or reduce demand. Merely exceeding one trigger's cost is insufficient. Complete the moving-regeneration checks above before enabling low-life Berserk.
Stage 3: Lightning Warp Automation
Core Sunder can clear without full Warp automation if damage and resources are stable. Add triggers individually, checking minion deaths, recovery and eligible targets in each set.
Stage 4: Endgame Optimization
Improve levels, quality and critical scaling after these checks. Allocate PoE 2 currency to the core first, then complete automation before investing in premium rolls. Price the snapshot in your league, including its Mageblood; no reliable fixed total is established.