Weekend Drop -














Meta Description:
Skull and Bones Galleon build guide covers a powerful poison and flooding setup, with weapons, armor, skills and Hallmarkers Table for World Tier 4.
Summary:
Skull and Bones players can turn the upgraded Galleon into a World Tier 4 powerhouse with poison, flooding, cannonball synergy and close-range damage.
Skull and Bones has plenty of viable ship builds, but this upgraded Galleon setup stands out by combining poison, flooding and cannonball damage into one aggressive loadout. The build is designed for close-range combat and has already proven capable in World Tier 4. Players looking to strengthen their progression can also consider buy Skull and Bones Silver.
Skull and Bones Galleon Build: Core Stats and Skills
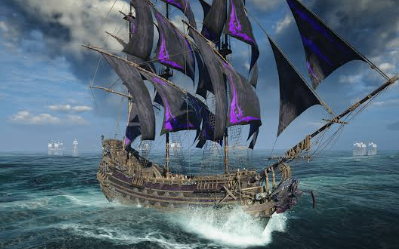
The featured Galleon is fully upgraded to 7/7, with 116,523 Hull Health, 23,304 Reseilience and 1,265 Armor.
Its defensive profile includes 44% combustion mitigation, 44% flooding resistance, 34% fire resistance, 19% piercing resistance, 34% electric resistance and 4% toxic resistance.
The skill tree focuses on stacking damage bonuses while supporting the build's weapon synergy. Impetus Order, Relentless Force, Weakness Finder and Firepower Order form the foundation.
Key Build Stats
| Category | Build Value |
| Ship | Galleon |
| Upgrade | 7/7 |
| Hull Health | 116,523 |
| Resilience | 23,304 |
| Armor | 1,265 |
| Combustion Mitigation | 44% |
| Flooding Resistance | 44% |
| Fire Resistance | 34% |
| Electric Resistance | 34% |
The setup also invests heavily into flooding and fire penetration, demi-cannon damage, reload speed and projectile speed. Vital Strike and Hard Munitions further improve the offensive package.
Build Tip: The skill tree is built around multiple weapon types and status effects, so swapping key weapons without considering their damage types can reduce the overall synergy.
Skull and Bones Weapons and Hallmarkers Table Synergy
Skull and Bones Silver is not the only resource players need to think about when building this setup. Weapon selection is crucial because several bonuses depend directly on cannonball ammo and different damage types.
The front weapon is a Blight Mall, which becomes especially valuable after landing 15 hits in a single volley. The target then receives 8% increased weapon damage for 10 seconds, increasing to 12% extra damage from all sources when the target is poisoned.
Outbreak adds a 70% chance to trigger Poison when hitting a weak point, helping activate the bonus consistently.
The rear weapon is a Lanka Curi long gun. Its primary purpose is not its individual perk but its combination of toxic, piercing and combustion damage types.
Weapon Setup
Front: Blight Mall
Stern: Lanka Curi long gun
Starboard: Demi-cannons with Phantom Round
Port: Demi-cannons with Lightning Strike
Auxiliary: Spirit Caller
Major Furniture: Hallmarkers Table
Phantom Round provides a 19% chance per shot to fire additional projectiles, which becomes particularly effective with demi-cannons because each shot contains multiple pellets.
The Hallmarkers Table is another major piece of the puzzle. Broadside hits have a 5% chance to apply an Impact Mark, causing affected targets to take 20% more damage from cannonball ammo for 20 seconds.
It also increases secondary damage by 5% for every cannonball-ammo weapon equipped, explaining why the long gun is included despite not being the main damage dealer.
Skull and Bones Furniture and Combat Strategy

The furniture setup pushes the build toward aggressive, close-range combat. Caustic Expulsion supports flooding damage through projectile-speed scaling, while the Breach Loaded Furnace increases secondary damage by up to 20% based on proximity to the target.
Ram Rod Workshop reduces reload time while adding 7% damage, keeping the demi-cannons firing consistently.
The Physician's Ledger is also important because the build uses mending weapons. Consecutive hits can increase damage by 7% per hit, up to 35%, rewarding players who maintain pressure.
Strengths and Weaknesses
Strengths
Excellent World Tier 4 damage
Strong poison and flooding synergy
High close-range burst potential
Multiple damage types
Strong cannonball amplification
Weaknesses
Most effective at close range
Requires careful weapon synergy
Some bonuses depend on maintaining consecutive hits
Less forgiving when status effects fail to activate
Combat Tip: Open with the Blight Mall to trigger Poison, then maintain broadside pressure with the demi-cannons. The goal is to stack status effects and Impact Marks before unloading sustained cannonball damage.
Final Verdict
This Skull and Bones Galleon build is a strong option for players who want an aggressive World Tier 4 setup built around poison, flooding and sustained broadside damage. The combination of Hallmarkers Table, Blight Mall and demi-cannons gives the ship several overlapping damage multipliers.
For players who want to get their ship progression moving faster and prepare the required resources, Skull and Bones Silver can also be considered.
TL;DR
The upgraded Galleon combines poison, flooding, cannonball damage and close-range furniture bonuses to create a powerful World Tier 4 build. Its biggest strengths come from stacking status effects, Impact Marks and consecutive-hit bonuses.
Would you run this poison/flooding Galleon, or would you build around a different damage type?