Summary:
At first glance, the Pops Damage Trial in ARC Raiders seems like one of the strangest challenges in the game. Instead of avoiding damage, you're rewarded for taking it. Once you understand the scoring mechanics, however, it becomes a surprisingly strategic trial. Having the right ARC Raiders Items can also help you prepare a more efficient loadout for the challenge. With the right approach, earning three stars is easy, and scores around 35,940 points are achievable on standard daytime raids.
This guide covers the scoring system, recommended loadout, healing strategy, positioning, and team play to help you maximize your score.

1. Understand the Scoring System First
The biggest factor affecting your score is whether you're using a shield.
With a shield: 540 points per Pops explosion
Without a shield: 900 points per Pops explosion
Because shields reduce the damage you receive, they also reduce the points awarded.
If you're only aiming for three stars, the requirements are fairly low:
Shield build: about 6 Pops explosions
No-shield build: about 4 Pops explosions
For leaderboard scores, though, you'll want to optimize every explosion.
2. Why a No-Shield Build Scores Higher
Running without a shield is the most effective way to maximize points.
The extra damage you receive translates directly into a higher score. The downside is reduced survivability, which makes healing and positioning much more important.
Instead of relying on armor, you'll be relying on efficient recovery between explosions.
3. Best Healing Setup
The most reliable healing combination is:
Viter Spray
Herbal Bandage
A single Pops explosion deals roughly 60 damage, and using one Herbal Bandage followed by a quick Viter Spray is usually enough to recover safely before the next encounter.
Players with access to Viterot can certainly use it, but the Spray and Bandage combination is more practical for most builds.
4. Tap Viter Spray Instead of Holding It
One of the biggest optimization tricks involves how you use Viter Spray.
Many players hold the spray continuously, but tapping it is significantly more efficient.
For roughly the same amount of healing:
Holding the spray consumes around 99 durability
Tapping consumes only 30 durability
That makes tap-healing dramatically more resource-efficient over the course of a long run.
Another advantage is that Viter Spray provides instant healing, while Herbal Bandages heal over time. If you need to reposition immediately after taking damage, the spray gives you a much safer recovery.
5. Recommended Loadout
Although you'll remove your shield before triggering Pops, it's still worth carrying one while traveling through the map.
Recommended equipment includes:
Shield (remove before taking Pops damage)
Lore Grenade
Barricade
Snap Hook
Kettle with a Suppressor
Leave one inventory slot empty so you can quickly unequip your shield when you're ready to score.
6. Using Suppressed Weapons to Control Pops
A suppressed weapon plays an important role during the trial.
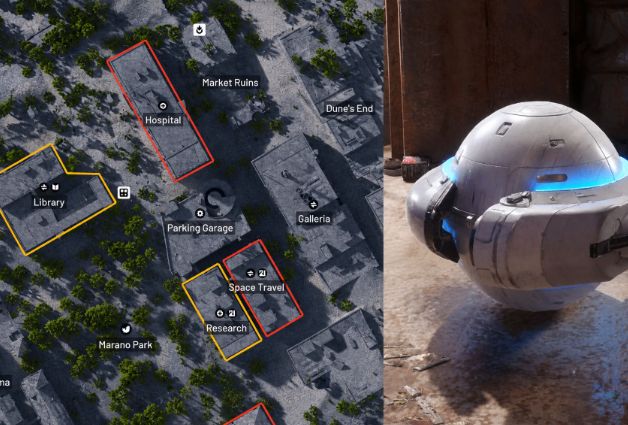
Shoot Pops once from a distance without killing it. This places the enemy into an alert state while avoiding unnecessary attention from nearby enemies.
The goal is simple:
Pull Pops toward you.
Let it self-destruct close enough to count the damage.
Prevent nearby Fireballs from killing Pops before it reaches you.
Proper aggro control often makes the difference between a smooth scoring run and a wasted opportunity.
7. Ammo and Weapon Choice
Your weapon isn't the focus of this trial, but it still needs to deal with dangerous enemies quickly.
Holecracker equipped with a Light Stock is a strong option thanks to its fast handling.
Use it primarily to eliminate threats like Fireballs or Shredders that interfere with your Pops setup rather than for sustained combat.
8. Best Maps and Time of Day
Both daytime and nighttime raids are viable, but they offer different experiences.
Day raids are safer and more consistent, making them ideal for learning the trial.
Night raids usually feature more Pops spawns, creating greater scoring potential. However, they also introduce more chaos, including multiple Pops detonating at once and a much higher risk of dying.
Choose daytime for consistency and nighttime if you're chasing leaderboard scores.
9. Team Play Is Surprisingly Effective
Although the trial can be completed solo, playing with teammates has several advantages.
Bringing Defibs allows teammates to revive one another, extending the run and reducing the penalty for mistakes.
Groups can also coordinate Pops pulls instead of competing for spawns, allowing everyone to benefit from the same scoring opportunities.
Good communication often results in much higher scores than playing alone.
10. Rotation Tips
A consistent farming route works better than wandering around the map.
Clear nearby Fireballs first, locate Pops, pull them with suppressed shots, survive the explosion, heal, then rotate to the next spawn area.
Don't rush between locations. Sometimes waiting for a fresh spawn is more efficient than constantly moving across the map.

Final Thoughts
The Pops Damage Trial may look unusual, but it's actually one of ARC Raiders' most tactical score challenges. Success depends on understanding how damage is converted into points, managing healing efficiently, controlling enemy behavior, and choosing safe positions.
If your goal is simply three stars, almost any setup will work. But if you're aiming for top scores, a no-shield build, efficient Viter Spray usage, proper aggro management, and coordinated team play will consistently produce the best results. Players who want to buy ARC Raiders Items can also prepare their preferred loadout more quickly before attempting high-score runs.
![[Expedition ⑤ Material] Foundation 1~4](https://assets.mmoexp.com/images/202607/18319d795653d1162748a8e5f10e1d3655a23dc7.webp)
![[Nomadic Envoys Services] Stash slots +24](https://assets.mmoexp.com/images/202605/7cc0b5e15731160f00918a5748eccd12f26fe3a5.webp)
![[BluePrint] Extended Barrel III](https://assets.mmoexp.com/images/202605/8ae025bf6fe8359742ebe88275df0051724ab65c.jpg)