
Summary:
This Torchlight: Infinite build combines massive Fire Resistance stacking, 100% Critical Chance, strong HP recovery, and damage conversion to create a powerful Fire-based setup. With around 20 billion damage, excellent survivability, and smooth mapping, Torchlight: Infinite Flame Elementium, it offers an impressive balance between damage and defense.
Torchlight: Infinite Fire Resistance Stacking Build Overview
This Fire-based build focuses on a unique combination of Fire Resistance stacking, Critical Damage, damage conversion, and Flame Intensification. Its main strength is turning defensive stats into offensive power. Instead of treating Fire Resistance purely as a defensive stat, the build uses excess Fire Resistance to increase Critical Damage through its core equipment.
The showcased setup reportedly reaches around 20 billion damage while maintaining strong survivability. It can comfortably handle standard mapping and more demanding farming content, making it a strong option for players looking for a balanced Torchlight: Infinite endgame build.
Why Fire Resistance Stacking Works
The core mechanic revolves around an armor effect that increases Critical Damage as Fire Resistance rises. This creates a highly efficient scaling system: increasing Fire Resistance simultaneously improves survivability and offensive performance.
Another important item converts incoming Cold and Lightning damage into Fire damage. Because of this conversion, the build can concentrate heavily on Fire Resistance rather than needing to separately invest in multiple elemental defenses.
This gives the setup a simple defensive foundation: stack Fire Resistance, convert incoming elemental damage into Fire damage, and use the excess resistance to generate additional Critical Damage.
100% Critical Chance Is Essential
Critical Chance is one of the most important offensive requirements for this build. The recommended target is as close to 100% Critical Chance as possible, with the ideal setup reaching the full 100%.
Once Critical Chance is capped, the build can take much greater advantage of its Critical Damage scaling. Players should therefore prioritize reaching reliable Critical Chance through talents, equipment, and other available modifiers before heavily investing in additional Critical Damage.
Interestingly, the build does not need to chase Critical Damage from every possible source. Much of that stat is already supplied by Fire Resistance stacking. This means other offensive modifiers can provide better overall value.
Truth of Flame and Flame Wings
Truth of Flame is another major part of the setup. It provides substantial damage amplification for Fire-based builds and works especially well with the build's overall scaling strategy.
The setup also uses Flame Wings, which adds another layer of damage through its Intensification mechanics. Maintaining the required health-related conditions is important because the Intensification value depends on the character maintaining a healthy state.
This makes HP recovery more than a defensive convenience. It directly supports the build's offensive engine.
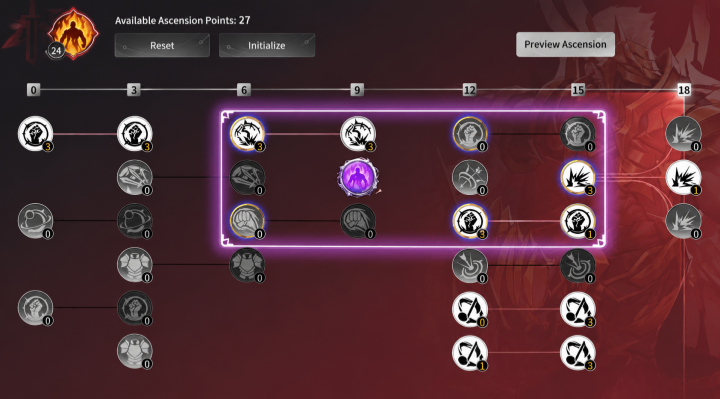
Ignition and Intensification Mechanics
One of the more interesting mechanics involves applying damage over time to enemies. Intensification increases as enemies continue taking damage over time, so reliable Ignition application is extremely valuable.
The build uses a precise Fire infusion to provide a reliable source of Ignition chance and base Ignition damage. This allows the character to trigger the necessary damage-over-time effects without investing heavily in additional mechanics.
For players copying the build, maintaining consistent Ignition uptime should therefore be a major priority.
Defensive Conversion Creates Excellent Survivability
The defensive setup is arguably one of the most impressive parts of this Torchlight: Infinite build.
Several mechanics convert incoming physical, Cold, and Lightning damage into Fire damage. Once that conversion is established, stacking Fire Resistance becomes extremely efficient because a much larger portion of incoming damage can be mitigated through the same defensive stat.
The build also benefits from additional Physical-to-Fire conversion and damage reduction effects. Combined with approximately 5,000 HP and strong HP recovery, the result is a surprisingly durable character.
During mapping footage, the character could take repeated hits without immediately entering a dangerous situation. This demonstrates that the build is not simply a glass-cannon setup built around its reported 20 billion damage.
Destruction Energy and Automation
Another important part of the setup is Destruction Energy recovery. The build uses talents and supporting equipment to reach the required recovery rate so that Destruction Energy can be automatically triggered.
The showcased setup uses approximately 200% recovery, while a more optimized version can push the recovery rate even higher for faster activation.
This creates another potential upgrade path. Players who want additional damage can invest in faster recovery and optimize the relevant support effects instead of simply purchasing more expensive equipment.
Build Cost and Budget Potential
The reported total investment is around 3,700 Embers, with an estimated variation of roughly 500 depending on market prices and individual purchases.
However, the actual cost can potentially be lower. The original setup appears to have calculated several equipment costs generously, meaning experienced players who shop carefully or craft efficiently may be able to reproduce the build for significantly less.
This is an important advantage for players interested in the build. It provides high-end performance without necessarily requiring an enormous investment into every single slot.

Mapping Performance
The build performs particularly well in normal mapping. Its consistent damage output does not depend heavily on whether the character is standing still or moving, making the gameplay smooth and comfortable.
The high defensive investment also means players do not need to constantly avoid every incoming attack. Even when the character takes several hits, the large HP pool and recovery allow it to recover quickly.
This makes the build particularly attractive for players who value comfortable farming over maximum theoretical DPS.
Boss and High-Difficulty Farming
The build can also handle more challenging farming setups, although performance depends heavily on the difficulty of the selected content.
In the showcased testing, additional map modifiers and specialized farming mechanics made enemies significantly tougher. The build still demonstrated strong performance, but the increased difficulty exposed some limitations in Ignition application and damage ramp-up.
This does not necessarily mean the build is weak. Instead, it shows that the showcased character was intentionally testing content above its most comfortable farming level.
Strengths and Weaknesses
The biggest strengths are its high damage, excellent tankiness, smooth mapping, and efficient stat scaling. Fire Resistance simultaneously contributes to defense and Critical Damage, making the build highly efficient.
Its main weaknesses are the lack of a convenient movement skill and the relatively complicated gearing process. Players must carefully balance Critical Chance, Fire Resistance, HP recovery, Intensification, Ignition, and Destruction Energy recovery.
The setup therefore works best for players who are comfortable following a detailed build guide rather than improvising their equipment.
Final Verdict
This Torchlight: Infinite Fire Resistance stacking build is an impressive example of how defensive stats can be transformed into offensive power. With around 20 billion damage, near-100% Critical Chance, strong HP recovery, and extensive damage conversion from cheap Torchlight: Infinite Flame Elementium, it offers an excellent balance between offense and defense.
For players searching for a powerful Fire build that can comfortably clear maps while remaining surprisingly tanky, this setup is definitely worth considering. Its relatively flexible upgrade paths and potentially manageable cost also make it an appealing option for endgame farming.